
There’s something truly special about making fresh pasta from scratch, and tagliatelle is one of the most beloved traditional Italian pastas. Originating from Bologna, Italy, tagliatelle is a long, ribbon-like pasta often paired with rich sauces like ragù alla Bolognese or a simple butter and parmesan sauce. Unlike store-bought dried pasta, homemade tagliatelle has a delicate, silky texture that absorbs sauces beautifully, making every bite a delight.
In this guide, I’ll show you how to make fresh tagliatelle pasta from scratch, step by step. You’ll learn how to mix and knead the dough, roll it out to the perfect thickness, cut it into beautiful ribbons, and cook it to al dente perfection. Whether you’re a beginner or an experienced home cook, this method will help you create authentic Italian pasta in your own kitchen.
Before we dive into the process, let’s go over the essential ingredients and tools you’ll need.
Ingredients and Tools You’ll Need
Essential Ingredients for Fresh Tagliatelle
Making fresh tagliatelle pasta requires only a few simple ingredients, but the quality of each one plays a crucial role in achieving that perfect silky, yet slightly firm texture. Let’s break down the essential ingredients and their importance.
1. Flour Choices: All-Purpose Flour vs. Semolina Flour
The choice of flour affects the texture, elasticity, and overall quality of your homemade tagliatelle. There are two main types of flour commonly used in fresh pasta-making:
00 Flour (Doppio Zero Flour) – This finely milled Italian flour is often the best choice for tagliatelle because it creates a soft, silky pasta dough that rolls out smoothly. It absorbs liquid well, resulting in a delicate texture that still holds its shape.
All-Purpose Flour – If you don’t have 00 flour, all-purpose flour is a good alternative. It has a slightly higher protein content, which makes the pasta a bit firmer and chewier.
Semolina Flour – Made from durum wheat, semolina flour has a coarser texture and higher gluten content, making it ideal for sturdier pasta like fettuccine or penne. While it’s not traditionally used for tagliatelle, some cooks mix a little semolina with 00 flour to add a slightly firmer bite.
Which one should you use?
For the most authentic texture, 00 flour is the best option. However, if you prefer a slightly firmer pasta, you can use a 50/50 blend of 00 flour and semolina or replace 00 flour with all-purpose flour in equal amounts.
2. Fresh Eggs: Why They Matter for Pasta Dough
Eggs are the key ingredient in fresh tagliatelle pasta, providing structure, moisture, and richness. The classic Italian pasta dough follows a simple flour-to-egg ratio:
1 large egg per 100g of flour (adjusted based on humidity and flour absorption).
The quality of your eggs can make a noticeable difference in both flavor and color. Fresh, organic, pasture-raised eggs typically have deep golden yolks, which result in a beautifully rich and yellow pasta. If your eggs are smaller, you may need to add an extra egg yolk to maintain the right dough consistency.
Pro Tip: Some traditional Italian chefs use only egg yolks instead of whole eggs for a richer, silkier pasta. If you want a more luxurious dough, try using 5 egg yolks per 300g of flour instead of whole eggs.
3. Salt and Olive Oil: Optional but Useful Additions
While traditional Italian pasta dough is made with just flour and eggs, some chefs add a pinch of salt and a drizzle of olive oil to enhance the dough’s elasticity and flavor.
Salt: Some pasta makers prefer to add salt directly to the pasta dough, while others believe it should only be added to the boiling water when cooking. If you add salt to the dough, keep it minimal to avoid making the pasta tough.
Olive Oil: Adding a teaspoon of olive oil to the dough can make it more pliable and easier to knead, especially if your dough feels too dry. However, it’s entirely optional and not traditionally used in classic tagliatelle dough.
Final Ingredient Tips for Perfect Tagliatelle
Always weigh your flour instead of using cups for accuracy.
Use room temperature eggs for better incorporation into the flour.
Adjust your flour-to-egg ratio slightly based on humidity levels—if the dough is too dry, add a little water; if it’s too sticky, dust it with extra flour.
By carefully selecting high-quality flour and fresh eggs, you’ll create a beautifully textured homemade tagliatelle that rivals any authentic Italian pasta. Now that you have your ingredients ready, let’s move on to choosing the right tools for making fresh pasta!
Tools for Making Homemade Tagliatelle
Making fresh tagliatelle from scratch doesn’t require fancy equipment, but having the right tools can make the process easier and more efficient. Whether you prefer the traditional hand-rolling method or want to use a pasta machine, these essential tools will help you create perfect homemade pasta.
1. Rolling Pin vs. Pasta Roller: Which One to Use?
Once your pasta dough is kneaded and rested, it’s time to roll it out to the right thickness. You have two main options:
Rolling Pin (Traditional Method)
If you want to go old-school Italian, a rolling pin is the way to go. This method gives you more control over the texture and thickness of your pasta but requires some arm strength and patience.
Pros:
✔️ Authentic way to make fresh pasta
✔️ No special equipment needed
✔️ Allows for a more hands-on feel
Cons:
❌ Takes more time and effort
❌ Harder to achieve even thickness
How to use it properly:
Start by flattening the dough slightly with your hands.
Roll the dough from the center outward, turning it frequently to maintain an even shape.
Keep the dough lightly floured to prevent sticking.
Aim for a 1-2mm thickness before cutting into tagliatelle strips.
Pasta Machine (Modern Method)
A pasta roller machine is a great tool for achieving consistently thin, even pasta sheets. Whether it’s a manual hand-crank machine or an electric attachment for a stand mixer, it makes the rolling process much easier.
Pros:
✔️ Saves time and effort
✔️ Ensures even thickness
✔️ Helps create professional-looking pasta
Cons:
❌ Requires an initial investment
❌ Takes up storage space
How to use it properly:
Start on the widest setting and roll the dough through.
Fold the dough in half and roll it again a few times to strengthen its structure.
Gradually decrease the thickness setting until the dough is smooth and thin (typically level 5-6 on most machines).
2. Mixing and Kneading Tools: Hands vs. Stand Mixer
Kneading pasta dough properly is essential for developing gluten structure, which gives tagliatelle its signature elasticity and chewiness. While kneading by hand is the traditional way, you can also use a stand mixer.
Hand Kneading (Traditional Method)
Ideal for small batches and more control over dough texture.
Requires 10-15 minutes of kneading to achieve a smooth, elastic consistency.
Stand Mixer (Time-Saving Option)
A stand mixer with a dough hook can cut kneading time in half.
Useful for making large batches of pasta dough.
Be careful not to over-mix, as it can lead to tough pasta.
3. Cutting Tools: Sharp Knife or Pasta Cutter?
After rolling out the dough, you’ll need to cut it into long, even tagliatelle ribbons. Here are the best tools for this step:
Sharp Knife (Simple and Effective)
Fold the rolled-out dough loosely into thirds.
Use a sharp chef’s knife to slice into ¼-inch (6-8mm) wide strips.
Unfold each strip and dust with flour to prevent sticking.
Pasta Cutter (For Precision)
A pasta wheel cutter or ravioli cutter can create neater edges.
Some cutters have a fluted design for a more rustic look.
Pasta cutter attachments for stand mixers are also available for precise cuts.
Optional: Tagliatelle Cutter Attachment
Some pasta machines come with a built-in tagliatelle cutter.
Simply feed the rolled-out pasta sheet into the cutter to create uniform ribbons.
4. Other Useful Pasta Tools
Flour Sifter
Helps evenly dust the pasta sheets to prevent sticking.
Bench Scraper or Dough Scraper
Useful for handling sticky dough and cleaning the work surface.
Drying Rack (Optional)
If you’re making pasta in advance, a drying rack prevents the strands from sticking together.
Can also be replaced with a floured kitchen towel or a wooden hanger.
Final Thoughts
The right tools can make homemade tagliatelle pasta easier and more enjoyable to prepare. While a pasta machine and cutter save time, a simple rolling pin and knife are all you need to make authentic, delicious tagliatelle just like they do in Italy!
Now that you know the tools required, let’s move on to the step-by-step guide for making the pasta dough.
Tips for Perfect Pasta Dough
Making fresh tagliatelle pasta dough from scratch requires a balance of technique, patience, and high-quality ingredients. While the process is simple, small mistakes can affect the final texture and consistency of your pasta. Follow these essential tips to ensure your dough is smooth, elastic, and easy to work with.
—
1. Use the Right Flour-to-Egg Ratio
A classic Italian pasta dough recipe follows a simple rule of thumb:
100g (3.5 oz) of flour per 1 large egg
This ratio creates a firm yet pliable dough that is easy to roll out and shape. If your dough feels too dry, you can add a few drops of water to bring it together. If it feels too wet or sticky, add a light dusting of flour.
Pro Tip:
If using all-purpose flour instead of 00 flour, be prepared to knead a little longer to achieve a smooth consistency.
If your eggs are small, add an extra egg yolk for more moisture.
—
2. Create a Well in the Flour for Mixing
The traditional method for mixing pasta dough is the well technique:
1. Pour the flour onto a clean work surface or in a large mixing bowl.
2. Make a well in the center and crack the eggs into it.
3. Using a fork, slowly whisk the eggs, gradually incorporating the flour from the edges.
4. Once the mixture becomes thick, use your hands to bring the dough together and start kneading.
This method helps the eggs and flour mix evenly, preventing clumps and ensuring a smooth dough texture.
Alternative Method:
If you prefer less mess, you can mix the dough in a bowl or use a stand mixer with a dough hook. However, the hand-mixed method gives you more control over the consistency.
—
3. Knead the Dough Properly for Gluten Development
Kneading is one of the most crucial steps in pasta-making. It helps develop gluten, which gives pasta its elasticity and bite.
How to Knead Pasta Dough by Hand:
Press the dough forward with the heel of your palm.
Fold it over itself and turn it 90 degrees.
Repeat this process for 8-10 minutes until the dough is smooth and elastic.
If using a stand mixer, knead on low speed for about 5-6 minutes until the dough forms a firm, slightly sticky ball.
How to Know It’s Ready:
The dough should be firm but pliable, not sticky or dry.
When you press your finger into it, it should spring back slightly.
Pro Tip:
If the dough tears easily, it needs more kneading.
If it feels too stiff, wrap it and let it rest before kneading further.
—
4. Let the Dough Rest Before Rolling
Once kneaded, pasta dough must rest for at least 30 minutes at room temperature. Resting allows the gluten to relax, making the dough easier to roll out.
How to Rest the Dough Properly:
Wrap it tightly in plastic wrap or place it under an upturned bowl to prevent it from drying out.
Avoid refrigerating the dough unless you’re storing it for later use (it can be kept in the fridge for up to 24 hours).
Pro Tip:
If the dough feels too tight after resting, let it sit for another 10-15 minutes before rolling.
If it feels too sticky, dust it lightly with flour before rolling.
—
5. Roll the Dough Gradually for an Even Thickness
Whether using a rolling pin or a pasta machine, always roll the dough gradually to achieve a uniform thickness.
Best Practices for Rolling Dough:
Divide the dough into smaller portions to make rolling easier.
Start on the widest setting if using a pasta machine, then gradually decrease the thickness.
Lightly dust the dough with flour or semolina to prevent sticking but avoid over-flouring, as it can make the pasta too dry.
Aim for a final thickness of 1-2mm (about the thickness of a credit card) before cutting into tagliatelle ribbons.
Pro Tip:
If the dough shrinks back while rolling, let it rest for another 5-10 minutes to relax the gluten.
—
6. Keep the Dough Moist but Not Sticky
Pasta dough should be moist and pliable, but not wet or sticky. Here’s how to adjust the consistency if needed:
If the dough is too dry:
Add a few drops of water or an extra egg yolk while kneading.
Knead longer to help it absorb moisture.
If the dough is too wet or sticky:
Lightly dust it with flour and knead until it feels firmer.
Avoid adding too much flour, as it can make the pasta tough.
Pro Tip:
If working in a humid environment, the dough might absorb extra moisture. Use less egg or add more flour as needed.
In a dry climate, cover the dough with a damp kitchen towel while rolling to prevent it from drying out.
—
7. Cut and Store the Pasta Correctly
After rolling out your tagliatelle dough, it’s time to cut it into even ribbons.
Best Way to Cut Tagliatelle:
Lightly dust the pasta sheet with semolina or flour to prevent sticking.
Fold it loosely, then use a sharp knife or pasta cutter to slice into ¼-inch (6-8mm) wide strips.
Gently shake out the strands and let them air-dry for 10-15 minutes before cooking.
How to Store Fresh Pasta:
Use within a few hours for the best texture.
To store, dust with semolina, form small nests, and keep in an airtight container in the fridge for up to 2 days.
To freeze, place pasta nests on a floured baking sheet and freeze until solid, then transfer to a ziplock bag (lasts up to 2 months).
—
Final Thoughts
Perfecting tagliatelle pasta dough takes practice, but with the right techniques, you’ll achieve smooth, silky, and flavorful fresh pasta every time. By focusing on flour quality, proper kneading, resting time, and careful rolling, you’ll master the art of homemade pasta like an Italian chef!
Now that your pasta dough is ready, let’s move on to the next step: cooking your fresh tagliatelle to perfection!
Step-by-Step Guide to Making Tagliatelle Dough
Mixing and Kneading the Dough
The foundation of perfect homemade tagliatelle lies in how well you mix and knead the pasta dough. This step is crucial for gluten development, which gives the pasta its signature elasticity, chewiness, and structure. Whether you mix the dough by hand or use a stand mixer, following the right techniques will ensure a smooth and pliable dough that rolls out easily.
—
1. Mixing the Dough: The Traditional Well Method vs. Bowl Mixing
Traditional Well Method (Authentic Italian Technique)
The well method is the most traditional way to mix fresh pasta dough and is commonly used in Italian kitchens. It allows for better control over the mixing process and ensures the eggs are fully incorporated without making the dough too sticky.
Steps for the Well Method:
1. Create a Flour Mound: On a clean work surface or wooden board, pour all-purpose flour or 00 flour into a mound.
2. Make a Well in the Center: Using your fingers or a spoon, create a deep well in the middle, ensuring the walls are sturdy to hold the eggs.
3. Crack the Eggs Inside: Add the eggs (or eggs + egg yolks for richer dough) into the well.
4. Gently Whisk the Eggs: Using a fork, lightly beat the eggs in the center, gradually pulling in flour from the edges.
5. Combine the Ingredients: Once the mixture thickens into a paste-like consistency, use your hands or a bench scraper to incorporate the remaining flour.
6. Form a Dough Ball: Press and squeeze the mixture together until a rough dough forms. If it feels dry, add a few drops of water; if too sticky, dust lightly with flour.
✔️ Best for: Traditional hand-kneaded pasta, smaller batches, and full control over the mixing process.
—
Bowl or Stand Mixer Method (Less Mess, Faster Process)
If you prefer a less messy and faster approach, you can mix the dough in a bowl or use a stand mixer with a dough hook.
Steps for Bowl Mixing:
1. Place the flour in a large mixing bowl.
2. Make a well in the center and add the eggs.
3. Using a fork or wooden spoon, gradually mix the flour into the eggs.
4. Once a shaggy dough forms, transfer it to a floured surface and begin kneading.
Using a Stand Mixer:
1. Attach the dough hook to the stand mixer.
2. Add the flour and eggs to the mixing bowl.
3. Start on low speed (level 1-2) to incorporate the ingredients.
4. Increase to medium speed (level 3-4) and mix for 2-3 minutes until a rough dough forms.
5. Once the dough pulls away from the sides, transfer it to a work surface and knead it by hand for a couple of minutes to finish.
✔️ Best for: Large batches, less manual effort, and quicker dough preparation.
—
2. Kneading the Dough: Developing Gluten for the Perfect Texture
Once the ingredients are fully combined into a rough dough, kneading helps develop the gluten structure, which gives tagliatelle its elasticity and chewiness.
How to Knead Pasta Dough by Hand
1. Flatten the Dough: Press the dough ball slightly with your palm to create a disc.
2. Push and Fold: Use the heel of your hand to push the dough forward, then fold it back onto itself.
3. Rotate the Dough: Turn it 90 degrees and repeat the pushing and folding motion.
4. Continue for 8-10 Minutes: The dough should become smoother, more elastic, and slightly firm.
✔️ How to Tell It’s Ready:
The dough should be smooth and slightly firm but not sticky.
When you press a finger into it, the dough should spring back slightly.
If it tears when stretched, it needs more kneading.
—
How to Knead Pasta Dough with a Stand Mixer
If using a stand mixer, knead the dough on medium-low speed (level 2-3) for about 5-6 minutes. Once the dough forms a firm ball and pulls away from the sides, transfer it to a work surface and knead by hand for 2 minutes to ensure proper gluten development.
✔️ Pro Tip: Avoid over-mixing in a stand mixer, as this can result in a dense, tough dough.
—
3. Common Kneading Mistakes and How to Fix Them
Even experienced home cooks can run into issues when kneading pasta dough. Here’s how to troubleshoot common problems:
—
4. Resting the Dough: The Secret to a Soft, Pliable Texture
Once kneading is complete, resting the dough is essential. This allows the gluten to relax, making the dough easier to roll and shape.
How to Rest Pasta Dough Properly:
Wrap the dough tightly in plastic wrap to prevent it from drying out.
Let it rest at room temperature for 30-45 minutes before rolling.
If making pasta later, refrigerate for up to 24 hours, but let it return to room temperature before rolling.
✔️ Why Resting Matters:
Prevents the dough from shrinking back while rolling.
Makes it smoother and more pliable for cutting into tagliatelle.
—
Final Thoughts
Properly mixing and kneading tagliatelle dough is key to achieving fresh pasta with the perfect texture. Whether you use the traditional well method or a stand mixer, focus on getting the right balance of ingredients, kneading thoroughly, and allowing the dough to rest before rolling.
Now that your dough is ready, it’s time to move on to the next step: rolling and cutting your fresh tagliatelle!
Resting the Dough: The Secret to Soft, Pliable Pasta
Once your tagliatelle dough has been properly mixed and kneaded, the next crucial step is resting the dough. Many home cooks are tempted to skip this step, but resting is essential for achieving silky, pliable, and easy-to-roll pasta. This process allows the gluten to relax, making the dough more elastic and preventing it from snapping back when rolled out.
—
1. Why Resting the Dough is Important
During kneading, the gluten strands in the dough become tight and elastic. If you try to roll or shape the dough immediately after kneading, it will be tough and resistant, making it difficult to stretch and cut into uniform strands. Resting gives the gluten time to loosen, making the dough more manageable.
✔️ Key Benefits of Resting Pasta Dough:
Easier Rolling: A relaxed dough is more pliable, requiring less effort to roll out.
Prevents Shrinking: When dough is stretched too soon, it tends to spring back. Resting minimizes this issue.
Improves Texture: A properly rested dough results in softer, smoother tagliatelle.
Enhances Hydration: Allows the flour to fully absorb moisture from the eggs, creating a more cohesive dough.
—
2. How to Rest Pasta Dough Properly
A. Wrapping the Dough
To prevent the dough from drying out, it must be covered properly during the resting period.
✔️ Best Wrapping Methods:
Plastic Wrap: The most effective way to keep moisture locked in. Wrap the dough tightly to prevent air exposure.
Damp Kitchen Towel: If you prefer an eco-friendly option, cover the dough with a damp (not wet) towel to keep it from drying out.
Airtight Container: If making multiple batches, place the dough in a covered bowl or airtight container.
—
B. Ideal Resting Time
The ideal resting time depends on the environment and the texture of the dough.
✔️ Pro Tip: If resting for longer than 1 hour, keep the dough in the refrigerator to prevent over-hydration and fermentation.
—
C. Room Temperature vs. Refrigerated Resting
1️⃣ Room Temperature Resting (Best for Immediate Use)
Most traditional pasta makers rest the dough at room temperature for 30 to 45 minutes before rolling.
This method works well in moderate kitchen temperatures (around 20-22°C / 68-72°F).
2️⃣ Refrigerated Resting (Best for Later Use)
If you’re not using the dough immediately, store it in the fridge for up to 24 hours.
Before rolling, allow it to sit at room temperature for 15-20 minutes to soften.
✔️ Avoid resting pasta dough for too long (more than 24 hours), as it can become too soft, sticky, or even ferment slightly, altering the taste.
—
3. How to Tell If the Dough Has Rested Enough
To check if your tagliatelle dough is ready for rolling, do the finger press test:
✔️ Press your finger into the dough. If it slowly springs back without resistance, it’s ready.
❌ If it feels too tight, let it rest for another 10-15 minutes.
❌ If it’s too soft or sticky, lightly dust it with flour before rolling.
—
4. What Happens If You Skip the Resting Step?
Skipping the resting period can lead to several issues:
❌ Dough that’s difficult to roll – It will shrink back as you try to stretch it.
❌ Uneven texture – The flour won’t fully absorb moisture, leading to dry or tough pasta.
❌ More breakage – The strands of tagliatelle may tear when rolling and cutting.
✔️ Resting is the key to soft, smooth, and pliable pasta dough!
—
Final Thoughts
Resting the tagliatelle dough is a simple yet essential step that enhances both the texture and workability of fresh pasta. Whether you let it rest for 30 minutes at room temperature or store it for later use in the fridge, this process ensures silky, tender homemade pasta that is easy to roll and shape.
Now that your dough is properly rested, it’s time to move on to the next step: rolling and cutting your fresh tagliatelle!
Rolling Out the Pasta Dough: Achieving the Perfect Thickness
Once your tagliatelle dough has been properly rested, it’s time to roll it out into thin, smooth sheets before cutting it into ribbons. Rolling the dough evenly is essential for achieving delicate yet sturdy pasta that cooks evenly and has the perfect texture. You can do this using a rolling pin or a pasta machine, depending on your preference and the tools available.
—
1. Preparing the Dough for Rolling
Before you begin rolling out your pasta dough, follow these steps to ensure a smooth process:
✔️ Lightly flour your work surface – This prevents sticking but avoid using too much flour, which can make the dough dry.
✔️ Cut the dough into smaller portions – Instead of rolling out the entire ball at once, divide it into four equal pieces. This makes handling easier.
✔️ Keep unused dough covered – Prevent drying out by keeping the other portions wrapped in plastic wrap or a damp towel while you work on one piece at a time.
✔️ Flatten the dough slightly – Use your hands or a rolling pin to press the dough into a rough oval or rectangle before rolling.
—
2. Rolling the Dough with a Rolling Pin (Traditional Method)
If you don’t have a pasta machine, you can use a rolling pin to achieve thin pasta sheets. This method requires a bit more effort, but it gives you greater control over thickness.
Step-by-Step Guide:
1️⃣ Start from the center – Place your rolling pin in the middle of the dough and gently press outward.
2️⃣ Rotate and roll – Turn the dough 90 degrees after every few rolls to maintain an even shape.
3️⃣ Use light, consistent pressure – Avoid pressing too hard, as this can make the dough uneven or cause it to stick.
4️⃣ Check for thinness – The dough should be about 1mm thick (thin enough that you can see your hand slightly through it).
✔️ Pro Tip: If the dough resists rolling and keeps shrinking back, let it rest for another 5–10 minutes to relax the gluten.
—
3. Rolling the Dough with a Pasta Machine (Easier Method)
Using a pasta machine makes it easier to roll out even, thin sheets with consistent thickness.
Step-by-Step Guide:
1️⃣ Set the machine to the widest setting (usually ‘0’ or ‘1’).
2️⃣ Feed the dough through the rollers – Hold the dough lightly and guide it through.
3️⃣ Fold and re-roll – For the first few passes, fold the dough in half and run it through again to build elasticity.
4️⃣ Gradually reduce thickness – Adjust the machine settings to thinner levels (one step at a time) until you reach the desired thinness (about setting ‘6’ on most machines).
✔️ Pro Tip: Dust the pasta lightly with flour between rolls to prevent sticking.
—
4. How Thin Should the Dough Be?
The ideal thickness for tagliatelle dough is about 1mm (1/32 inch). To check:
✔️ Hold the dough up to a light – you should see your fingers slightly through it.
✔️ If using a pasta machine, stop at level 6 or 7 on most models.
✔️ The pasta should be thin but not so fragile that it tears when handled.
—
5. Troubleshooting Rolling Issues
❌ Dough is too sticky? → Lightly dust it with flour but don’t overdo it.
❌ Dough is too dry and cracking? → Lightly mist with water and knead briefly.
❌ Dough keeps shrinking back? → Let it rest for a few more minutes before rolling again.
—
Final Thoughts
Rolling out pasta dough is a crucial step in making fresh tagliatelle. Whether you use a rolling pin or a pasta machine, aim for a smooth, even sheet that’s thin enough for delicate pasta but sturdy enough to hold its shape. Once your dough is perfectly rolled out, you’re ready for the next step: cutting it into beautiful ribbons of fresh tagliatelle!
Cutting and Cooking Fresh Tagliatelle
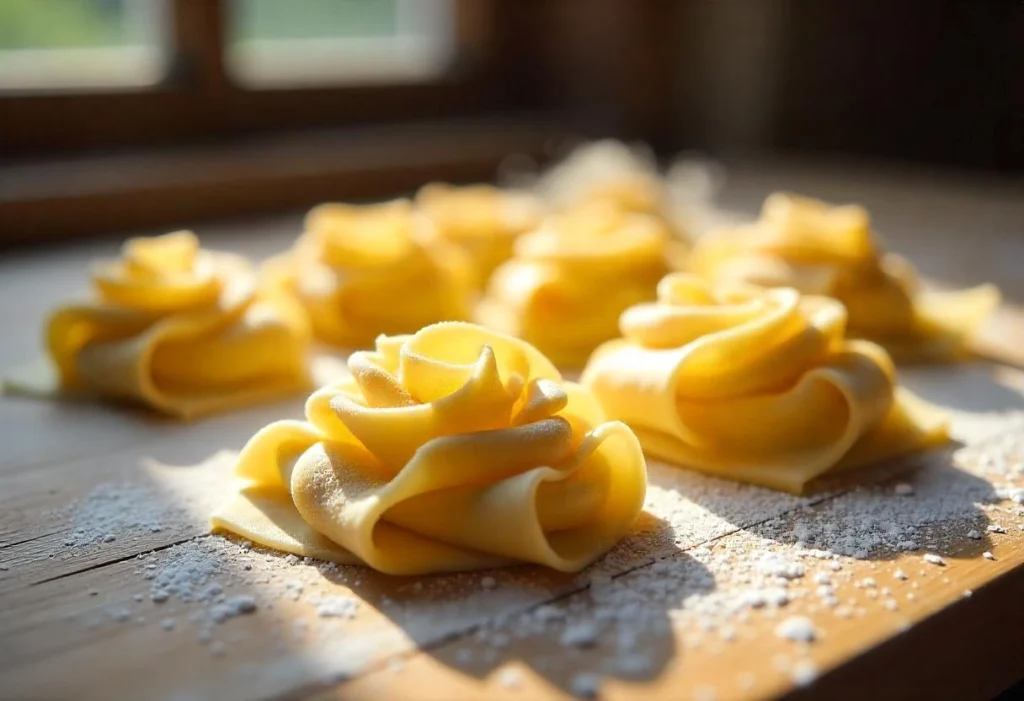
How to Cut Tagliatelle into Perfect Strips
Once your pasta dough is rolled out to the perfect thinness, it’s time to cut it into beautiful, even tagliatelle strips. Tagliatelle is known for its ribbon-like shape, about 6-8mm (¼-⅓ inch) wide, making it ideal for absorbing rich sauces.
There are two ways to cut tagliatelle: by hand using a knife or with a pasta cutter attachment on a pasta machine. Both methods work well as long as you follow the right technique.
—
1. Preparing the Pasta for Cutting
Before you start cutting, take these steps to ensure uniform strips:
✔️ Lightly dust the dough with flour – This prevents the pasta from sticking together.
✔️ Fold the dough for easier cutting – Instead of cutting a long, unwieldy sheet, gently fold it for precise cuts.
✔️ Use a sharp knife or cutter – A dull blade can tear the dough instead of making clean cuts.
—
2. Cutting Tagliatelle by Hand (Traditional Method)
If you’re cutting by hand, using a sharp chef’s knife or pasta wheel will help create even strips.
Step-by-Step Guide:
1️⃣ Lightly dust the rolled-out pasta sheet with flour to prevent sticking.
2️⃣ Fold the sheet into thirds or fourths, like an accordion. Be careful not to press down too hard.
3️⃣ Use a sharp knife to slice the dough into strips about 6-8mm (¼-⅓ inch) wide.
4️⃣ Gently unravel the strips and toss them in a bit of flour to keep them from sticking.
✔️ Pro Tip: If you want extra precision, use a ruler as a guide while cutting.
—
3. Cutting Tagliatelle with a Pasta Machine Cutter
Most pasta machines come with a tagliatelle cutter attachment that makes the process faster and more uniform.
Step-by-Step Guide:
1️⃣ Feed the pasta sheet into the tagliatelle cutter attachment.
2️⃣ Turn the handle steadily to guide the pasta through, allowing the cutter to slice even ribbons.
3️⃣ Lightly toss the cut pasta in flour or semolina to prevent sticking.
✔️ Pro Tip: Let the pasta sheet dry for 10 minutes before cutting—it helps prevent sticking while cutting.
—
4. Preventing Tagliatelle from Sticking Together
To keep your freshly cut tagliatelle from clumping:
✔️ Dust the pasta with semolina or flour after cutting.
✔️ Loosely separate the strands and let them rest on a floured surface.
✔️ If not cooking immediately, form small nests by twirling a few strands together and lightly dusting with flour.
—
5. Storing Freshly Cut Tagliatelle
If you’re not cooking the pasta right away:
✔️ For short-term storage: Let the pasta sit at room temperature for up to 2 hours, lightly floured.
✔️ For longer storage: Freeze the pasta in portions on a tray, then transfer it to an airtight container and store for up to 1 month.
✔️ Avoid refrigerating fresh pasta – The humidity can make it sticky.
—
Final Thoughts
Cutting tagliatelle evenly and neatly is the key to achieving a restaurant-quality dish. Whether you cut it by hand or use a pasta cutter attachment, the goal is to create beautiful, uniform ribbons that will cook evenly and hold sauce perfectly. Once your tagliatelle is cut and ready, the next step is cooking it to perfection!
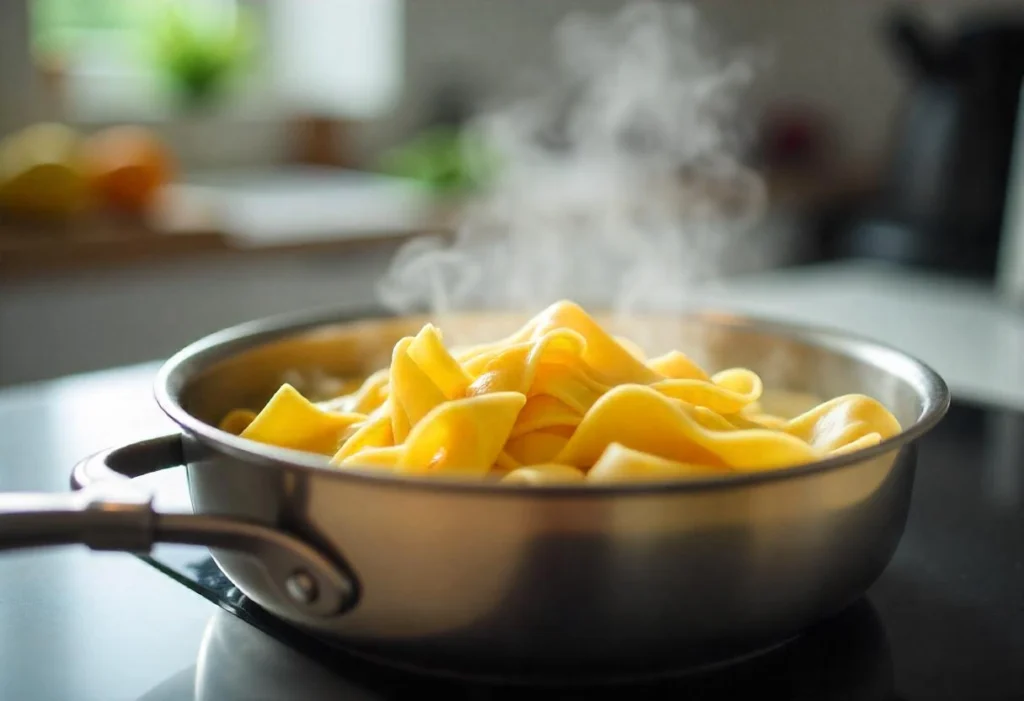
How to Cook Fresh Tagliatelle Properly
Cooking fresh tagliatelle is a simple but crucial step in achieving perfectly textured pasta. Unlike dried pasta, fresh pasta has a softer texture and cooks much faster. Proper cooking ensures that the pasta remains tender yet firm (al dente) and absorbs the sauce beautifully.
Follow these steps to cook fresh tagliatelle properly and avoid common mistakes like overcooking or having pasta that sticks together.
—
1. Boiling Water: How Much and Why It Matters
Fresh pasta needs plenty of water to cook evenly. Here’s what you need to keep in mind:
✔️ Use a large pot – Fresh tagliatelle expands slightly as it cooks, so give it room to move. A large pot (4-5 liters of water per 250g of pasta) prevents overcrowding.
✔️ Salt the water generously – Add 1-2 tablespoons of salt per 4-5 liters of water. This seasons the pasta from the inside and enhances its flavor.
✔️ Bring water to a rolling boil – The water should be boiling vigorously before adding the pasta.
✔ Pro Tip: Avoid adding oil to the water—it won’t prevent sticking and can make it harder for the sauce to cling to the pasta.
—
2. Cooking Time: How Long to Boil Fresh Tagliatelle
Unlike dried pasta, fresh tagliatelle cooks quickly—usually within 2-4 minutes. Keep these factors in mind:
✔ Check for doneness after 2 minutes – Fresh pasta softens faster than dried pasta, so test early.
✔ Al dente texture – The pasta should be tender but still slightly firm when bitten.
✔ Avoid overcooking – Fresh pasta can turn mushy if left in boiling water too long.
✔ Pro Tip: If pairing with a sauce that requires further cooking (like a cream or butter-based sauce), undercook the pasta slightly and finish cooking it in the sauce.
—
3. Draining and Handling Cooked Tagliatelle
Once the pasta is cooked, follow these steps to ensure it remains light, non-sticky, and perfect for serving:
✔ Use a pasta strainer or tongs – Instead of dumping pasta into a colander, lift it out with tongs or a pasta fork. This prevents delicate tagliatelle from breaking.
✔ Reserve some pasta water – Before draining, save about ½ cup of pasta water. This starchy water helps bind the sauce to the pasta.
✔ Do not rinse the pasta – Rinsing washes away the starch that helps the sauce cling to the pasta.
✔ Pro Tip: If the pasta sits for a few minutes before saucing, toss it with a bit of olive oil or butter to prevent it from sticking together.
—
4. Tossing Tagliatelle with Sauce: The Final Step
Fresh tagliatelle absorbs sauce better when tossed while still warm. Here’s the best way to combine it with sauce:
✔ Add pasta directly to the sauce – Instead of pouring sauce over the pasta, toss it in a pan with the sauce for better coating.
✔ Use reserved pasta water – If the sauce is too thick, add a splash of reserved pasta water to loosen it and help it stick to the noodles.
✔ Gently toss, don’t stir – Use tongs or a pasta fork to lightly toss the pasta, ensuring the sauce is evenly distributed.
✔ Pro Tip: Avoid adding cheese too early—it’s best sprinkled over plated pasta to avoid clumping in the pan.
—
5. Serving and Storing Freshly Cooked Tagliatelle
Once the pasta is sauced, serve immediately for the best texture. If you need to store leftovers:
✔ Refrigerate leftovers – Store in an airtight container for up to 2 days.
✔ Reheat gently – Warm it in a pan with a splash of water or extra sauce to prevent drying out.
✔ Avoid freezing cooked pasta – Fresh pasta is best enjoyed fresh, as freezing can affect its texture.
—
Final Thoughts
Cooking fresh tagliatelle properly is all about timing, technique, and sauce pairing. By boiling it in salted water, cooking it briefly, and tossing it with sauce immediately, you’ll get perfectly tender, flavorful pasta every time. Now that your pasta is cooked, it’s time to plate it and enjoy a delicious homemade meal!
Storing Fresh Tagliatelle for Later
Fresh tagliatelle is best enjoyed immediately after making it, but if you want to prepare it ahead of time, proper storage is essential to preserve its texture and prevent sticking. Whether you plan to use it within a few hours, a couple of days, or even weeks later, there are different methods to store it effectively.
Here’s how to store fresh tagliatelle properly based on how long you need to keep it.
—
1. Storing Fresh Tagliatelle at Room Temperature (Short-Term: Up to 2 Hours)
If you’re planning to cook your fresh pasta within a couple of hours, follow these steps:
✔️ Lightly dust the pasta with semolina or flour – This prevents the strands from sticking together.
✔️ Form small nests – Loosely twirl portions of pasta into small nests to keep them manageable.
✔️ Let them rest on a floured surface or tray – Place the nests on a baking sheet lined with parchment paper to dry slightly.
✔️ Cover with a clean kitchen towel – This keeps the pasta from drying out too much or absorbing unwanted moisture.
✔ Pro Tip: Do not leave fresh pasta uncovered for too long, as it may dry out unevenly and become brittle.
—
2. Storing Fresh Tagliatelle in the Refrigerator (Short-Term: Up to 2 Days)
If you want to store fresh pasta for a day or two before cooking, refrigeration is a good option. However, fresh pasta can absorb moisture and become sticky in the fridge, so follow these steps carefully:
✔️ Lightly flour the pasta strands – Prevents them from clumping together.
✔️ Use an airtight container – Place the pasta in a container or ziplock bag, ensuring minimal air exposure.
✔️ Line the container with parchment paper – This absorbs excess moisture and prevents sticking.
✔️ Avoid stacking pasta layers directly – If storing multiple layers, separate them with parchment paper.
✔ Pro Tip: Refrigerated fresh pasta may turn slightly darker due to oxidation, but this won’t affect its taste.
—
3. Freezing Fresh Tagliatelle (Long-Term: Up to 1 Month)
Freezing is the best method if you want to preserve fresh tagliatelle for longer periods. Unlike dried pasta, fresh pasta maintains its soft, delicate texture even after freezing.
How to Freeze Fresh Tagliatelle Properly
1️⃣ Dust the pasta strands with flour or semolina – Prevents sticking.
2️⃣ Form small nests – Loosely coil the pasta into small portions for easy cooking later.
3️⃣ Place on a baking sheet – Arrange the nests in a single layer on a floured tray.
4️⃣ Freeze for 1-2 hours – This “flash freezes” the pasta, preventing it from clumping together.
5️⃣ Transfer to an airtight bag or container – Once frozen solid, move the pasta to a ziplock bag or airtight container and return it to the freezer.
6️⃣ Label with the date – Fresh pasta can be frozen for up to 1 month before quality starts to decline.
✔ Pro Tip: You can cook frozen tagliatelle directly from the freezer—no need to thaw! Simply drop it into boiling salted water and cook for 1-2 minutes longer than fresh pasta.
—
4. Drying Fresh Tagliatelle (Shelf-Stable Storage: Up to 2 Months)
If you want homemade tagliatelle that lasts longer without refrigeration or freezing, drying is a great option. Properly dried pasta can be stored at room temperature for up to 2 months.
How to Dry Fresh Tagliatelle
1️⃣ Hang the pasta to air dry – Use a pasta drying rack or lay the strands over a clean broomstick or a wooden dowel.
2️⃣ Let the pasta dry completely – It should feel hard and brittle (this takes 12-24 hours, depending on humidity).
3️⃣ Store in an airtight container – Once fully dry, keep the pasta in a sealed jar, ziplock bag, or airtight container.
4️⃣ Keep in a cool, dry place – Store in a pantry away from direct sunlight and moisture.
✔ Pro Tip: If drying pasta in a humid environment, use a low-temperature oven (95°F/35°C) for 1-2 hours to speed up the process.
—
Final Thoughts
Fresh tagliatelle can be stored at room temperature, in the fridge, frozen, or dried, depending on when you plan to use it. To preserve its quality and prevent clumping, always lightly flour the pasta, store it in breathable containers, and avoid excess moisture.
By choosing the right storage method, you’ll have fresh homemade tagliatelle ready to cook anytime, whether it’s later the same day or weeks down the line!
Serving Suggestions and Classic Tagliatelle Sauces
Classic Italian Sauces for Tagliatelle
Tagliatelle is one of Italy’s most beloved pasta varieties, known for its wide, ribbon-like shape that perfectly holds rich, velvety sauces. While it can be paired with many different sauces, traditional Italian recipes focus on simple, high-quality ingredients that allow the pasta’s flavor to shine.
Here are some classic Italian sauces that pair beautifully with homemade tagliatelle.
—
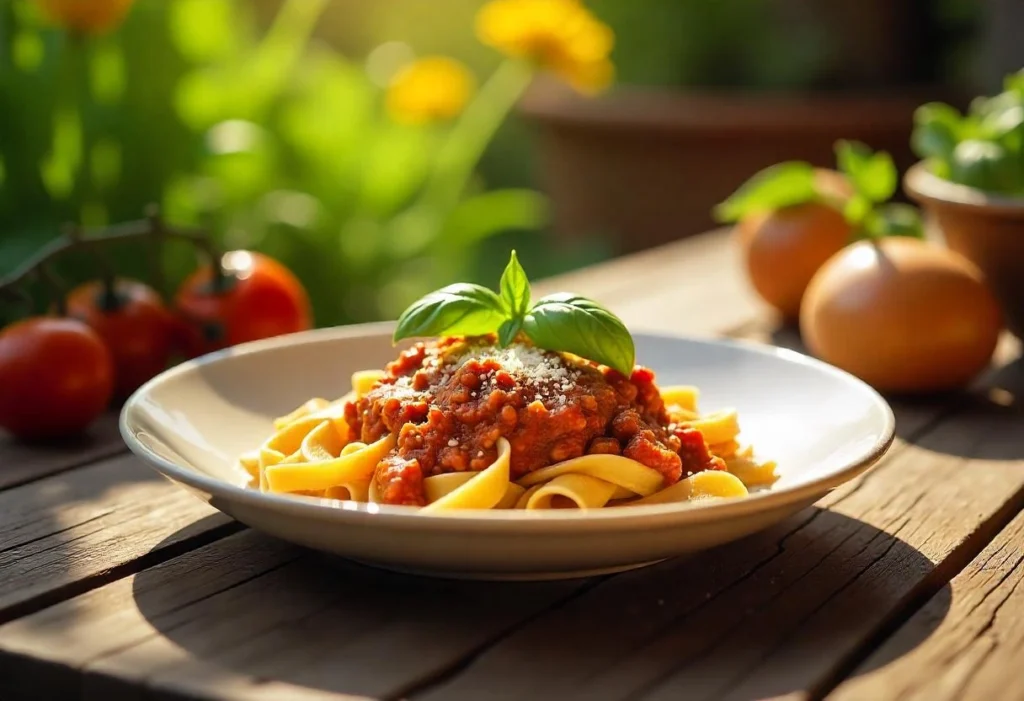
1. Ragù alla Bolognese (Authentic Meat Sauce)
Perhaps the most famous tagliatelle pairing, ragù alla Bolognese is a slow-cooked, meat-based sauce originating from Bologna, Italy. Unlike the Americanized “spaghetti Bolognese,” the traditional version is a rich, thick sauce made with a mix of ground beef and pork, soffritto (onions, carrots, and celery), tomatoes, and red wine.
How to Make Ragù alla Bolognese
✔ Brown the meat – Use a mix of ground beef, pork, or veal for depth of flavor.
✔ Sauté the soffritto – Slowly cook onions, carrots, and celery in olive oil for a rich base.
✔ Deglaze with wine – Red or white wine adds depth and enhances the sauce.
✔ Simmer for hours – Low and slow cooking (2-4 hours) brings out the best flavor.
✔ Finish with milk – A splash of milk or cream at the end balances acidity and adds creaminess.
✔ Best Served With: Fresh tagliatelle, topped with Parmesan cheese.
✔ Pro Tip: In Bologna, Bolognese sauce is never served with spaghetti, only with tagliatelle or other broad pasta.
—
2. Tagliatelle al Tartufo (Truffle Butter Sauce)
For a truly luxurious dish, tagliatelle al tartufo is a simple yet elegant recipe featuring black or white truffles. This sauce is rich, aromatic, and perfect for special occasions.
How to Make Truffle Butter Sauce
✔ Melt butter in a pan – Use high-quality unsalted butter for the best flavor.
✔ Infuse with garlic (optional) – Lightly sauté a crushed garlic clove, then remove it.
✔ Toss the pasta in truffle butter – Stir in fresh-cooked tagliatelle.
✔ Shave fresh truffles on top – Black truffles offer a deep, earthy taste, while white truffles have a delicate aroma.
✔ Finish with Parmesan – A sprinkle of Parmigiano-Reggiano enhances the dish.
✔ Best Served With: A glass of white wine, like Chardonnay or Pinot Grigio.
✔ Pro Tip: If fresh truffles aren’t available, use truffle oil or truffle-infused butter for a similar flavor.
—
3. Tagliatelle al Burro e Parmigiano (Butter and Parmesan Sauce)
Also known as “pasta al burro,” this is one of the simplest yet most delicious ways to serve fresh tagliatelle. It’s a classic Italian comfort food, featuring just butter and Parmigiano-Reggiano cheese.
How to Make Butter and Parmesan Sauce
✔ Use high-quality butter – European-style butter with a high butterfat content (82%) works best.
✔ Melt butter gently – Let it coat the tagliatelle evenly without overheating.
✔ Toss in grated Parmesan – Stir in freshly grated Parmigiano-Reggiano until creamy.
✔ Add pasta water – A splash of reserved starchy pasta water helps emulsify the sauce.
✔ Best Served With: A side of crusty Italian bread and a light salad.
✔ Pro Tip: This dish is the base for Fettuccine Alfredo, an Americanized version that adds heavy cream.
—
4. Tagliatelle al Pesto Genovese (Basil Pesto Sauce)
Pesto Genovese is a vibrant, herbaceous sauce originating from Genoa, Italy. Made with fresh basil, pine nuts, garlic, Parmesan cheese, and olive oil, it’s a fresh and flavorful pairing for tagliatelle.
How to Make Pesto Genovese
✔ Use fresh basil – Sweet Italian basil (Genovese basil) gives the best flavor.
✔ Toast pine nuts – Lightly toast pine nuts for a nuttier taste.
✔ Blend with garlic, Parmesan, and olive oil – Mix in a food processor until smooth.
✔ Toss with tagliatelle – Use a bit of pasta water to loosen the sauce.
✔ Best Served With: Cherry tomatoes or grilled chicken for extra flavor.
✔ Pro Tip: To prevent pesto from turning dark, mix in a few drops of lemon juice to preserve its bright green color.
—
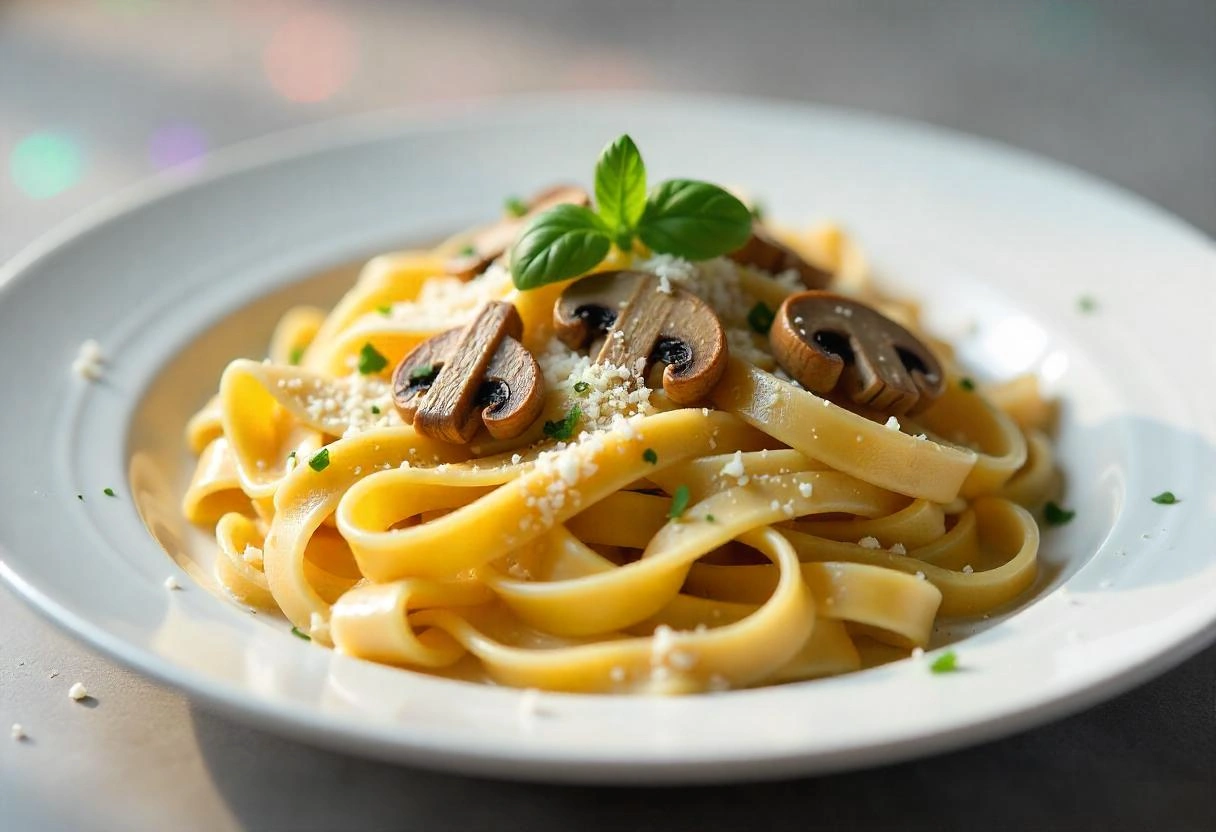
5. Tagliatelle al Sugo di Funghi (Creamy Mushroom Sauce)
This hearty, earthy sauce is perfect for mushroom lovers. It’s a vegetarian-friendly alternative to Bolognese, using sautéed mushrooms, garlic, cream, and Parmesan for a rich, umami-packed sauce.
How to Make Creamy Mushroom Sauce
✔ Use a mix of mushrooms – Porcini, cremini, or wild mushrooms add depth.
✔ Sauté mushrooms in butter and garlic – Cook until golden brown for maximum flavor.
✔ Deglaze with white wine – Adds complexity and enhances the mushroom taste.
✔ Add cream and Parmesan – Stir in heavy cream or mascarpone for a creamy texture.
✔ Toss with tagliatelle – Finish with fresh parsley and black pepper.
✔ Best Served With: A glass of red wine like Chianti or Pinot Noir.
✔ Pro Tip: For a dairy-free version, replace cream with blended cashews or coconut milk.
—
Final Thoughts
Tagliatelle is a versatile pasta that pairs beautifully with rich meat sauces, creamy butter-based sauces, herbaceous pesto, and delicate truffle flavors. Whether you prefer a hearty Bolognese or a light, aromatic pesto, choosing the right sauce will elevate your homemade tagliatelle to restaurant-quality perfection.
Which sauce will you try first?
Pairing Tagliatelle with the Right Ingredients
Fresh tagliatelle has a delicate yet slightly chewy texture that allows it to absorb flavors beautifully. Choosing the right ingredients to pair with it can enhance its taste, complement its texture, and create a perfectly balanced dish. Whether you’re going for a classic Italian experience or experimenting with new flavors, here’s how to pair tagliatelle with the best ingredients.
—
1. Choosing the Right Protein
Adding protein to tagliatelle makes the dish more satisfying and nutritionally complete. Depending on the sauce you’re using, different proteins will bring out the best in your pasta.
✔ Beef & Pork – If you’re making Ragù alla Bolognese, a combination of ground beef and pork creates a rich, hearty sauce that clings perfectly to the ribbons of tagliatelle.
✔ Chicken & Turkey – For a lighter option, grilled or shredded chicken works well with creamy or pesto-based sauces.
✔ Seafood – Fresh shrimp, scallops, or smoked salmon pair beautifully with buttery, lemon-based, or creamy sauces.
✔ Vegetarian Proteins – Mushrooms, chickpeas, or tofu can replace meat in many recipes, adding depth and texture without overpowering the pasta.
✔ Best Pairing:
Bolognese Sauce → Beef & pork
Pesto Genovese → Grilled chicken or shrimp
Truffle Butter Sauce → Seared scallops
Creamy Mushroom Sauce → Sautéed mushrooms
—
2. Selecting the Best Vegetables
Adding seasonal vegetables to your tagliatelle dish provides color, flavor, and nutrients. Some vegetables pair naturally with specific sauces.
✔ Leafy Greens – Spinach, kale, or arugula add freshness and blend well with light sauces like pesto or garlic butter.
✔ Tomatoes – Cherry tomatoes, sun-dried tomatoes, or slow-roasted tomatoes bring a sweet acidity that complements creamy or oil-based sauces.
✔ Mushrooms – Earthy mushrooms like porcini, cremini, or chanterelles create a rich umami taste, ideal for creamy or truffle-based sauces.
✔ Zucchini & Asparagus – These mild, slightly sweet vegetables pair beautifully with buttery or citrusy sauces.
✔ Bell Peppers & Eggplant – Great for a Mediterranean-inspired dish with olive oil and Parmesan.
✔ Best Pairing:
Tomato-based sauce → Cherry tomatoes & basil
Truffle butter sauce → Wild mushrooms & arugula
Pesto sauce → Roasted zucchini & asparagus
Creamy sauce → Spinach & caramelized onions
—
3. Choosing the Right Cheese
A good cheese can elevate tagliatelle by adding saltiness, creaminess, or sharpness. Some cheeses melt into the sauce, while others serve as a garnish.
✔ Parmigiano-Reggiano – The king of cheeses in Italian cooking, its nutty and salty flavor is perfect for buttery or tomato-based sauces.
✔ Pecorino Romano – A sharper, saltier alternative to Parmesan, ideal for carbonara or cacio e pepe.
✔ Ricotta – Light and creamy, ricotta works well with lemony or vegetable-based sauces.
✔ Gorgonzola – A bold, tangy cheese that pairs beautifully with walnuts, pears, and creamy sauces.
✔ Mozzarella & Burrata – Soft, milky cheeses that enhance fresh tomato-based dishes.
✔ Best Pairing:
Bolognese Sauce → Parmigiano-Reggiano
Pesto Sauce → Pecorino Romano
Mushroom Cream Sauce → Gorgonzola
Lemon Butter Sauce → Ricotta
—
4. Enhancing Flavor with Herbs & Spices
Using the right herbs and spices can transform a basic pasta dish into a gourmet meal. Italian cuisine relies on a balance of fresh and dried herbs to bring out the best in the ingredients.
✔ Basil – A must-have for pesto and tomato-based sauces.
✔ Oregano – A warm, slightly bitter herb that enhances meat sauces.
✔ Rosemary & Thyme – Great for buttery and truffle-based sauces.
✔ Garlic & Shallots – Add depth to almost any pasta dish.
✔ Nutmeg – A small pinch can enhance creamy sauces like Alfredo or béchamel.
✔ Crushed Red Pepper Flakes – Provides a little heat for oil-based or tomato sauces.
✔ Best Pairing:
Pesto Sauce → Fresh basil & pine nuts
Tomato Sauce → Oregano & garlic
Creamy Sauce → Nutmeg & black pepper
Olive Oil-Based Sauce → Crushed red pepper flakes
—
5. Perfecting the Final Touches
The final touches can elevate the dish and make your tagliatelle meal unforgettable.
✔ Olive Oil – A drizzle of extra virgin olive oil adds depth to pesto, tomato, or garlic-based sauces.
✔ Lemon Zest – Enhances buttery or seafood pasta dishes.
✔ Toasted Nuts – Pine nuts, walnuts, or almonds add crunch and nutty flavor to pesto or creamy pasta.
✔ Fresh Herbs – A sprinkle of fresh parsley, basil, or chives brightens up any dish.
✔ Balsamic Reduction – A few drops add a sweet acidity that pairs well with tomato or cheese-based dishes.
✔ Best Pairing:
Truffle Pasta → Olive oil & fresh thyme
Lemon Butter Pasta → Lemon zest & parsley
Pesto Pasta → Toasted pine nuts & Parmesan
Tomato-Based Pasta → Balsamic glaze & basil
—
Final Thoughts
Pairing fresh tagliatelle with the right ingredients is the key to creating a balanced, flavorful dish. Whether you opt for a hearty Bolognese, a delicate truffle butter sauce, or a fresh pesto, choosing the best proteins, vegetables, cheeses, herbs, and finishing touches will enhance your homemade pasta.
What’s your favorite way to enjoy tagliatelle? Let me know in the comments!
Final Tips for the Best Homemade Tagliatelle
Making fresh tagliatelle from scratch is a rewarding process, but a few expert tips can take your pasta to the next level. From getting the right texture to ensuring your pasta cooks perfectly, these final tips will help you achieve restaurant-quality tagliatelle at home.
—
1. Use High-Quality Ingredients
The quality of your ingredients directly impacts the taste and texture of your pasta.
✔ Flour – Use 00 flour for a silky-smooth texture or semolina flour for a bit more bite. Avoid all-purpose flour if possible, as it lacks the elasticity needed for fresh pasta.
✔ Eggs – Always use fresh, high-quality eggs, preferably organic or farm-fresh, for richer flavor and better dough consistency.
✔ Olive Oil (Optional) – Some recipes call for a small drizzle of olive oil in the dough, which can add smoothness. If you use it, make sure it’s extra virgin olive oil for the best flavor.
✅ Pro Tip: If you’re unsure about your flour, try mixing 50% 00 flour and 50% semolina for a balance of smoothness and chewiness.
—
2. Get the Dough Consistency Right
A good pasta dough should be firm yet pliable, not sticky or too dry.
✔ Too Dry? – If the dough crumbles or cracks, add a few drops of water and knead until smooth.
✔ Too Sticky? – Dust with a light sprinkle of flour and knead until it’s firm but still elastic.
✔ The Poke Test – Press your finger into the dough; it should spring back slowly, showing proper elasticity.
✅ Pro Tip: Let the dough rest for at least 30 minutes before rolling it out. This helps the gluten relax, making it easier to shape.
—
3. Roll the Dough Evenly
Uneven pasta dough will cook inconsistently, with some parts becoming mushy while others remain undercooked.
✔ Start Thick, Go Thin – Roll the dough to a thicker setting first before gradually making it thinner.
✔ Use Enough Flour – Lightly dust the dough with flour to prevent sticking, but don’t overdo it, or the pasta will be too dry.
✔ Check for Transparency – When rolled correctly, the dough should be thin enough to see your hand through it but still sturdy enough to hold its shape.
✅ Pro Tip: If using a pasta machine, pass the dough through each setting twice for a smoother, more elastic texture.
—
4. Cut the Tagliatelle Properly
When cutting tagliatelle, uniformity is key for even cooking.
✔ Use a Sharp Knife or Pasta Cutter – A dull knife can crush the dough instead of slicing cleanly.
✔ Flour the Dough Before Cutting – Prevent strands from sticking together by lightly dusting the dough with semolina before slicing.
✔ Shake Out the Strands – After cutting, gently separate and fluff the pasta strands to keep them from clumping.
✅ Pro Tip: If rolling by hand, roll the dough into a loose cylinder and slice it into strips, then unfurl the strands immediately.
—
5. Cook Tagliatelle in Plenty of Water
Fresh pasta cooks much faster than dried pasta, so you need to be careful not to overcook it.
✔ Use a Large Pot – Pasta needs space to cook properly, so always use a large pot of boiling salted water.
✔ Salt the Water Generously – The water should be as salty as the sea to enhance the flavor of the pasta.
✔ Watch the Cooking Time – Fresh tagliatelle cooks in 2-3 minutes, so taste-test frequently to ensure it’s al dente.
✔ Reserve Pasta Water – Before draining, save a cup of pasta water to help thicken and emulsify sauces.
✅ Pro Tip: Instead of rinsing the pasta, toss it directly into the sauce after draining to absorb more flavor.
—
6. Serve Tagliatelle Immediately
Fresh pasta is best enjoyed right away, as it can become sticky or overcooked if left sitting too long.
✔ Toss with Sauce Quickly – Mix the pasta with your chosen sauce immediately after draining to prevent it from clumping.
✔ Use Warm Plates – Serving pasta on pre-warmed plates helps maintain its ideal texture and temperature.
✔ Garnish for Extra Flavor – Add a final touch of Parmesan, fresh herbs, or a drizzle of olive oil to enhance the dish.
✅ Pro Tip: If you’re serving multiple portions, keep freshly cooked pasta warm in a bowl covered with a lid or foil while preparing the rest.
—
7. Storing Leftover Tagliatelle Properly
If you’ve made extra tagliatelle, storing it correctly will keep it fresh for later use.
✔ Refrigeration – Store fresh pasta in an airtight container with a light dusting of semolina for up to 2 days.
✔ Freezing – For long-term storage, freeze fresh tagliatelle in nests on a floured baking sheet. Once frozen, transfer to a freezer bag for up to 2 months.
✔ Reheating – To cook frozen pasta, boil it directly from frozen for an extra 1-2 minutes.
✅ Pro Tip: Never store fresh pasta in an airtight plastic bag without flouring it first—it will stick together!
—
Final Thoughts
Making fresh tagliatelle at home is a labor of love, but with the right techniques, you can achieve perfect pasta every time. By using high-quality ingredients, kneading properly, rolling evenly, and cooking carefully, you’ll be able to create tagliatelle that rivals any Italian restaurant.
Now that you have all the expert tips, it’s time to get rolling! What’s your favorite way to enjoy tagliatelle? Let me know in the comments!
Conclusion
Making fresh tagliatelle from scratch is a deeply satisfying process that allows you to experience pasta in its purest, most flavorful form. With just a few simple ingredients—flour, eggs, and a little patience—you can create silky, tender pasta that pairs beautifully with a variety of classic Italian sauces.
By following the step-by-step guide, mastering techniques like kneading, rolling, and cutting, and using expert tips for cooking and storing, you’ll be able to prepare authentic homemade tagliatelle every time. Whether you enjoy it with a rich Bolognese, a creamy Alfredo, or a simple olive oil and garlic sauce, fresh pasta elevates any meal.
Now that you’ve learned the art of making tagliatelle, why not put your skills to the test? Try different variations, experiment with new flavors, and most importantly, enjoy the process!
Have you made fresh tagliatelle before? What’s your favorite way to serve it? Share your thoughts in the comments!