
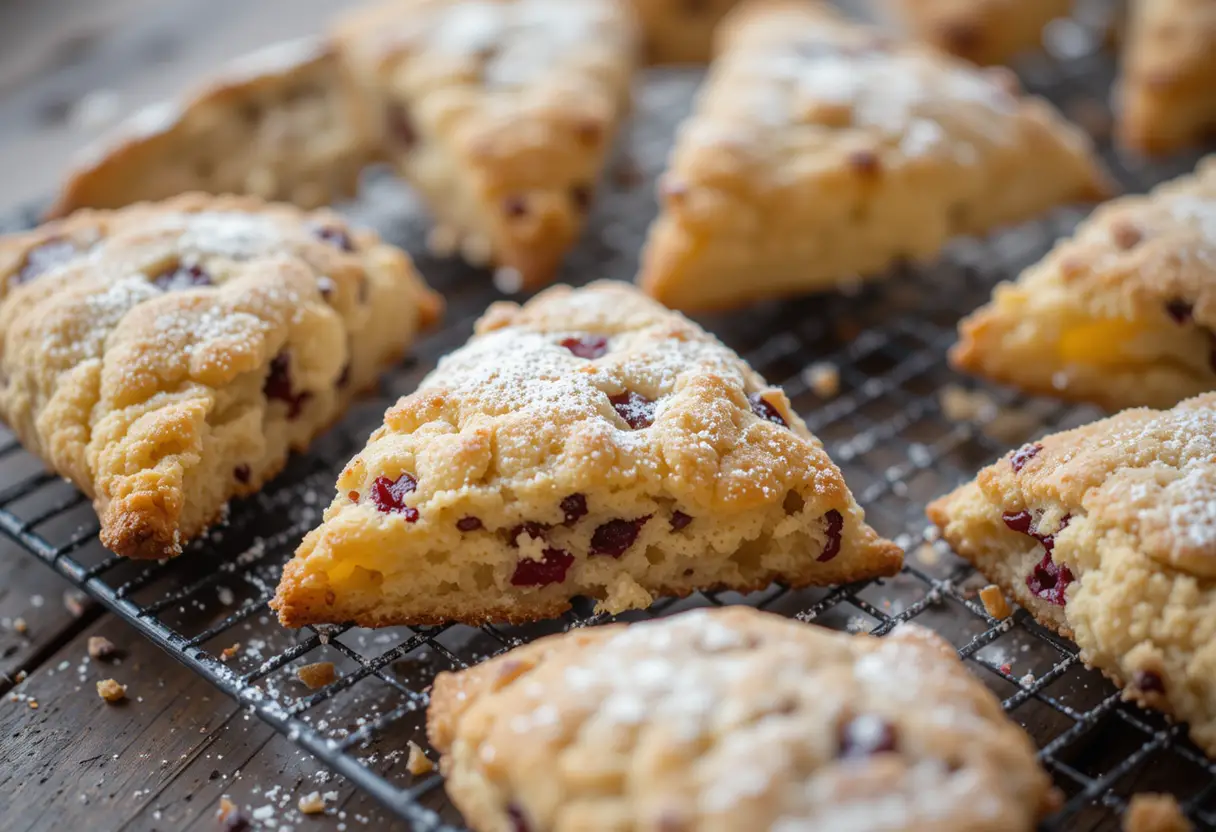
There’s nothing quite like the aroma of freshly baked orange cranberry scones filling your kitchen. These delightful treats strike the perfect balance between zesty orange and sweet-tart cranberries, creating a flavor that’s both refreshing and comforting. With their buttery, flaky texture, they make an excellent choice for breakfast, brunch, or an afternoon tea break.
Not only are they incredibly delicious, but they’re also easy to make at home with simple ingredients. Whether you prefer them plain or with a drizzle of orange glaze, these scones are sure to impress. In this guide, we’ll walk you through the step-by-step process to make the best homemade orange cranberry scones, along with expert tips to ensure they turn out perfect every time. Let’s get baking!
Why You’ll Love These Orange Cranberry Scones
A Perfect Balance of Sweet and Tangy Flavors
One of the reasons orange cranberry scones are so popular is their harmonious blend of flavors. The combination of zesty orange and sweet-tart cranberries creates a delightful contrast that makes each bite exciting and satisfying.
The Bright Citrus Note of Orange
The addition of fresh orange zest and juice infuses these scones with a natural brightness that enhances their overall taste. The citrusy aroma and flavor cut through the richness of the butter, making the scones feel lighter and more refreshing. If you love the taste of citrus in baked goods, you’ll appreciate how orange elevates the sweetness of the dough without overpowering it.
The Tart Sweetness of Cranberries
Cranberries bring a pleasant tartness that pairs beautifully with the buttery, slightly sweet scone dough. Using dried cranberries provides a chewy texture and concentrated sweetness, while fresh cranberries add bursts of tangy flavor in every bite. This contrast keeps the scones from being overly sweet, making them perfect for those who enjoy a balanced, slightly tart pastry.
A Flavor Combination That Works for Any Occasion
This mix of sweet and tangy flavors makes orange cranberry scones an excellent choice for different occasions. Whether served warm with butter, drizzled with a light orange glaze, or enjoyed with a cup of tea or coffee, they always deliver a deliciously well-rounded taste experience. Plus, their vibrant flavor makes them ideal for holidays, brunch gatherings, or just a cozy morning treat.
By combining these two flavors, you get a scone that’s bright, flavorful, and not too sweet—just the perfect treat for any time of the day.
Soft, Flaky Texture with a Buttery Richness
A well-made orange cranberry scone is all about achieving that perfect texture—soft on the inside, slightly crisp on the outside, and beautifully flaky. This delicate balance comes from the right combination of ingredients and techniques, ensuring that every bite is tender, rich, and satisfying.
The Role of Cold Butter in Flakiness
One of the secrets to getting flaky, buttery scones is using cold butter. When the butter remains cold during mixing and baking, it creates steam pockets that result in a light, layered texture. This is similar to how pie crust or biscuits develop their characteristic flakiness. Grating the butter or cutting it into small cubes before incorporating it into the flour mixture helps distribute it evenly, ensuring every bite has that rich, buttery flavor.
The Right Flour and Mixing Technique for Softness
The choice of flour and how you mix the dough also affects the texture. All-purpose flour is typically used because it provides just the right amount of gluten to hold the scones together without making them too dense. Overmixing the dough can lead to tough scones, so it’s essential to gently fold the ingredients together until just combined. A slightly shaggy dough ensures that the scones bake up light and tender.
Moisture from Heavy Cream and Eggs
To keep scones from becoming dry, the right amount of heavy cream or buttermilk is essential. These liquids add moisture and tenderness, ensuring that the scones stay soft and rich. Some recipes also include an egg, which adds structure while contributing to the overall tenderness. Together, these ingredients give the scones a melt-in-your-mouth texture that pairs beautifully with the tart cranberries and citrusy orange zest.
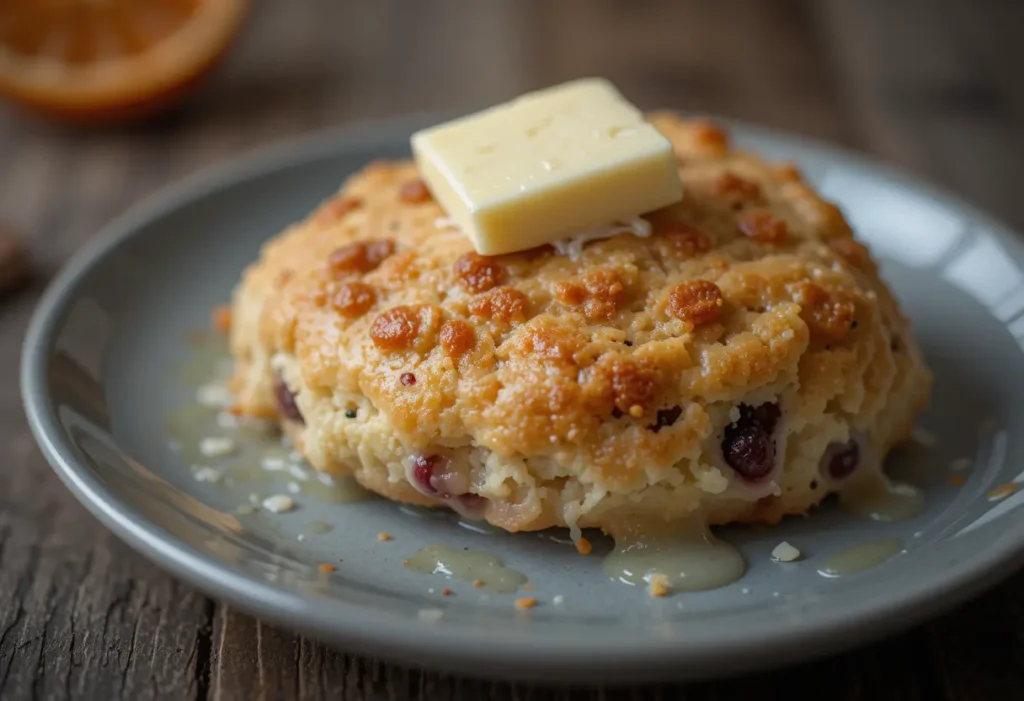
A Crisp, Golden Exterior for the Perfect Finish
While the inside of a great scone is soft and buttery, the outside should have a slightly crisp, golden-brown crust. This is achieved by brushing the tops with heavy cream or an egg wash before baking. This step enhances the appearance and flavor, giving the scones a delicate crunch that complements their tender interior.
By following these key steps, you’ll get perfectly soft, flaky, and rich scones every time—delivering a bakery-quality treat right from your kitchen!
Great for Breakfast, Brunch, or Afternoon Tea
One of the best things about orange cranberry scones is their versatility. Whether you’re looking for a quick morning bite, a special brunch treat, or a delightful addition to afternoon tea, these scones fit the occasion perfectly. Their buttery texture, balanced sweetness, and refreshing citrus-cranberry flavor make them a fantastic choice for any time of the day.
A Delicious and Satisfying Breakfast Option
If you’re someone who enjoys a hearty yet quick breakfast, these scones are a great choice. They provide a good balance of carbohydrates and fats, keeping you full and energized for the morning. Enjoy them warm with a pat of butter, a drizzle of honey, or a dollop of jam for an extra layer of flavor. Pairing them with a cup of coffee or tea makes for a comforting start to the day.
For busy mornings, you can bake a batch ahead of time and store them for easy grab-and-go breakfasts. They can be quickly reheated in the oven or microwave, bringing back their fresh-from-the-bakery warmth and aroma.
A Show-Stopping Brunch Treat
Brunch is all about indulgence and variety, and these scones fit right in. They add a homemade, rustic touch to any brunch table, especially when served with butter, clotted cream, or a light orange glaze. The zesty orange and tart cranberries bring a bright, refreshing contrast to traditional brunch dishes like eggs, pancakes, or savory quiches.
For special occasions like holiday gatherings or weekend brunch with friends, a batch of freshly baked scones will impress guests and make the meal feel extra special. Serve them on a platter with fresh fruit, jams, and a selection of teas or mimosas for a well-rounded spread.
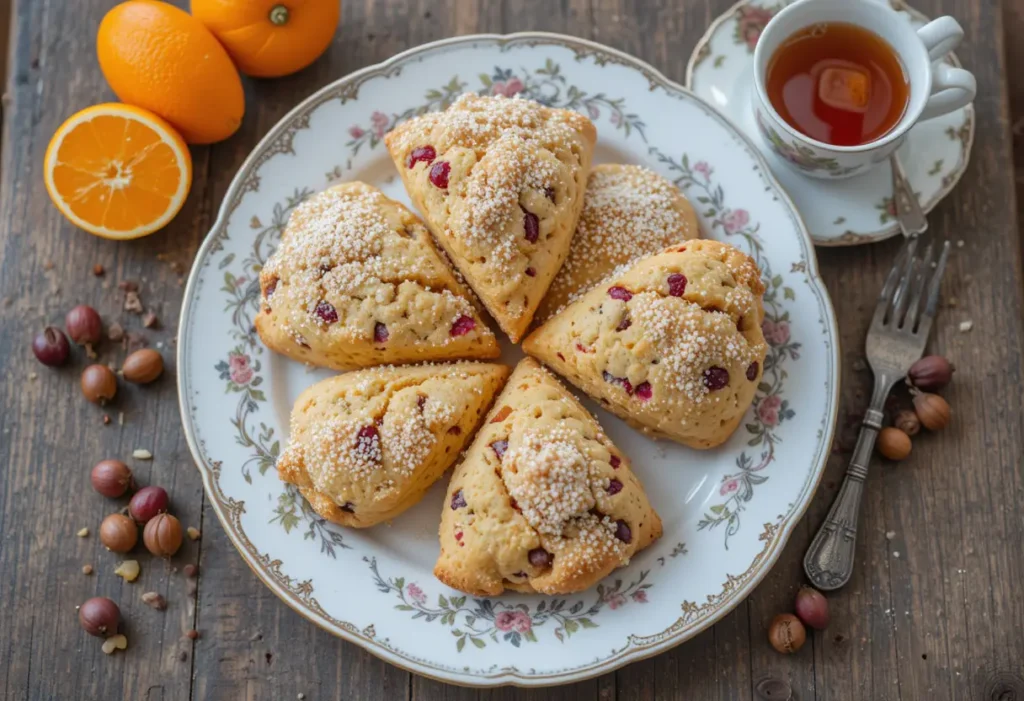
A Classic Afternoon Tea Companion
Scones are a staple of traditional afternoon tea, and these orange cranberry scones are no exception. Their light, crumbly texture and subtle sweetness make them an ideal companion to a hot cup of black tea, Earl Grey, or herbal blends.
For an authentic tea-time experience, serve them warm with clotted cream and orange marmalade. You can also add a light dusting of powdered sugar or a simple citrus glaze for an elegant touch. Whether you’re hosting a formal tea party or just enjoying a quiet afternoon treat, these scones bring warmth and comfort to the moment.
Perfect for Any Occasion
The beauty of these orange cranberry scones is that they can be enjoyed at any time of the day. Whether you need a quick breakfast, a special brunch treat, or a comforting afternoon snack, these scones offer a flavorful, homemade indulgence that’s both satisfying and easy to prepare.
Ingredients You’ll Need for Orange Cranberry Scones
Key Dry Ingredients for Orange Cranberry Scones
The foundation of any great scone recipe starts with the right dry ingredients. Each component plays a specific role in achieving the perfect texture and flavor—light, flaky, and buttery with just the right amount of structure. Let’s take a closer look at the essential dry ingredients you’ll need for your orange cranberry scones and why they matter.
All-Purpose Flour: The Base of the Scones
Flour is the main structural ingredient in scones. All-purpose flour is ideal because it contains just the right amount of protein (gluten) to provide structure without making the scones too dense. Using a lower-protein flour, like cake flour, could result in scones that are too delicate, while higher-protein flour, like bread flour, might make them too chewy.
For lighter, flakier scones, some bakers like to replace a small portion of all-purpose flour with cake flour to soften the texture. However, for most home bakers, standard all-purpose flour works perfectly.
Baking Powder: The Leavening Agent
Scones get their rise and fluffy texture from baking powder, which creates tiny air pockets in the dough when baked. It’s crucial to use fresh baking powder for the best results—if it’s old or expired, your scones may not rise properly and could turn out dense.
Some recipes also use a small amount of baking soda if an acidic ingredient like buttermilk is present, but for a traditional scone recipe using heavy cream, baking powder alone does the job well.
Granulated Sugar: A Touch of Sweetness
While scones aren’t as sweet as cookies or cakes, a little sugar enhances their flavor and helps balance the tartness of the cranberries. Granulated sugar is the most common choice, but you can also use:
Brown sugar for a hint of caramel-like depth
Coconut sugar for a natural sweetness with a mild molasses flavor
Maple sugar if you want a slight maple undertone
Most scone recipes use about ¼ to ⅓ cup of sugar, but you can adjust the amount based on your preference. Just keep in mind that the cranberries and orange zest also contribute some natural sweetness.
Salt: Enhancing Flavor
Salt might seem like a small ingredient, but it plays a big role in balancing flavors. It enhances the sweetness, brings out the buttery richness, and prevents the scones from tasting flat. A pinch (¼ to ½ teaspoon) of fine sea salt is usually enough. If using salted butter, you may want to reduce the added salt slightly.
Orange Zest: The Secret Flavor Booster
Though not traditionally considered a “dry” ingredient, orange zest is added to the dry mix before the wet ingredients to help distribute the citrus oils evenly. The zest provides a fresh, fragrant orange aroma that pairs beautifully with the tart cranberries and buttery dough. Using a fine grater or microplane will help you get the most flavorful part of the peel without the bitter white pith.
The Right Balance for Perfect Scones
Each of these dry ingredients contributes to the flavor, texture, and structure of your scones. Accurate measuring and proper mixing are key—over-mixing can lead to tough scones, while the right technique ensures a light, crumbly, and tender bite.
Now that you know how these dry ingredients work together, let’s move on to the wet ingredients that bring the dough together and add moisture!
Essential Wet Ingredients for Orange Cranberry Scones
While dry ingredients provide the foundation of a great scone, the wet ingredients bring everything together, adding moisture, richness, and flavor. The right combination ensures a tender, flaky texture with just the right amount of richness. Let’s take a closer look at the essential wet ingredients that make orange cranberry scones irresistible.
Cold Butter: The Secret to Flaky Scones
Butter is the most important wet ingredient in scones because it contributes to both flavor and texture. The key to achieving a flaky, layered structure is using cold, solid butter. When the butter melts in the oven, it creates steam pockets within the dough, resulting in light, airy layers.
To incorporate butter properly:
Cut it into small cubes before mixing with dry ingredients.
Use a pastry cutter, fork, or your fingers to blend the butter into the flour until it resembles coarse crumbs.
Grating frozen butter is another great method, as it ensures even distribution without overworking the dough.
For extra buttery flavor, some bakers prefer European-style butter, which has a higher butterfat content. This can make the scones even richer and more flavorful.
Heavy Cream: Moisture and Tenderness
Heavy cream (or whipping cream) is the primary liquid ingredient in many scone recipes. It provides moisture and fat, resulting in a rich, tender crumb. Compared to milk or water, heavy cream gives scones a more luxurious texture and a slightly softer bite.
If you don’t have heavy cream, you can substitute it with:
Buttermilk – Adds a slight tangy flavor and helps create an extra tender texture.
Whole milk – A lighter alternative, but the scones may be slightly less rich.
Half-and-half – Works well as a middle-ground option between milk and heavy cream.
To get the best results, add the cream gradually and mix gently—overworking the dough can make the scones tough instead of light and tender.
Egg: Structure and Richness
Eggs are sometimes optional in scone recipes, but they help:
Bind the ingredients together for a slightly sturdier texture.
Add extra richness and tenderness to the dough.
Give the scones a golden color when brushed on top before baking.
A single large egg is usually enough, but if you prefer a more biscuit-like texture, you can make scones without eggs and rely on the heavy cream for moisture.
Vanilla Extract: A Subtle Flavor Enhancer
While not always included, a splash of vanilla extract can subtly enhance the flavor of the scones, adding a warm, slightly sweet depth. It pairs well with the orange zest and cranberries, complementing their natural sweetness.
For an extra citrus boost, you can also add a few drops of orange extract or a teaspoon of orange juice to intensify the orange flavor.
How These Wet Ingredients Work Together
The key to perfect orange cranberry scones is balancing moisture, fat, and structure. Cold butter creates flaky layers, heavy cream keeps the scones moist and rich, and eggs (if used) add a touch of softness and stability. Together, they ensure your scones are buttery, tender, and full of flavor.
Now that we’ve covered the essential wet ingredients, let’s move on to the step-by-step method for making these delicious scones!
Flavor Boosters for Orange Cranberry Scones
What makes orange cranberry scones stand out is their bright, refreshing flavor. While the base ingredients create the perfect texture, it’s the flavor boosters that truly elevate these scones from simple to spectacular. Ingredients like fresh orange zest, tart cranberries, and a touch of spice add depth, contrast, and richness to every bite. Let’s explore how these elements enhance the flavor of your scones.
1. Fresh Orange Zest: A Burst of Citrus Aroma
The zest of an orange is one of the most important ingredients in these scones. It infuses the dough with a fragrant citrus aroma and a slightly tangy flavor that perfectly complements the sweetness of the cranberries.
Why use zest instead of juice?
Orange zest contains natural essential oils, which provide a much stronger citrus flavor than orange juice.
How to get the best zest?
Use a microplane grater to remove only the bright orange outer layer of the peel, avoiding the bitter white pith underneath.
Want an extra citrus kick?
Add a teaspoon of fresh orange juice to the wet ingredients or mix a drop of orange extract into the dough.
2. Cranberries: A Tart and Sweet Contrast
The cranberries in these scones provide a pop of tartness that balances the buttery richness of the dough. There are two common options for cranberries:
Dried Cranberries – These are slightly chewy and have a concentrated sweetness. They blend seamlessly into the dough, providing little bursts of flavor in every bite. If they seem too dry, you can soak them in warm orange juice for a few minutes to plump them up before adding them to the dough.
Fresh Cranberries – These add a more intense tartness and a juicy texture. When using fresh cranberries, it’s best to cut them in half or quarters so they distribute evenly throughout the scone.
Whichever you choose, the combination of cranberries and orange zest creates a perfect balance of sweet and tangy flavors.
3. Vanilla Extract: A Warm, Sweet Undertone
Though subtle, a teaspoon of vanilla extract enhances the overall flavor profile of these scones. It provides a warm, slightly floral sweetness that complements both the citrusy orange and the tart cranberries.
If you want to experiment with variations, you could also try:
Almond extract – Adds a nutty, slightly sweet depth.
Orange extract – Enhances the citrus notes even further.
4. A Hint of Spice: Cinnamon or Cardamom
Spices can add an extra layer of warmth and complexity to the scones. While not always included in traditional recipes, a small amount of cinnamon or cardamom can complement the citrus and cranberry flavors beautifully.
Cinnamon – Adds a cozy, slightly sweet warmth that pairs well with cranberries.
Cardamom – Has a delicate citrusy-spiced flavor that enhances the orange zest.
Use these sparingly—about ¼ teaspoon is enough to add depth without overwhelming the other flavors.
5. A Light Orange Glaze (Optional but Delicious!)
For those who love a little extra sweetness, a simple orange glaze can take these scones to the next level. Made with powdered sugar, fresh orange juice, and a touch of zest, this glaze adds a sweet citrus finish that enhances the overall flavor.
How to make it:
1 cup powdered sugar
2 tablespoons fresh orange juice
½ teaspoon orange zest
Simply whisk everything together and drizzle over the warm scones for an elegant, bakery-style touch.
Bringing It All Together
The combination of fresh orange zest, tart cranberries, vanilla, spices, and a light glaze transforms these scones into a bright, flavorful treat. Each ingredient enhances the others, creating a balanced, delicious scone that’s perfect for any occasion.
Now that we’ve explored how to build the perfect flavor, let’s move on to the step-by-step guide to making these irresistible scones!
Step-by-Step Guide to Making the Best Scones
Preparing the Dough for Orange Cranberry Scones
The key to making light, flaky, and buttery orange cranberry scones lies in how you prepare the dough. Unlike cakes or cookies, scones require a gentle mixing technique to ensure a tender, crumbly texture without becoming dense. Let’s go through each step of the dough preparation process, from combining ingredients to shaping the dough for perfect scones.
—
1. Mixing the Dry Ingredients
Start by whisking together your dry ingredients in a large mixing bowl. This ensures an even distribution of leavening agents and flavors.
Flour – Provides structure to the dough. Use all-purpose flour for the perfect balance of tenderness and strength.
Baking Powder – The key leavening agent that helps the scones rise, making them light and airy.
Sugar – Adds a touch of sweetness, balancing the tart cranberries and citrus zest.
Salt – Enhances flavor and prevents the scones from tasting flat.
Orange Zest – Mix it into the dry ingredients before adding the wet ones. This step helps release its essential oils, maximizing the citrus aroma.
After whisking, set the bowl aside while you prepare the butter.
—
2. Incorporating the Butter for a Flaky Texture
Cold butter is essential for flaky scones. As it melts during baking, it creates steam pockets, resulting in a light, airy texture. Here’s how to incorporate it properly:
Use cold butter straight from the fridge (or even frozen for extra flakiness).
Cut it into small cubes or grate it using a box grater. Grated butter distributes more evenly and blends into the flour more easily.
Work it into the flour mixture using a pastry cutter, fork, or your hands until the mixture resembles coarse crumbs with small, pea-sized bits of butter.
Avoid overmixing! The small chunks of butter should still be visible—this ensures the signature flaky layers of a great scone.
—
3. Adding the Cranberries for Even Distribution
Before adding the wet ingredients, stir in the cranberries to coat them with the flour mixture. This prevents them from sinking to the bottom of the dough.
For dried cranberries – Use them as they are, or soak them in warm orange juice for 5-10 minutes to plump them up before draining and adding them to the dough.
For fresh cranberries – Chop them into halves or quarters to evenly distribute their tart bursts throughout the scones.
Lightly toss them in the dry ingredients so they are evenly spread throughout the mixture.
—
4. Mixing the Wet Ingredients Separately
In a separate small bowl, whisk together your wet ingredients:
Heavy Cream (or Buttermilk) – Adds moisture and richness to the dough.
Egg (if using) – Provides structure and helps bind the ingredients together.
Vanilla Extract – Enhances the overall flavor with a subtle warmth.
Whisk these ingredients until well combined.
—
5. Bringing the Dough Together (Without Overmixing!)
Now it’s time to combine the wet and dry ingredients:
Create a well in the center of the dry ingredients and pour in the wet mixture.
Gently stir with a wooden spoon or spatula until the dough starts to come together.
Use your hands to finish mixing by folding the dough over itself a few times. The dough should be slightly sticky but not overly wet.
⚠️ Important Tip: Overmixing leads to tough scones! Stop mixing as soon as the dough comes together—it should still look a little shaggy and not overly smooth.
—
6. Shaping the Dough for Perfect Scones
Once the dough is mixed, transfer it onto a lightly floured surface for shaping:
Gently pat it into a circle (about ¾ to 1 inch thick).
Use a sharp knife or bench scraper to cut the dough into 8 equal wedges (like a pizza).
For round scones, use a biscuit cutter and press straight down—don’t twist, as that can prevent them from rising properly.
If the dough feels too warm at this stage, chill the shaped scones in the fridge for 15-20 minutes before baking. This helps firm up the butter again, ensuring a flaky texture.
—
Next Steps: Baking the Scones to Perfection
Now that your dough is ready and shaped, it’s time to bake them! Move on to the baking and finishing touches to achieve golden, bakery-style orange cranberry scones.
Shaping and Cutting the Dough for Orange Cranberry Scones
Shaping and cutting your orange cranberry scone dough properly is crucial to achieving flaky, evenly baked scones with the perfect texture and rise. The goal is to work with the dough as gently as possible to avoid overworking it, while ensuring that the scones hold their shape during baking. Let’s walk through each step of shaping and cutting the dough for the best results.
—
1. Handling the Dough Gently
Once your dough has come together (after mixing the wet and dry ingredients), it’s time to transfer it to a lightly floured surface. At this point, the dough should still be slightly shaggy and sticky—this is perfectly fine. The key to great scones is to handle the dough as little as possible to maintain its light, crumbly texture.
Flour your hands lightly if the dough is sticking to your fingers, but don’t add too much flour to the dough, as this can make the scones dense.
Avoid kneading the dough like you would with bread; instead, gently fold it over itself once or twice to make it more cohesive.
Overworking the dough can cause the gluten to develop, which results in tougher, denser scones. The goal is to keep the dough as light and airy as possible.
—
2. Shaping the Dough into a Circle or Rectangle
Once the dough is combined, you’ll need to shape it into a form that’s easy to cut. There are two common methods for shaping scones:
Round Scones (Traditional Method)
For round scones, shape the dough into a rough circle, about ¾ to 1 inch thick. Here’s how:
Pat the dough into a flat circle on your floured surface using your hands.
Make sure it’s uniform in thickness so the scones bake evenly.
Use a sharp knife or a bench scraper to cut the dough into 8 wedges, just like cutting a pie. Press straight down rather than twisting, which can prevent the scones from rising properly.
This method gives you the classic triangle-shaped scones that are perfect for serving in wedges, and they’re easy to handle and transport.
Square or Rectangular Scones (Biscuit Style)
If you prefer a more rustic or biscuit-like appearance, you can also shape the dough into a rectangle:
Pat the dough into a square or rectangle (about ¾ inch thick) and then cut it into squares or smaller rectangles (about 2-inch pieces).
You can either cut straight down or use a cookie cutter for round shapes.
This style is less formal and gives your scones a chunkier, heartier appearance, perfect for a more casual presentation.
—
3. Cutting the Dough Properly
When it’s time to cut your shaped dough, make sure you’re doing so in a way that helps the scones rise uniformly and nicely. This is crucial for achieving those signature flaky layers.
Use a sharp knife or bench scraper to cut through the dough cleanly.
Avoid twisting the knife or cutter—this can seal the edges and prevent the scones from rising fully.
If you’re using a round biscuit cutter, press straight down without twisting; this will help the scones rise higher.
For wedges, use a sharp knife to cut the dough in 8 wedges (or however many pieces you want). It’s best to cut the dough once and not go back over it, as repeated cutting can flatten the dough.
If your dough is too sticky to cut easily, you can lightly dust the knife or cutter with flour to help it move through the dough without sticking.
—
4. Chilling the Dough (Optional but Helpful)
Once the dough is shaped and cut, it’s a good idea to chill it for 15-20 minutes in the refrigerator before baking. Here’s why:
Chilling the dough solidifies the butter again, which is key to achieving flaky layers. The butter needs to stay cold as it melts during baking, creating steam and pockets within the dough.
Chilling also helps the scones hold their shape while baking, preventing them from spreading out too much.
If you’re in a hurry, you can skip this step, but for best results, a quick chill in the fridge can make a noticeable difference.
—
5. Preparing for Baking: Adding the Finishing Touches
Before baking your shaped and cut scones, it’s time to add a little extra touch to give them a golden, slightly crispy top. There are a couple of things you can do at this stage:
Brush the tops with heavy cream or a beaten egg wash (1 egg + 1 tbsp milk or water). This will help the scones bake to a beautiful golden color and give them a slight shine.
You can also sprinkle a little sugar on top for a sweet crunch after baking.
—
Next Steps: Baking the Scones
Once your scones are shaped, chilled, and brushed with cream or egg wash, they’re ready for the oven. Move on to the baking instructions to get those perfect, golden brown scones!
Baking Tips for Perfect Orange Cranberry Scones
Baking is the final step in creating light, golden, and flaky orange cranberry scones. The right technique can make a huge difference in texture and flavor. From temperature control to positioning in the oven, these tips will help ensure your scones rise beautifully and bake to perfection. Let’s dive into the essential baking tips for the best results.
—
1. Preheat the Oven Properly
One of the most crucial steps in baking any scone is ensuring that the oven is preheated to the correct temperature.
Preheat the oven to 400°F (200°C): Scones bake best in a hot oven. The initial high heat helps the butter in the dough melt quickly, creating steam pockets that make the scones rise and become flaky.
Allow at least 10-15 minutes for the oven to fully preheat before placing your scones inside. An oven thermometer is a good investment if you’re not sure if your oven’s temperature is accurate.
—
2. Use the Right Bakeware
The type of bakeware you use can affect the outcome of your scones. Here are some considerations:
Baking Sheet – For a traditional triangular shape, use a flat baking sheet lined with parchment paper or a silicone baking mat. This ensures the scones don’t stick, and it allows for even heat distribution.
Round Cake Pan – If you prefer to bake your scones in a round shape, use a round cake pan to keep them together, helping them rise taller and bake more evenly.
Make sure to space the scones at least 1 inch apart on the baking sheet if you want them to bake separately. If you prefer a soft, slightly doughy edge, you can place the scones closer together.
—
3. Bake on the Middle Rack
When it comes to oven positioning, the middle rack is the best place for scones. This ensures the scones bake evenly without burning the bottom or top.
The middle rack allows air to circulate evenly around the scones, ensuring the heat is distributed consistently for a uniform rise and golden crust.
Avoid placing your scones on the top or bottom rack, as this can lead to uneven baking. The top may brown too quickly while the inside remains undercooked.
—
4. Don’t Overcrowd the Oven
It’s tempting to bake a big batch of scones at once, but crowding the oven can lead to uneven baking. For the best results, you want the hot air to circulate freely around each scone.
Bake in batches if necessary, especially if you’re using a smaller oven or multiple trays. If you’re baking two trays at once, rotate them halfway through the baking time to ensure even cooking.
Allow for some space between each scone to give them room to rise and expand during baking.
—
5. Watch the Baking Time
Scones don’t take long to bake, so it’s important to monitor the time carefully. Overbaking can cause them to dry out, while underbaking can lead to a doughy interior.
Bake the scones for 15-20 minutes or until they are golden brown on top and a toothpick inserted into the center comes out clean.
If the tops of the scones are browning too quickly, you can loosely cover them with aluminum foil to prevent burning while the inside continues to cook.
Keep an eye on them toward the end of the baking time—scones can go from golden to overbaked quickly!
—
6. Avoid Opening the Oven Door Too Often
While it’s tempting to check on your scones constantly, opening the oven door too frequently can cause a drop in temperature and disrupt the baking process.
Limit the number of times you open the oven door, especially in the first 10 minutes of baking. This is when the scones are rising, and fluctuating temperatures can prevent them from achieving their full height and flakiness.
If you need to check, do it quickly and avoid letting all the heat escape.
—
7. Let the Scones Cool Before Serving
Once the scones are golden brown and baked through, it’s important to let them cool for a few minutes before serving. This allows the steam to escape, preventing them from becoming soggy or too crumbly.
Cool the scones on a wire rack to allow air to circulate around them, preventing condensation from forming on the bottom.
While they’re best eaten warm, freshly baked scones can be enjoyed at room temperature within a few hours.
—
8. Optional: Adding a Glaze for Extra Shine and Sweetness
If you want to add a little extra sweetness or shine to your orange cranberry scones, you can glaze them after baking:
Make a simple orange glaze by mixing powdered sugar with fresh orange juice (and a bit of zest if desired).
Drizzle the glaze over warm scones for a sweet finish that enhances the citrusy flavor of the scones.
You can also sprinkle the tops with a little sugar before baking for a light, sweet crunch.
—
9. Storing Leftover Scones
Scones are best enjoyed fresh from the oven, but if you have leftovers, you can store them for later:
Store them in an airtight container at room temperature for up to 2 days. They are best enjoyed within this time frame for maximum freshness.
To reheat, you can warm them in the oven at a low temperature (about 300°F or 150°C) for a few minutes to restore their flakiness.
For longer storage, you can freeze the scones after baking. Wrap them tightly in plastic wrap and aluminum foil, and store in a freezer bag for up to 3 months. Simply thaw and reheat when ready to serve.
—
Final Thoughts
With the right techniques, you can achieve perfectly baked orange cranberry scones that are golden brown, tender, and full of flavor. By following these baking tips—from properly preheating the oven to using the right bakeware—you’ll ensure that your scones turn out light, flaky, and utterly irresistible every time. Happy baking!
Delicious Variations and Serving Suggestions
Glazed Scones: Adding a Sweet Finish to Your Orange Cranberry Scones
While orange cranberry scones are delicious on their own, adding a glaze can elevate them to a new level of flavor and presentation. A glaze not only adds a touch of sweetness and shine, but it also enhances the citrusy freshness of the scones. The glaze provides a contrast to the flaky texture of the scones, creating a perfect balance of flavors. Let’s dive into how to make and apply a glaze to your scones for a beautiful, extra-special finish.
—
1. Why Add a Glaze?
Adding a glaze to your orange cranberry scones is optional but highly recommended for several reasons:
Visual Appeal – The glaze adds a shiny, polished look to your scones, making them more tempting and professional-looking.
Extra Sweetness – While scones can be mildly sweet on their own, a glaze enhances the overall sweetness without overpowering the tangy cranberries or the bright citrus flavor.
Flavor Boost – A glaze made from orange juice or zest can further highlight the citrus notes in the scones, intensifying the flavor.
Moisture – The glaze can add a slight moisture to the outer layer of the scone, preventing it from drying out too quickly after baking.
—
2. Choosing the Right Glaze for Orange Cranberry Scones
There are several glaze options you can use, depending on the flavor profile and appearance you want for your scones. Here are the best choices for orange cranberry scones:
Orange Glaze
An orange glaze is a natural pairing with orange cranberry scones, as it amplifies the citrusy aroma and creates a harmonious flavor profile. To make an orange glaze, all you need are a few simple ingredients:
Powdered Sugar – This forms the base of the glaze and gives it that smooth, sweet finish.
Fresh Orange Juice – Adds the fresh, tangy citrus flavor that complements the scones.
Orange Zest (Optional) – For an extra burst of citrus flavor and texture, you can add a pinch of zest to the glaze.
How to make the glaze:
1. In a small bowl, whisk together 1 cup of powdered sugar with 2 tablespoons of fresh orange juice.
2. If you want a thicker glaze, add a little more powdered sugar until it reaches your desired consistency. If you want a thinner glaze, add more juice.
3. Optional: Add a teaspoon of orange zest for an even more intense citrus kick.
Vanilla Glaze
If you’re looking for a more neutral glaze that complements the tart cranberries without competing with the orange flavor, a vanilla glaze is an excellent choice. This glaze is slightly sweeter and pairs well with the subtle, buttery flavor of the scones.
How to make the glaze:
1. In a small bowl, whisk together 1 cup of powdered sugar with 1 teaspoon of vanilla extract.
2. Add about 1-2 tablespoons of milk (or heavy cream) until you reach a smooth consistency.
3. Adjust the milk or powdered sugar to achieve the thickness you prefer.
—
3. How to Apply the Glaze
Once your scones are baked and slightly cooled, it’s time to apply the glaze. Here’s the best way to do it:
Drizzling the Glaze
Cool the scones slightly: Let the scones cool for about 5-10 minutes after they come out of the oven. If you glaze them while they’re too hot, the glaze will melt and run off too quickly.
Use a spoon or fork: Dip a spoon into the glaze and gently drizzle it back and forth over the top of each scone. Let the glaze fall naturally, creating an even coating that will set as it cools.
Be generous but controlled: You want to add enough glaze to enhance the flavor without soaking the scones completely. Aim for a thin, even layer over the surface.
Dipping the Scones in Glaze
For a thicker, more indulgent glaze on each scone, you can dip the tops directly into the glaze:
1. Dip the top of each scone into the glaze, allowing it to coat the surface.
2. Lift the scone out and let the excess glaze drip off.
3. Set the scones on a wire rack to allow the glaze to harden slightly as they cool.
—
4. Letting the Glaze Set
Once the glaze is applied, allow the scones to sit for a few minutes to let the glaze set and firm up. This ensures that the glaze stays in place while you serve or store the scones.
Cool on a wire rack: Place the scones on a cooling rack to prevent any condensation from forming on the bottom.
Wait at least 10 minutes before serving to allow the glaze to harden into a shiny, slightly firm layer.
—
5. Serving Glazed Scones
Once the glaze is set, your orange cranberry scones are ready to serve! The glaze will provide a delightful contrast to the flaky texture of the scones and will add a touch of sweetness to balance the tartness of the cranberries.
Perfect for Breakfast or Brunch – Serve them on a platter for an elegant brunch spread alongside coffee, tea, or fresh juice.
Great for Gifting – Glazed scones make for a beautiful homemade gift. Simply place them in a box or gift bag lined with tissue paper.
Store for Later Enjoyment – While they’re best fresh, you can store glazed scones for 1-2 days in an airtight container. Just be aware that the glaze may soften slightly after a day or two, but they’ll still taste delicious.
—
6. Variations to Experiment With
You can customize your glaze and experiment with different flavors to suit your tastes or to match the season:
Lemon Glaze – If you prefer a tart finish, a lemon glaze is an excellent alternative. Just swap the orange juice for lemon juice.
Maple Glaze – For a warmer, more indulgent option, try a maple glaze made with powdered sugar and maple syrup.
Cranberry Glaze – To enhance the cranberry flavor, make a cranberry glaze by simmering fresh or dried cranberries with sugar and water until the mixture thickens. Strain the cranberries before using the syrupy liquid as a glaze.
—
Final Thoughts
A glaze is the perfect finishing touch for your orange cranberry scones, adding both sweetness and a beautiful shine. Whether you opt for an orange glaze that intensifies the citrus flavor or a more neutral vanilla glaze, it’s sure to enhance both the flavor and the presentation of your scones. Enjoy these scones fresh from the oven, with a perfect glaze that completes the perfect bite!
Alternative Add-ins for Orange Cranberry Scones: Customize Your Recipe
While the classic combination of orange and cranberries creates a delightful flavor profile, one of the best parts about baking scones is the opportunity to customize them with different add-ins. By incorporating extra ingredients, you can transform the scones into a variety of flavors that suit your personal taste or seasonal preferences. Whether you’re looking to add more texture, flavor complexity, or a touch of indulgence, these alternative add-ins will elevate your orange cranberry scones to new heights.
—
1. Nuts: Crunch and Flavor Contrast
Nuts not only add a crunchy texture to the soft, flaky scones, but they also contribute a rich, nutty flavor that complements the fruity sweetness of the cranberries and the citrusy zing of the orange. Here are some great nut options to consider:
Walnuts
Flavor Profile: Walnuts add an earthy, slightly bitter flavor that balances the tart cranberries.
How to Use: Roughly chop 1/2 to 3/4 cup of walnuts and fold them into the dough. For an extra burst of flavor, toast the nuts lightly before adding them to the batter.
Pecans
Flavor Profile: Pecans provide a sweet, buttery taste that pairs well with the citrus notes of orange.
How to Use: Add 1/2 cup of chopped pecans to your dough. They work wonderfully in combination with the cranberries and provide a smooth texture contrast.
Almonds
Flavor Profile: Sliced almonds add a light, crisp texture and a subtle almond flavor that doesn’t overwhelm the scones.
How to Use: Use 1/4 cup of sliced almonds in the dough, or sprinkle them on top before baking for added crunch and visual appeal.
—
2. Chocolate: A Touch of Sweetness and Decadence
For those who love a sweet treat, adding chocolate to orange cranberry scones introduces a wonderful depth of flavor. Chocolate chips or chunks not only add sweetness but also create pockets of melted chocolate in each bite. Here are some ways to incorporate chocolate into your scones:
Dark Chocolate Chips
Flavor Profile: Dark chocolate’s slightly bitter flavor complements the sweetness of the orange and cranberries, creating a more complex flavor profile.
How to Use: Mix 1/2 cup of dark chocolate chips into the dough for a rich, bittersweet contrast to the fruity scones.
White Chocolate Chips
Flavor Profile: White chocolate adds a creamy sweetness that enhances the overall flavor while still allowing the fruit and citrus to shine.
How to Use: Add 1/2 cup of white chocolate chips to the dough, or drizzle a little white chocolate over the glazed scones for a decadent finishing touch.
Milk Chocolate Chunks
Flavor Profile: Milk chocolate offers a smoother, sweeter flavor that pairs well with the tart cranberries.
How to Use: Add 1/2 cup of chopped milk chocolate to the scone mixture for a rich, sweet experience in every bite.
—
3. Dried Fruits: Amplify the Fruity Flavor
If you love a fruitier scone, consider incorporating additional dried fruits into the dough. These can bring extra layers of flavor and texture, and many dried fruits pair wonderfully with both orange and cranberry.
Raisins
Flavor Profile: Raisins are naturally sweet and chewy, adding a caramel-like sweetness to your scones.
How to Use: Add 1/4 to 1/2 cup of raisins to the dough. For added depth, you can soak the raisins in warm water or orange juice for 10-15 minutes before adding them to the mix.
Dried Cherries
Flavor Profile: Dried cherries have a slightly tart flavor that complements the cranberries while adding a chewy texture.
How to Use: Add 1/4 to 1/2 cup of dried cherries, ensuring they’re evenly distributed in the dough for a lovely pop of color and flavor.
Dried Apricots
Flavor Profile: Dried apricots offer a sweet, slightly tangy flavor that pairs beautifully with the orange zest in the scones.
How to Use: Chop 1/2 cup of dried apricots into small pieces and fold them into the dough.
—
4. Spices: Add Warmth and Complexity
For an extra layer of warmth and complexity, consider adding spices to your scones. A touch of spice can complement the fruit and citrus flavors while introducing new aromatic elements to the scones.
Cinnamon
Flavor Profile: Cinnamon adds a cozy, warm flavor that enhances the sweetness of the scones.
How to Use: Add 1/2 teaspoon of ground cinnamon to the dry ingredients, or sprinkle some cinnamon on top of the scones before baking for an extra burst of flavor.
Nutmeg
Flavor Profile: Nutmeg has a slightly sweet, spicy, and aromatic flavor that works well with citrus and fruit.
How to Use: Add 1/4 teaspoon of ground nutmeg to the dry ingredients for a subtle depth of flavor.
Ginger
Flavor Profile: Ground ginger brings a warm, spicy kick that pairs beautifully with the tartness of cranberries.
How to Use: Add 1/4 teaspoon of ground ginger to the dough for a zesty twist. For a fresher ginger taste, you can also use grated fresh ginger.
—
5. Zest and Extracts: Enhance the Citrus Flavor
To boost the citrus flavor in your orange cranberry scones, experiment with different zests or extracts that can make your scones even more aromatic and flavorful.
Lemon Zest
Flavor Profile: Lemon zest adds a bright, zesty citrus note that enhances the orange flavor and complements the tangy cranberries.
How to Use: Add 1 teaspoon of lemon zest to the dough along with the orange zest for a more pronounced citrus punch.
Vanilla Extract
Flavor Profile: Vanilla extract has a warm, floral sweetness that pairs wonderfully with the tart cranberries and sweet orange.
How to Use: Add 1 teaspoon of vanilla extract to the dough for a richer, more rounded flavor profile.
Lime Zest
Flavor Profile: Lime zest offers a bright, tangy citrus flavor that pairs well with the cranberries while adding a unique twist to the scones.
How to Use: Add 1/2 teaspoon of lime zest to the dough to bring a subtle, tangy citrus essence to your scones.
—
6. Sweeteners: Customize the Sweetness
While the scones are naturally sweet, you can adjust the level of sweetness with different sweeteners. This is particularly useful if you want a healthier version or if you want to add a unique flavor twist.
Honey
Flavor Profile: Honey adds a floral sweetness and a slightly chewy texture.
How to Use: Replace some of the sugar with 2-3 tablespoons of honey in the dough, or drizzle honey over the scones after glazing for a natural sweetness.
Maple Syrup
Flavor Profile: Maple syrup provides a rich, caramel-like sweetness that pairs perfectly with the buttery flavor of the scones.
How to Use: Add 2 tablespoons of pure maple syrup in place of some of the sugar or in the glaze for an indulgent twist.
—
7. Seeds: Texture and Crunch
Seeds can add an interesting crunchy texture to scones, as well as a burst of flavor. Consider adding a few of these seeds to your dough:
Chia Seeds
Flavor Profile: Chia seeds are mild and won’t overpower the scone’s flavor, but they add texture and a bit of extra nutrition.
How to Use: Add 1 tablespoon of chia seeds to the dough for a slightly chewy texture.
Poppy Seeds
Flavor Profile: Poppy seeds add a subtle nutty flavor and a unique crunch.
How to Use: Add 1 tablespoon of poppy seeds to the dough, or sprinkle some on top before baking for a decorative touch.
—
Final Thoughts
Customizing your orange cranberry scones with alternative add-ins is a great way to make them uniquely yours. Whether you prefer to add nuts, dried fruits, chocolate, or spices, each ingredient brings its own distinct flavor and texture. Don’t be afraid to experiment and try new combinations, as these additions can transform your scones into something even more delightful and exciting. Happy baking and enjoy creating your perfect scone recipe!
Best Ways to Serve Orange Cranberry Scones: Elevating Your Scone Experience
Once your orange cranberry scones are baked to perfection and glazed with a sweet finishing touch, it’s time to serve them! These scones can be enjoyed in a variety of ways, whether you’re serving them for a special occasion or as part of a casual snack. The key is to complement their tangy orange and tart cranberry flavors with the right beverages and accompaniments. Here are some of the best ways to serve your scones to make every bite a memorable experience.
—
1. Classic with Tea or Coffee
There’s something wonderfully timeless about pairing scones with a hot beverage. The warmth of tea or coffee enhances the flavors of the scones and creates a soothing, comforting treat. Here are a few popular beverage pairings:
Earl Grey Tea
Flavor Profile: The subtle citrus undertones of Earl Grey tea complement the orange flavor in the scones. The bergamot aroma of the tea blends beautifully with the citrusy zest in the scones, creating a harmonious flavor pairing.
Serving Tip: Brew a pot of Earl Grey tea and serve your scones with a side of lemon curd or clotted cream for an extra indulgent experience.
Green Tea
Flavor Profile: A mild green tea offers a delicate, slightly grassy flavor that pairs well with the bright citrus of the scones. Green tea’s subtlety won’t overpower the scone’s flavor, providing a refreshing contrast.
Serving Tip: Serve with a small bowl of fresh fruit, such as orange slices or strawberries, to bring out the fruitiness of the scones.
Coffee
Flavor Profile: The rich, bitter taste of coffee balances out the sweetness of the scones. Whether you prefer black coffee or a latte, the robust flavor of coffee enhances the depth of the scones.
Serving Tip: For a more indulgent option, pair your scones with a cinnamon latte or a mocha to add extra flavor complexity to the pairing.
—
2. Serve with Cream or Butter
A touch of cream or butter can take your scones from simple to extraordinary. The richness of the cream complements the soft, buttery texture of the scones, adding indulgence and enhancing their flavor. Here are some options to consider:
Clotted Cream
Flavor Profile: Clotted cream has a rich, velvety texture with a slightly sweet taste, making it the perfect accompaniment to your scones.
Serving Tip: Spread a generous amount of clotted cream on each scone, and top with a dollop of jam (such as apricot jam or strawberry jam) to bring out the fruitiness in the scones.
Whipped Cream
Flavor Profile: Light, fluffy, and subtly sweet, whipped cream is a great way to add a bit of extra sweetness and richness without overwhelming the scone’s flavors.
Serving Tip: Serve a side of fresh whipped cream for guests to spoon onto their scones, or add a bit of vanilla extract to the cream for added flavor.
Butter
Flavor Profile: For those who prefer a simpler approach, unsalted butter can be spread on a warm scone to enhance its natural flavor. The butter’s creamy texture adds richness without overpowering the delicate balance of orange and cranberry.
Serving Tip: Warm the scones slightly in the oven before serving, so the butter melts beautifully into the scone’s crumb.
—
3. Pair with Fruit or Jam
For a fresh and fruity contrast, serving fruit or jam alongside your orange cranberry scones will amplify their bright citrus and tart cranberry flavors. Choose fruits or preserves that complement the scones’ fruity profile:
Citrus Marmalade
Flavor Profile: Citrus marmalade is made from the zest and juice of oranges and other citrus fruits, offering a sweet-tart spread that enhances the scones’ orange flavor.
Serving Tip: Spread a thin layer of marmalade on your scone for a burst of citrus sweetness that amplifies the orange flavor in the scones.
Berry Jam
Flavor Profile: Strawberry, blueberry, or raspberry jam provides a sweet, slightly tangy contrast to the cranberry’s tartness and complements the orange zest.
Serving Tip: Use homemade jam or your favorite store-bought version and spread it generously over the scones or serve on the side.
Fresh Fruit
Flavor Profile: Fresh fruits like orange slices, strawberries, or blueberries add a juicy, refreshing burst that contrasts nicely with the scone’s crumbly texture.
Serving Tip: Serve the scones alongside a fruit salad or with a few slices of fresh orange, to bring out the citrus notes in the scones.
—
4. Serve as Part of a Brunch Spread
For a brunch gathering, orange cranberry scones can be the star of the table, paired with a variety of other complementary dishes. Their slightly sweet and tangy flavor makes them versatile enough to fit into a wide range of brunch spreads. Here are a few ideas:
Egg Dishes
Flavor Profile: The richness of scrambled eggs or a frittata pairs wonderfully with the scone’s light, flaky texture.
Serving Tip: Serve the scones alongside a hearty egg dish like a vegetable frittata or scrambled eggs with herbs. The eggs’ savory richness balances the sweetness of the scones perfectly.
Cheese Plate
Flavor Profile: A cheese plate adds variety and complexity to the brunch. Choose cheeses that contrast with the sweetness of the scones, such as sharp cheddar, brie, or goat cheese.
Serving Tip: Offer a selection of cheeses alongside your scones to give your guests a choice of complementary flavors. You can even spread a bit of cheese on the scones for a savory twist.
Mimosas
Flavor Profile: The bright, bubbly nature of a mimosa pairs well with the citrusy notes in the scones, making it a popular brunch beverage.
Serving Tip: For a fun twist, consider serving your scones with mimosas made from orange juice and champagne or a bellini made with peach puree.
—
5. Make it a Dessert
If you’re looking to serve orange cranberry scones as a dessert, you can elevate them further with some creative accompaniments. For a sweet treat that feels more indulgent, here are some ideas:
Ice Cream
Flavor Profile: Pairing scones with a scoop of vanilla ice cream or orange sorbet creates a delightful contrast between the warm, flaky scones and the cold, creamy dessert.
Serving Tip: Serve the scones warm, with a generous scoop of vanilla or citrus-flavored ice cream for a refreshing, indulgent dessert.
Custard or Cream Sauce
Flavor Profile: A rich custard or cream sauce adds an indulgent touch to the scones, making them feel like a luxurious dessert.
Serving Tip: Drizzle vanilla custard or a simple cream anglaise over the scones for a creamy, dessert-like twist.
—
6. Storing and Reheating
For those who wish to enjoy their orange cranberry scones later, proper storage and reheating can preserve their texture and freshness:
Storage Tip: To keep scones fresh for 1-2 days, store them in an airtight container at room temperature. If you’ve glazed them, keep the scones in a single layer to prevent the glaze from getting smudged.
Reheating Tip: To revive their flakiness, warm the scones in the oven at 300°F (150°C) for 5-10 minutes. If you want to warm them up with a bit of extra flavor, you can place them in a sealed container with a pat of butter to give them a buttery finish.
—
Final Thoughts
No matter how you choose to serve your orange cranberry scones, the key is to complement their citrusy freshness and flaky texture with the right accompaniments. Whether you pair them with a cup of tea, serve them as part of a brunch spread, or indulge in a rich dessert option, these scones are guaranteed to be a hit. Enjoy the versatility and deliciousness of your scones, and make every occasion special with this perfect treat!
Expert Tips for Perfect Scones Every Time
Using Cold Butter for a Flaky Texture: The Secret to Perfect Scones
The key to achieving a flaky, tender texture in your orange cranberry scones lies in the use of cold butter. The cold butter helps create layers of dough, resulting in scones that are light, airy, and wonderfully flaky. Here’s why it’s so important and how to use it effectively in your recipe.
—
Why Cold Butter Matters
Butter is a crucial ingredient in scones, contributing to their rich flavor and texture. The temperature of the butter has a significant impact on the end result:
Creating Layers
When you incorporate cold butter into the dough, the butter remains in small, solid pieces. These pieces of butter form pockets between the layers of dough. As the scones bake, the butter melts and creates steam, which helps to lift and separate the layers of dough, giving the scones their flaky texture. This is the same principle used to make flaky pastries like croissants and puff pastry.
Preventing Overmixing
Using cold butter also reduces the risk of overmixing the dough. If the butter were warm or melted, it would blend too thoroughly into the flour, resulting in a denser, more bread-like texture rather than the desired light and airy consistency. The cold butter ensures that the fat remains separate from the flour, giving the scones their tender crumb.
—
How to Use Cold Butter for the Best Results
1. Chilling the Butter
The first step to achieving a flaky texture is to ensure that the butter is as cold as possible before using it. You can achieve this by:
Cutting the butter into cubes: Before using, chop the butter into small cubes, about 1/2-inch in size. This helps the butter stay solid as you work it into the dough.
Chill the butter: For the best results, place the butter in the refrigerator for at least 30 minutes before starting to make the scones. If you’re in a rush, you can also place the butter in the freezer for 10-15 minutes. This quick chilling ensures that the butter remains firm while you’re working with it.
2. Using a Pastry Cutter or Fork
Instead of using your hands to incorporate the butter into the flour, it’s best to use a pastry cutter, fork, or two knives. The goal is to work the butter into the dry ingredients without melting it. Here’s how:
Pastry Cutter Method: Hold the pastry cutter in both hands and press the cold butter into the flour mixture, working until the butter is in small pea-sized pieces.
Fork or Knife Method: You can also use a fork to cut the butter into the flour, or use two knives to slice through the butter, continuing until the mixture resembles coarse crumbs with visible pieces of butter.
3. Avoid Overworking the Dough
Once the butter is incorporated into the dry ingredients, it’s essential to handle the dough with care. Overworking the dough can cause the butter to warm up and melt, which will result in a denser texture.
Tip: Use a light hand when mixing the wet ingredients into the dough. Stir gently until everything just comes together. You may still see some visible pieces of butter, which is perfectly fine—these pockets will melt during baking and contribute to the flakiness.
—
Cold Butter in the Freezer: An Extra Tip for Maximum Flakiness
For even more flakiness, some bakers like to take the cold butter to the next level:
Freeze the butter: After cutting the butter into cubes, place it in the freezer for about 5 minutes before adding it to the dry ingredients. The colder the butter is when it hits the flour, the flakier the scones will be. This is particularly useful when you’re aiming for an ultra-flaky texture, similar to puff pastry.
—
What Happens If You Use Warm Butter?
If you use softened or warm butter in your scone dough, you’ll notice a few key differences:
Drier Texture
Warm butter incorporates too well into the flour, making the dough less likely to form the layers needed for a flaky scone. The result will likely be a dense, crumbly scone that may not have the tender, airy texture you want.
Spread Out Scones
When you bake scones made with warm butter, they tend to spread more during baking rather than rising and puffing up. The scones will be flatter and lack the light, lifted texture that makes scones so irresistible.
—
Final Thoughts
Using cold butter is one of the most important techniques in making perfectly flaky orange cranberry scones. The colder the butter, the better the layers, resulting in a scone that is both light and tender with the perfect crumb. By following this simple yet crucial step, you’ll ensure your scones have that signature flaky, melt-in-your-mouth texture that everyone loves. Whether you’re making them for a special occasion or a casual treat, taking the time to use cold butter will always pay off in the final result.

Avoid Overmixing to Keep the Scones Light: The Key to a Tender Crumb
One of the most critical factors in achieving light, tender scones is the ability to avoid overmixing the dough. Overworking the dough can result in tough, dense scones instead of the flaky, airy texture that makes them so irresistible. Here’s why overmixing is detrimental and how you can ensure your scones stay light and tender.
—
What Happens When You Overmix the Dough?
Scones, like many baked goods, are quick breads, meaning they don’t require a long mixing process. The goal is to combine the ingredients just enough to form a dough, leaving it rough and shaggy. Overmixing causes the gluten in the flour to develop too much, which leads to a chewy, tough texture. Here’s how overmixing can affect your scones:
Tough, Dense Scones
When you mix the dough too long, you activate the gluten more than necessary. The gluten network becomes stronger and more developed, resulting in a more chewy texture. Scones should be light and crumbly, so overmixing will completely ruin this delicate balance, making the scones dense and tough.
Less Flakiness
The key to a flaky scone is achieving layers of dough that separate during baking. Overmixing the dough prevents these layers from forming properly, leaving you with a more uniform texture and less lift. Instead of having that flaky, melt-in-your-mouth texture, the scones will have a heavy, compact crumb.
Loss of Lightness and Tenderness
Scones are prized for their tender crumb—the result of light, gentle mixing. Overmixing the dough toughens it, so the scones lose that melt-in-your-mouth quality. Instead of feeling soft and airy, they will have a dense, dry mouthfeel.
—
How to Avoid Overmixing
1. Use the Right Tools
The best way to prevent overmixing is by using the right tools and method for incorporating your ingredients. Instead of relying on an electric mixer, which can easily lead to overmixing, opt for these hand tools:
Pastry Cutter or Fork: These tools allow you to cut the butter into the flour gently, without overworking the dough. Use a pastry cutter to cut the cold butter into the dry ingredients until the mixture resembles coarse crumbs. If you don’t have a pastry cutter, a fork will work just fine for the same purpose.
Hands for Mixing: When adding the liquid ingredients, use your hands to gently bring the dough together. The warmth of your hands is helpful in gently working the dough without activating the gluten too much. You want the dough to look a bit rough and shaggy, not smooth.
2. Combine Wet and Dry Ingredients Briefly
Once you’ve added the wet ingredients (such as cream, milk, or buttermilk) to the dry ingredients (such as flour, baking powder, and sugar), mix the dough just enough to bring it together. The dough should remain slightly uneven, with some pockets of dry flour remaining.
Tip: Stir the dough with a wooden spoon or spatula in a folding motion, rather than stirring in circles. This minimizes the risk of overworking the dough.
3. Don’t Worry About Small Clumps of Flour
A bit of dry flour left in the dough is actually a good thing! It’s better to have some lumps and visible dry spots than to keep stirring until everything is perfectly smooth. The small clumps of flour will hydrate as the dough rests and bakes. What you’re aiming for is a rough, shaggy dough with visible bits of butter throughout. This will create the perfect texture when baked.
—
The Importance of Resting the Dough
Another step in the process that can help prevent overmixing is allowing the dough to rest before shaping it. Resting gives the flour time to fully absorb the liquid ingredients, making it easier to handle the dough without overworking it. Here’s how resting benefits the scone dough:
1. Allows the Flour to Hydrate
Resting the dough for about 10-15 minutes helps the flour to absorb the liquid, which results in a more cohesive dough. When the dough is allowed to rest, it also makes it easier to handle without having to mix it too much.
2. Helps Relax the Gluten
Resting gives the gluten in the dough a chance to relax. As a result, the dough becomes more manageable and less likely to become tough when you shape and cut the scones.
—
How to Recognize When to Stop Mixing
1. Look for the Shaggy Texture
The dough should have a shaggy texture, meaning it looks rough and not fully blended. There should still be some visible bits of butter and perhaps small pockets of dry flour. When you reach this point, stop mixing immediately.
2. Test the Dough with Your Hands
Use your hands to gently squeeze a small amount of dough. If it comes together without falling apart, it’s ready to go. If it’s too sticky, add a little more flour and gently mix again. If it’s too dry, add a small amount of liquid and incorporate it briefly. The goal is a soft dough that holds together without being overly sticky.
3. Handle the Dough Gently
When shaping or cutting the dough, handle it as little as possible. Press the dough into a flat disk for cutting, rather than rolling it out, which could overwork it.
—
Final Thoughts
Avoiding overmixing is one of the easiest yet most important steps to making perfect orange cranberry scones. By using cold butter, mixing the dough gently, and recognizing when to stop, you can ensure that your scones have a light, flaky texture that’s the hallmark of a well-baked treat. Keep your dough handling light, and you’ll be rewarded with tender, airy scones every time!
Storage Tips: Keeping Your Scones Fresh and Delicious
Proper storage of your orange cranberry scones is essential to maintaining their flaky texture and freshness. While scones are best enjoyed fresh out of the oven, following the right storage methods can ensure they stay delicious for a few days. Here’s how to store your scones to keep them tasting as good as the day they were baked.
—
1. Storing Freshly Baked Scones
After baking, scones are at their best when fresh, but if you want to store them for later, follow these steps to keep them as tasty as possible:
Cool Completely Before Storing
Before placing your scones in storage, allow them to cool completely on a wire rack. Storing warm scones can trap moisture inside the container, making the scones soggy or sticky. Let them cool to room temperature to avoid this problem.
Use an Airtight Container
To preserve the scones’ freshness, store them in an airtight container. This helps prevent them from becoming stale by sealing in the moisture. Choose a container that’s large enough to hold the scones without squishing them, but make sure the lid fits tightly.
Tip: If you don’t have a large airtight container, you can store scones in a resealable plastic bag. Squeeze out as much air as possible before sealing the bag.
Layer with Parchment Paper
If you have multiple scones, layer them in the storage container with parchment paper between each one. This will help prevent them from sticking together and will also protect their shape. It’s also a good way to keep the scones from becoming too squished.
—
2. Storing Scones for Longer Freshness
If you want to store your scones for longer periods (more than a few days), freezing is the best option. Here’s how to do it properly:
Freezing Baked Scones
To keep your scones fresh for weeks, freezing is a great option. Follow these steps for freezing:
1. Cool Completely: As with storing at room temperature, make sure your scones have cooled down completely.
2. Wrap Individually: Wrap each scone in plastic wrap or aluminum foil. This prevents freezer burn and protects the scones from the cold air in the freezer.
3. Place in a Freezer Bag: After wrapping, place the scones in a freezer-safe resealable bag or airtight container. Make sure to remove as much air as possible to prevent freezer burn.
4. Label and Date: Label the bag or container with the date you froze the scones. This will help you keep track of their freshness. Scones can be stored in the freezer for up to 3 months.
Freezing Unbaked Scones
If you prefer to bake your scones fresh later, you can freeze them before baking:
1. Shape the Scones: Cut and shape the scones as you would if you were baking them.
2. Freeze on a Baking Sheet: Arrange the unbaked scones on a baking sheet lined with parchment paper, leaving space between them.
3. Freeze Until Solid: Place the sheet in the freezer for about 1-2 hours or until the scones are completely frozen.
4. Transfer to Storage: Once frozen, transfer the scones to a freezer bag or airtight container for longer storage.
5. Bake from Frozen: When you’re ready to bake, you can bake the scones directly from the freezer. Just add 5-10 minutes to the normal baking time.
—
3. Refreshing Stored Scones
If your scones have been stored for a day or two and have become slightly stale or dry, you can easily refresh them before serving:
In the Oven
Preheat your oven to a low temperature of 300°F (150°C). Place the scones on a baking sheet and bake for 5-10 minutes. This will warm them up and restore some of their flakiness. Be sure to watch them carefully to prevent them from overbaking.
In the Microwave
For a quicker option, you can use the microwave. Wrap the scone in a damp paper towel and heat it for 10-15 seconds. The steam will help soften the scone, but it won’t provide the same crispness as the oven. Use this method only if you need the scones quickly.
—
4. How Long Do Scones Stay Fresh?
Room Temperature
Scones are best enjoyed within 1-2 days of baking. After this time, they may start to lose their freshness and become dry. To keep them as fresh as possible, store them in an airtight container at room temperature.
Freezer Storage
As mentioned, scones can be kept frozen for up to 3 months. If you’re freezing unbaked scones, they can stay in the freezer for up to 3 months as well. After baking, you’ll want to use them within a couple of days after thawing for the best taste and texture.
—
Final Thoughts
Proper storage is key to keeping your orange cranberry scones fresh and delicious for as long as possible. Whether you store them at room temperature for a few days or freeze them for longer-term enjoyment, following these tips ensures that you can enjoy fresh scones whenever you crave them. By taking care to store them correctly, you can prevent them from becoming stale and preserve their delightful texture for later enjoyment!