
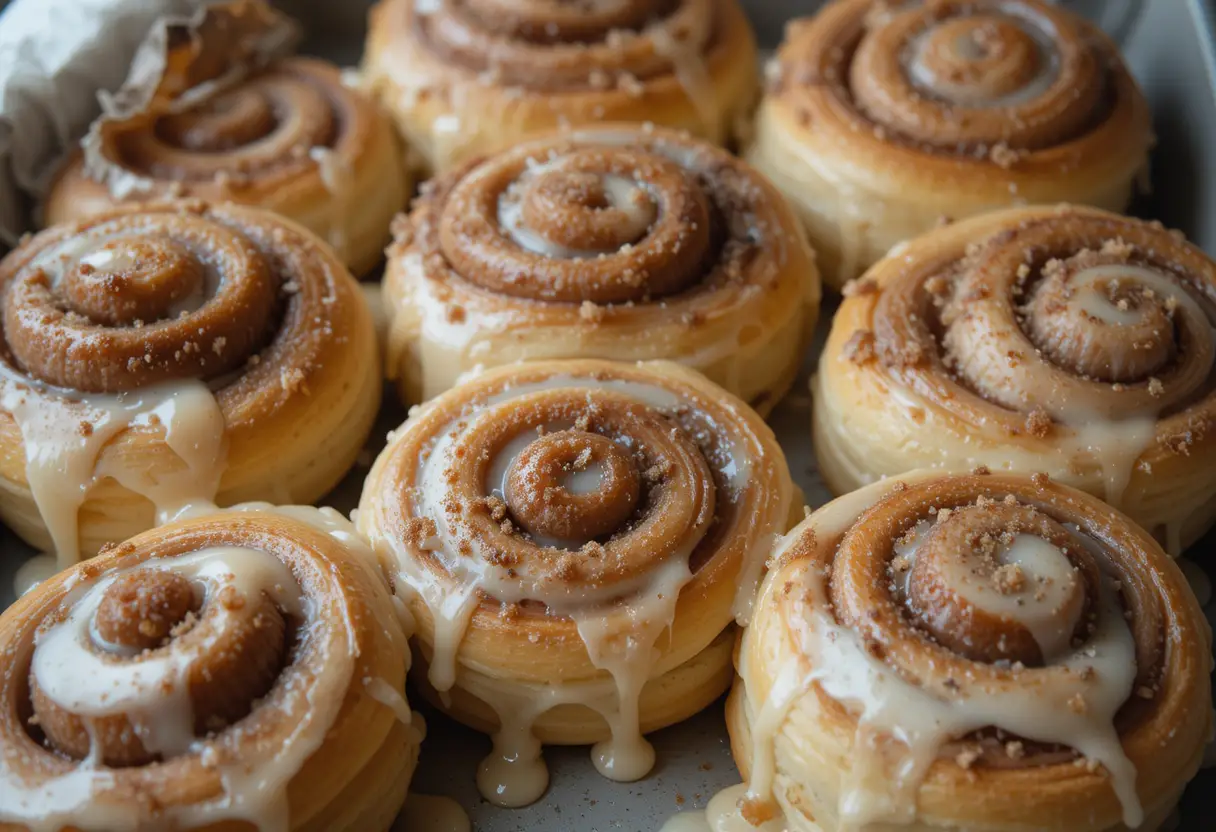
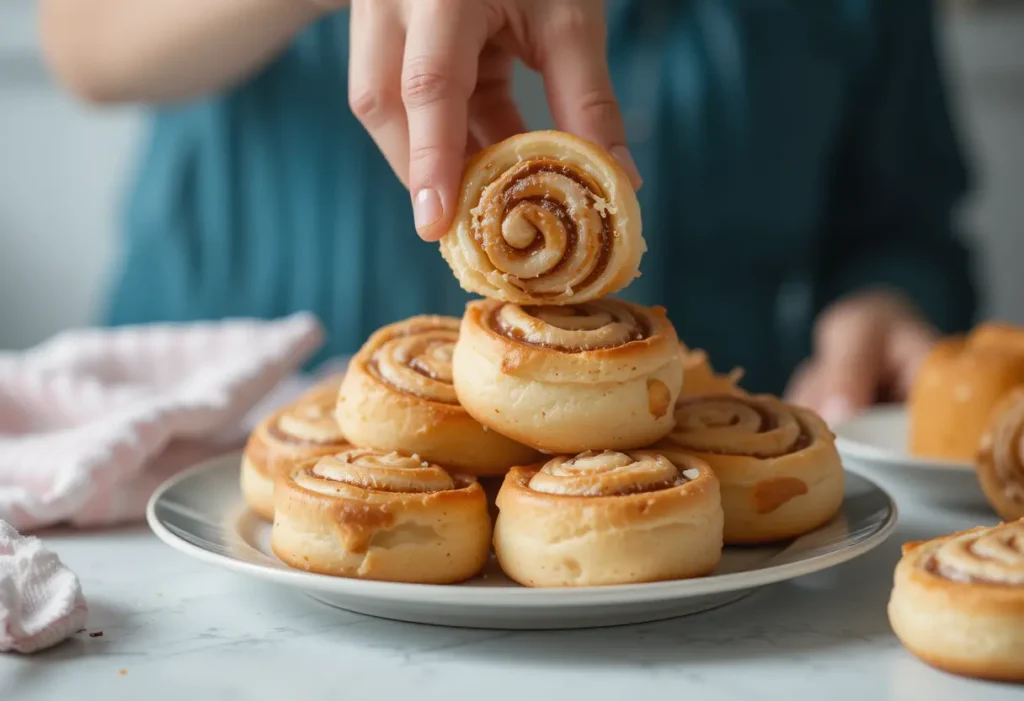
There’s nothing quite like the aroma of freshly baked cinnamon rolls filling your kitchen. Soft, fluffy, and packed with a rich cinnamon-sugar filling, these warm treats are the perfect indulgence for breakfast or dessert. If you’ve ever had a Cinnabon cinnamon roll, you know how irresistibly gooey and flavorful they are—but did you know you can make them at home from scratch?
In this guide, I’ll show you step by step how to recreate the famous Cinnabon experience in your own kitchen. From mixing the perfect dough to achieving that signature cream cheese frosting, you’ll learn all the secrets to making soft, delicious cinnamon rolls that taste just like the ones from your favorite bakery.
Whether you’re a seasoned baker or a beginner, this recipe is easy to follow and guarantees melt-in-your-mouth results. So, grab your ingredients, and let’s get started on making the ultimate homemade Cinnabon-style cinnamon rolls!
Ingredients You’ll Need for the Best Cinnamon Rolls
Essential Dough Ingredients
Making the perfect cinnamon roll dough is all about using the right ingredients in the right proportions. Each component plays a crucial role in achieving that soft, fluffy, and slightly chewy texture that makes Cinnabon-style rolls so irresistible. Let’s take a closer look at the key ingredients and why they matter.
1. All-Purpose Flour: The Foundation of the Dough
Flour provides the structure for your cinnamon rolls. All-purpose flour is the best choice because it has the right balance of protein and starch, ensuring soft yet sturdy rolls. If you prefer a slightly chewier texture, you can substitute a portion of the flour with bread flour, which has a higher protein content.
2. Active Dry Yeast: The Secret to a Fluffy Rise
Yeast is what gives cinnamon rolls their airy, pillowy texture. Active dry yeast needs to be dissolved in warm liquid (usually milk or water) before mixing it into the dough. Alternatively, you can use instant yeast, which can be added directly to the dry ingredients without proofing.
Tips for Working with Yeast:
Ensure the liquid is warm (around 100–110°F or 37–43°C) to activate the yeast. Too hot, and it will kill the yeast; too cold, and it won’t activate.
If using active dry yeast, let it sit in warm milk with a teaspoon of sugar for 5–10 minutes until foamy before adding it to the dough.
3. Sugar: For Sweetness and Yeast Activation
Sugar does more than just sweeten the dough—it also helps feed the yeast, promoting a good rise. Granulated sugar is commonly used, but you can also experiment with honey or maple syrup for a slightly different flavor profile.
4. Butter: Richness and Flavor
Butter adds richness, softness, and a deliciously buttery flavor to the dough. Unsalted butter is preferred, as it allows you to control the salt level in the recipe. Make sure the butter is melted or very soft before mixing it into the dough for even distribution.
5. Milk: For Moisture and Tenderness
Using whole milk in the dough creates a tender and rich texture. The fat content in milk enhances the flavor and ensures the rolls stay soft longer. If you want an even richer dough, you can use half-and-half or heavy cream instead of milk.
Dairy-Free Option:
If you’re lactose-intolerant or prefer a dairy-free version, substitute whole milk with almond milk, oat milk, or coconut milk.
6. Eggs: Adding Structure and Softness
Eggs contribute to the structure of the dough while keeping it tender and fluffy. They help bind the ingredients together and enhance the overall richness. Make sure your eggs are at room temperature before mixing them in, as this helps with even incorporation into the dough.
7. Salt: Balancing the Flavors
Salt is essential in baking because it enhances the flavors and balances the sweetness. Without salt, the dough can taste bland. Use fine sea salt or kosher salt for the best distribution.
8. Warm Water: Activating the Yeast (Optional)
Some recipes call for a small amount of warm water to help activate the yeast, especially if using active dry yeast. If your recipe already includes warm milk, you may not need additional water.
Bringing It All Together
Each of these ingredients plays a specific role in creating the perfect cinnamon roll dough. The key to success is using fresh, high-quality ingredients and following proper mixing and proofing techniques. Once you have the dough ready, it’s time to move on to rolling, filling, and shaping your cinnamon rolls for baking!
Filling Ingredients: The Secret to Irresistibly Gooey Cinnamon Rolls
The filling is what gives cinnamon rolls their signature warm, sweet, and slightly caramelized flavor. A perfect filling should be rich, buttery, and packed with a deep cinnamon aroma. Let’s break down the essential ingredients and how they contribute to the irresistible taste of homemade Cinnabon-style cinnamon rolls.
1. Brown Sugar: The Key to a Deep, Caramelized Flavor
Brown sugar is the main ingredient in the filling, providing sweetness and a rich, molasses-like depth of flavor. It melts beautifully as the rolls bake, creating that signature gooey texture inside.
Which type of brown sugar is best?
Light brown sugar has a mild molasses flavor and is most commonly used.
Dark brown sugar contains more molasses, making the filling even richer and slightly stickier.
If you want the closest match to Cinnabon’s filling, opt for dark brown sugar to enhance the caramelization.
2. Ground Cinnamon: The Star of the Show
Cinnamon is the most important spice in cinnamon rolls, giving them their classic warm and comforting taste. Cinnabon uses Makara cinnamon, which is a specific type known for its intense, sweet-spicy aroma. While you may not have access to Makara cinnamon, you can use Ceylon cinnamon (milder, more delicate) or Cassia cinnamon (stronger, spicier) to get a similar effect.
Tips for the Best Cinnamon Flavor:
Always use fresh ground cinnamon for the best aroma and taste. Old, stale cinnamon loses its potency.
If you love a strong cinnamon flavor, you can increase the amount slightly in your filling.
3. Unsalted Butter: Creating a Rich, Buttery Filling
Butter acts as the glue that holds the cinnamon-sugar mixture together. It helps the sugar melt into a caramel-like consistency while keeping the filling moist and flavorful.
How to use butter in the filling:
Softened butter: For a spreadable, even layer that coats the dough perfectly.
Melted butter: This allows the sugar and cinnamon to blend more smoothly, but it can sometimes cause the filling to ooze out too much during baking.
For the most authentic Cinnabon-style texture, spread softened butter over the dough before sprinkling the sugar-cinnamon mixture. This ensures even coverage and helps the flavors infuse properly.
4. (Optional) Cornstarch: Preventing a Runny Filling
If you’ve ever had cinnamon rolls where the filling leaked out too much while baking, adding a teaspoon of cornstarch to the sugar-cinnamon mixture can help. It absorbs excess moisture, keeping the filling thick and gooey instead of runny.
5. (Optional) Vanilla Extract: Enhancing the Flavor
A small amount of pure vanilla extract can take your filling to the next level by adding warmth and depth to the sweetness. If you want an extra flavor boost, mix ½ to 1 teaspoon of vanilla extract into the softened butter before spreading it onto the dough.
6. (Optional) Nuts or Raisins: Adding Extra Texture (Customizable)
While traditional Cinnabon rolls don’t include nuts or raisins, some people love the added crunch and chewiness. If you’d like to customize your filling, try these additions:
Chopped pecans or walnuts – Add a crunchy contrast to the soft dough.
Golden or regular raisins – Provide a natural sweetness and chewy texture.
To prevent dried fruit from becoming too hard during baking, soak raisins in warm water or orange juice for 10 minutes before adding them to the filling.
How to Assemble the Filling for the Best Flavor
1. Spread softened butter evenly over the rolled-out dough, making sure to coat every corner.
2. Mix brown sugar and cinnamon (and optional cornstarch) in a bowl, then sprinkle it evenly over the buttered dough.
3. Press the sugar mixture lightly into the dough so it sticks and doesn’t fall out when rolling.
4. Roll the dough tightly to keep the filling inside and ensure even layers in each roll.
By using high-quality ingredients and the right techniques, your cinnamon roll filling will turn out rich, gooey, and bursting with flavor—just like the famous Cinnabon rolls!
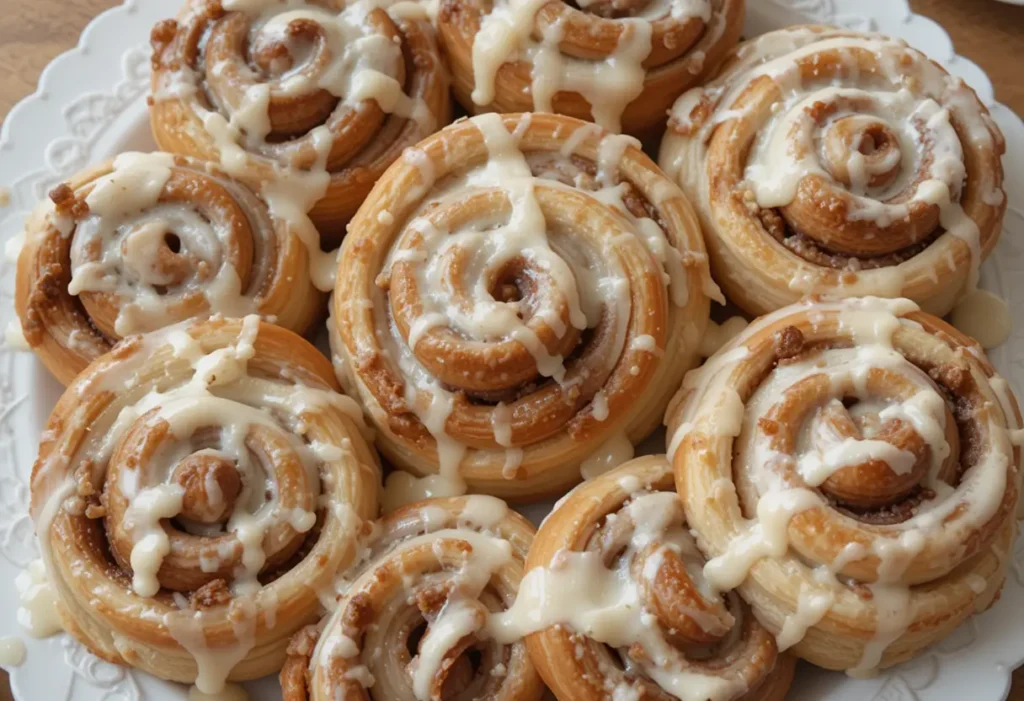
Cream Cheese Frosting Ingredients: The Perfect Finishing Touch
No Cinnabon-style cinnamon roll is complete without its signature thick, creamy, and slightly tangy cream cheese frosting. This luscious topping melts beautifully over the warm rolls, seeping into every layer and adding the perfect balance of sweetness and richness.
Let’s break down the key ingredients that make this frosting so irresistible and how each one contributes to its silky-smooth texture and delicious flavor.
—
1. Cream Cheese: The Star of the Frosting
Cream cheese gives this frosting its signature tangy, creamy texture. It balances out the sweetness from the cinnamon rolls and adds depth to the overall flavor.
What type of cream cheese is best?
Full-fat cream cheese: For the richest, creamiest frosting.
Reduced-fat cream cheese: Can be used, but the texture will be slightly less smooth.
Whipped cream cheese: Not recommended, as it contains too much air and won’t blend as well.
✅ Tip: Always use room temperature cream cheese to avoid lumps and ensure smooth blending.
—
2. Unsalted Butter: For a Velvety Texture
Butter adds richness and helps create a creamy, spreadable consistency. It also enhances the overall flavor, making the frosting smooth and luxurious.
Best way to use butter in frosting:
Use softened butter (room temperature) for easier mixing.
If you want a slightly thicker frosting, reduce the butter slightly.
If you prefer a thinner, more glaze-like consistency, add a little extra butter or milk.
✅ Tip: Using unsalted butter allows you to control the saltiness of the frosting. If you only have salted butter, reduce the added salt in the recipe.
—
3. Powdered Sugar: For Sweetness and Structure
Also known as confectioners’ sugar, powdered sugar is used instead of granulated sugar because it dissolves easily, creating a smooth, lump-free frosting.
How much powdered sugar should you use?
For a thicker frosting: Use more powdered sugar.
For a softer, glaze-like consistency: Use less powdered sugar and add a splash of milk.
✅ Tip: Sift the powdered sugar before mixing to prevent lumps and achieve the smoothest texture.
—
4. Vanilla Extract: Enhancing the Flavor
Vanilla extract rounds out the flavors, adding warmth and depth to the frosting. It complements both the tangy cream cheese and the sweet cinnamon rolls perfectly.
Best options for vanilla flavoring:
Pure vanilla extract: Best for rich and natural vanilla flavor.
Vanilla bean paste: Adds stronger vanilla flavor with visible vanilla specks.
Artificial vanilla extract: Works in a pinch, but the flavor won’t be as deep.
✅ Tip: If you love a richer, bakery-style frosting, use Mexican vanilla extract for a slightly bolder taste.
—
5. Milk or Heavy Cream: Adjusting the Consistency
A small amount of liquid is sometimes added to make the frosting easier to spread or drizzle.
What type of liquid should you use?
Milk (Whole or 2%) – Thins the frosting while keeping it light.
Heavy Cream – Makes the frosting extra creamy and rich.
Half-and-Half – A good middle ground between milk and heavy cream.
✅ Tip: Add liquid one teaspoon at a time to avoid making the frosting too runny.
—
6. (Optional) A Pinch of Salt: Balancing the Sweetness
Adding a tiny pinch of salt (about ⅛ teaspoon) can help balance the sweetness and enhance the overall flavor of the frosting.
—
How to Make the Perfect Cream Cheese Frosting
1. Beat softened butter and cream cheese together until smooth and fluffy.
2. Gradually add powdered sugar, mixing well after each addition.
3. Pour in vanilla extract and mix to combine.
4. Adjust the consistency by adding a splash of milk or heavy cream if needed.
5. Spread over warm cinnamon rolls so it slightly melts into the layers for maximum gooeyness!
—
Bonus: Customizing Your Cream Cheese Frosting
Want to switch things up? Try these variations:
Maple Cream Cheese Frosting: Add 1-2 tablespoons of maple syrup for a warm, caramelized flavor.
Lemon Cream Cheese Frosting: Add ½ teaspoon of lemon zest for a bright, tangy twist.
Chocolate Cream Cheese Frosting: Mix in 1-2 tablespoons of cocoa powder for a chocolatey touch.
—
With the perfect balance of tangy, sweet, and creamy, this cream cheese frosting is what makes Cinnabon-style cinnamon rolls truly indulgent. Whether you like it thick and spreadable or soft and melty, this frosting will take your homemade cinnamon rolls to the next level!
How to Make the Perfect Cinnamon Roll Dough
Activating the Yeast for a Fluffy Dough
Yeast is the key ingredient that gives cinnamon rolls their light, airy texture. Properly activating the yeast ensures that your dough rises well, resulting in soft and fluffy cinnamon rolls just like Cinnabon’s. This step is crucial because if the yeast isn’t activated correctly, the dough may not rise properly, leading to dense or flat rolls.
—
What Type of Yeast Should You Use?
There are two main types of yeast used in baking cinnamon rolls:
1. Active Dry Yeast:
Requires proofing (activation) in warm liquid before being added to the dough.
Takes slightly longer to rise but results in a more developed flavor.
Ideal if you want a more traditional baking approach.
2. Instant Yeast (Rapid Rise Yeast):
Can be mixed directly into the flour without proofing.
Works faster than active dry yeast, reducing the rise time.
A great option for beginners or those who want quicker results.
✅ Which One is Better?
Both types work well, but active dry yeast is recommended for achieving the best flavor and texture. If using instant yeast, you can skip the proofing step, but allowing it to bloom in warm liquid still helps ensure it’s active.
—
How to Activate Yeast for the Best Dough Rise
Step 1: Warm the Liquid
Yeast needs warmth to activate. Use warm milk or water (depending on your recipe) at the right temperature:
Ideal temperature: 100°F to 110°F (37°C to 43°C)
If the liquid is too hot (above 120°F/49°C), it will kill the yeast.
If the liquid is too cold (below 95°F/35°C), the yeast won’t activate properly.
✅ Tip: If you don’t have a thermometer, test the temperature by dipping a clean finger into the liquid. It should feel warm but not hot.
—
Step 2: Add Sugar to Feed the Yeast
Yeast needs a food source to begin fermentation. Adding a teaspoon of granulated sugar or honey helps kickstart the process by feeding the yeast. Even if your recipe doesn’t call for sugar in the yeast activation step, adding a small amount can speed up the process and ensure better activation.
✅ Tip: If using brown sugar or honey, it will work the same way as white sugar.
—
Step 3: Add the Yeast and Let It Bloom
Sprinkle one packet (or the amount specified in your recipe) of active dry yeast over the warm liquid.
Let it sit undisturbed for 5–10 minutes.
The yeast should start foaming and bubbling—this means it’s alive and ready to be used.
✅ What if there’s no foam?
If the mixture remains flat with no bubbles or froth, the yeast might be dead due to:
1. Expired yeast – Always check the expiration date before using.
2. Water too hot – It may have killed the yeast. Try again with cooler liquid.
3. Water too cold – The yeast didn’t activate. Try again with slightly warmer liquid.
—
Step 4: Stir and Use in the Dough
Once the yeast is foamy, give it a gentle stir and incorporate it into your dough mixture. At this point, the yeast is fully activated and will begin working to help the dough rise.
✅ Tip: If using instant yeast, you can still do this step for extra assurance, but it’s not required.
—
Troubleshooting Common Yeast Activation Problems
—
Why Proper Yeast Activation is Important
When yeast is activated correctly, it produces carbon dioxide, which creates air pockets in the dough, leading to a light and fluffy texture. If the yeast isn’t activated properly, the rolls will turn out dense and heavy instead of soft and airy.
By following these steps carefully, you’ll ensure that your cinnamon roll dough rises perfectly, creating bakery-style rolls with a pillowy texture.
Mixing and Kneading the Dough: The Secret to Soft and Fluffy Cinnamon Rolls
Once your yeast is activated, the next crucial step in making perfect cinnamon rolls is mixing and kneading the dough properly. This process develops the gluten structure, which gives the dough its elasticity and chewiness while ensuring a light and airy texture. Poor mixing or kneading can lead to tough or dense rolls, so it’s important to get this step right.
—
Step 1: Combining the Ingredients
Before kneading, you need to properly mix the ingredients to form a smooth, well-hydrated dough.
1. Mixing the Wet Ingredients
Start by combining the following in a large mixing bowl:
✔️ Activated yeast mixture (warm milk, yeast, and sugar)
✔️ Eggs (room temperature for better mixing)
✔️ Melted butter (adds richness and softness)
✔️ Vanilla extract (for extra flavor)
✅ Tip: If you want extra soft cinnamon rolls, use buttermilk instead of regular milk—it helps break down gluten, resulting in a more tender dough.
—
2. Adding the Dry Ingredients
Gradually add the following dry ingredients to the wet mixture:
✔️ All-purpose or bread flour – Provides structure
✔️ Salt – Enhances flavor and strengthens gluten development
✔️ Sugar – Adds a touch of sweetness
How to add the flour:
Start with half the flour and mix with a spatula or dough hook (if using a stand mixer).
Slowly add the rest of the flour 1 cup at a time until a shaggy dough forms.
The dough should be soft and slightly sticky but not overly wet.
✅ Tip: Too much flour can make the dough dry and tough. If your dough feels too stiff, add 1 tablespoon of warm milk at a time until it softens.
—
Step 2: Kneading the Dough for the Perfect Texture
Kneading is essential for developing gluten, the protein network that gives the dough elasticity and strength. Properly kneaded dough will be soft, smooth, and slightly tacky.
Kneading by Hand (10–12 minutes)
1. Lightly flour your work surface to prevent sticking.
2. Place the dough on the surface and press it down and away with the heel of your hand.
3. Fold the dough over itself and rotate it slightly.
4. Repeat this process for 10–12 minutes until the dough becomes smooth and elastic.
✅ Tip: If the dough sticks too much, add a small amount of flour, but don’t overdo it! Adding too much can make the rolls dense.
—
Kneading with a Stand Mixer (5–7 minutes)
If using a stand mixer, attach the dough hook and mix on medium speed. Knead for 5–7 minutes, stopping occasionally to scrape down the sides.
✅ How to tell when the dough is properly kneaded:
It should be smooth and elastic.
If you press it with your finger, it should slowly spring back.
If you stretch a small piece, it should create a thin, see-through “windowpane” without tearing (this means gluten is fully developed).
—
Step 3: First Rise (Proofing the Dough)
Once kneaded, the dough needs time to rise and develop air pockets, making the cinnamon rolls light and fluffy.
1. Lightly grease a bowl with oil or butter.
2. Place the dough inside and cover with plastic wrap or a damp towel.
3. Let it rise in a warm place (around 75–85°F or 24–29°C) for 1 to 1.5 hours, or until doubled in size.
✅ Troubleshooting:
Dough isn’t rising? Check that your yeast was properly activated and your kitchen isn’t too cold.
Rising too fast? If your kitchen is too warm, the dough may over-proof, leading to a weaker structure.
—
Why Mixing and Kneading Matter for Fluffy Cinnamon Rolls
✔️ Proper mixing ensures ingredients are evenly distributed.
✔️ Kneading develops gluten, making the dough strong but soft.
✔️ A good first rise ensures the rolls will be light, fluffy, and airy.
By following these steps, you’ll create the perfect cinnamon roll dough—smooth, elastic, and ready to be rolled out and filled with delicious cinnamon-sugar goodness!
Proofing: The Key to Light and Fluffy Cinnamon Rolls
Proofing (or fermenting) is the process of allowing the dough to rise after kneading, giving the yeast time to create air pockets that make the cinnamon rolls soft, pillowy, and airy. This is a crucial step—rushing or skipping it can lead to dense, tough rolls instead of the light and fluffy texture you’re aiming for.
In this section, we’ll cover the different stages of proofing, how to create the perfect proofing environment, and troubleshooting tips for achieving the best rise.
—
Step 1: The First Proof (Bulk Fermentation)
After kneading, the dough needs time to rise and develop gluten strength. This step allows the yeast to produce carbon dioxide, causing the dough to expand.
How to Proof the Dough Properly
1. Grease a large mixing bowl with a thin layer of oil or butter.
2. Place the dough in the bowl and cover it with plastic wrap or a damp towel to prevent drying.
3. Let it rise in a warm place for 1 to 1.5 hours, or until doubled in size.
✅ Ideal Proofing Conditions:
Temperature: 75–85°F (24–29°C)
Humidity: Covering the bowl helps trap moisture, preventing the dough from drying out.
✅ Where to Proof the Dough:
Inside the oven (turned off) with the light on – The oven light creates gentle warmth, perfect for proofing.
Near a warm window or sunny spot – A natural, cozy environment for yeast activity.
On the stovetop (if the oven is preheating for another recipe) – The residual heat helps maintain the right temperature.
✅ How to Know When the Dough is Fully Proofed:
The dough should be visibly puffy and doubled in size.
Gently press a finger into the dough:
If the indentation springs back slowly, it’s ready.
If it bounces back quickly, it needs more time.
If it doesn’t spring back at all, the dough may be over-proofed.
—
Step 2: Shaping the Cinnamon Rolls
After the first proof, the dough is punched down to release excess gas and then rolled out, filled with cinnamon-sugar filling, and shaped into rolls. Once shaped, they need a second proofing before baking.
—
Step 3: The Second Proof (Final Rise Before Baking)
The second proof is essential for achieving extra fluffy cinnamon rolls. This step allows the dough to relax, expand, and become light and airy before baking.
How to Proof Shaped Cinnamon Rolls:
1. Place the shaped rolls in a greased baking dish, spacing them slightly apart (they will expand).
2. Cover them loosely with plastic wrap or a towel.
3. Let them rise for 30–45 minutes, or until they appear puffy and nearly doubled in size.
✅ Signs That Rolls Are Ready to Bake:
They have expanded and are slightly touching each other.
When gently pressed, the dough springs back slowly.
✅ What Happens If You Over-Proof?
Rolls may collapse in the oven.
They could have a strong yeasty taste due to excessive fermentation.
—
Overnight Proofing: A Make-Ahead Option
Want fresh cinnamon rolls in the morning without the long wait? You can proof the rolls overnight in the fridge for an even better flavor and texture.
How to Do an Overnight Proof:
1. After shaping the rolls, place them in the baking dish.
2. Cover tightly with plastic wrap and refrigerate for 8–12 hours.
3. The next morning, let them sit at room temperature for 30–45 minutes before baking.
✅ Why Choose Overnight Proofing?
Slower fermentation develops deeper flavor.
Convenient for busy mornings—just bake and enjoy!
—
Troubleshooting Proofing Issues
—
Why Proper Proofing is Essential for Cinnabon-Style Rolls
✔️ Creates the light, airy texture cinnamon rolls are known for.
✔️ Allows gluten to relax, making rolls soft and tender.
✔️ Enhances flavor development, making the rolls taste better.
By taking the time to proof the dough correctly, you’ll ensure that your cinnamon rolls turn out perfectly soft, fluffy, and bakery-quality every time!
Rolling, Filling, and Shaping the Cinnamon Rolls
Rolling the Dough to the Right Thickness: Perfectly Shaped Cinnamon Rolls
Once your dough has undergone its first rise, it’s time to move on to the rolling process, which is critical for achieving the right size and texture of your cinnamon rolls. Rolling the dough to the correct thickness is key because it ensures an even distribution of filling and helps the rolls maintain a consistent shape while baking.
In this section, we’ll explore the best practices for rolling the dough and tips to ensure your cinnamon rolls turn out perfectly swirled, with just the right amount of cinnamon filling inside each one.
—
Step 1: Prepare Your Work Surface
Before rolling out your dough, ensure your work surface is clean and lightly floured. This will prevent the dough from sticking while you roll it out, giving you a smoother and more controlled process.
Flour the Surface Lightly
Sprinkle a small amount of all-purpose flour on your countertop or work surface.
Use your hands or a dough scraper to spread the flour evenly.
Be careful not to use too much flour—too much flour can result in a dry dough. Use just enough to keep the dough from sticking.
✅ Tip: You can also use parchment paper if you prefer to roll the dough on a non-stick surface. It helps with cleanup and keeps the dough in place.
—
Step 2: Rolling the Dough
Once the dough is ready to be rolled out, you’ll want to shape it into a rectangle. The goal is to roll it evenly without squeezing out the air pockets that make the rolls soft and fluffy.
How to Roll the Dough Evenly
1. Flatten the dough gently with your hands to form a rough rectangle.
2. Start rolling from the center using a rolling pin. Roll outward while applying even pressure to avoid uneven thickness.
3. Rotate the dough as you go, and roll in both directions to form a rectangle about 16 inches by 10 inches in size.
4. Keep the edges straight and tidy, and ensure the dough is rolled out evenly.
✅ Tip: If the dough resists or shrinks back, it means the gluten has relaxed too much. Let it rest for a few minutes before continuing to roll—it will become more pliable.
—
Step 3: The Right Dough Thickness
The thickness of the dough will impact the final texture and the number of layers in each cinnamon roll.
How Thick Should the Dough Be?
Aim for about ¼ inch thick when rolling out the dough. This thickness ensures that each cinnamon roll will have multiple layers of dough and filling, which will bake up tender and fluffy.
Thicker dough may result in larger rolls with fewer layers, but they could be denser.
Thinner dough (under ¼ inch) might result in smaller rolls that are less soft and more compact.
✅ Tip: If you roll the dough too thin, it could tear when you’re ready to slice it into individual rolls, leading to uneven shapes.
—
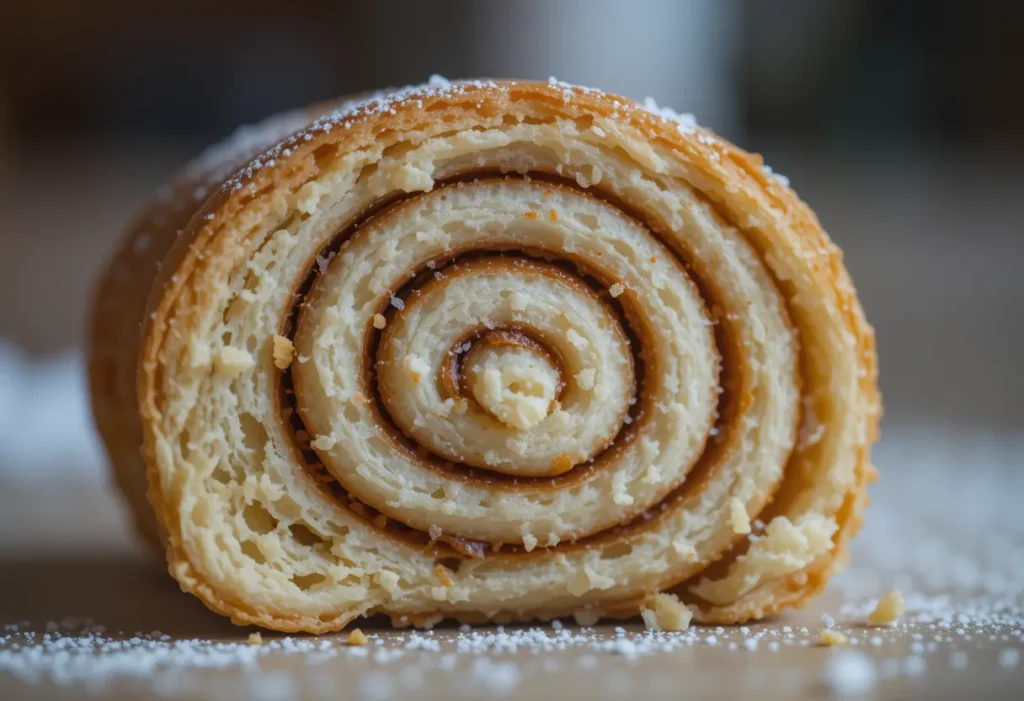
Step 4: Shaping the Dough into a Log
Once the dough is rolled out to the right thickness, it’s time to fill it with the cinnamon-sugar filling and roll it into a log. This step requires a bit of care to ensure that the dough is rolled up evenly without tearing.
How to Roll the Dough
1. Spread the cinnamon-sugar filling evenly over the entire surface of the dough, leaving about ½ inch border along the edges.
2. Starting at one long side of the dough, gently roll the dough into a tight log, making sure the filling stays in place.
3. As you roll, keep the log tight but not too tight—this allows the dough to expand and create fluffy layers.
—
Step 5: Cutting the Cinnamon Rolls
After rolling the dough into a log, it’s time to slice it into individual rolls. Proper slicing is essential for ensuring that each roll maintains its shape and layering.
How to Slice the Dough Evenly
1. Use a sharp serrated knife or dental floss (unflavored) to cut the log into individual rolls.
2. Cut the dough into 12 to 14 rolls, depending on how large you want each roll.
3. Slice gently, ensuring the rolls don’t get squished or lose their shape.
4. When using dental floss, slide the floss underneath the dough log, bring the ends together, and pull tightly to create a clean slice.
✅ Tip: Don’t use a regular knife that can flatten the rolls—dental floss or a serrated knife provides a cleaner cut without squishing the dough.
—
Why Rolling the Dough to the Right Thickness Matters
✔️ Even distribution of filling – Rolling the dough to the right thickness ensures that the cinnamon-sugar filling is evenly distributed throughout each roll, so every bite is packed with flavor.
✔️ Multiple layers – The right dough thickness allows for many layers to form as the dough rises, creating a flaky and tender texture.
✔️ Perfect shape – Consistent rolling results in evenly shaped rolls that bake uniformly.
—
By paying attention to the thickness of your dough, you’ll create beautifully layered, tender cinnamon rolls with the perfect balance of fluffiness and cinnamon flavor.
Spreading the Cinnamon Sugar Filling Evenly: The Secret to Delicious Swirls
The cinnamon sugar filling is one of the defining features of cinnamon rolls—it’s what gives them that irresistible flavor and makes each bite a perfect mix of soft dough and spiced sweetness. However, spreading the filling evenly is crucial for achieving the classic swirl pattern and ensuring that every roll is packed with flavor. An uneven spread can result in dry spots or over-sweetened sections that disrupt the balance of taste and texture.
In this section, we’ll break down the steps to ensure your cinnamon sugar filling is evenly distributed, creating rolls that are as delicious as they are beautiful.
—
Step 1: Prepare the Cinnamon Sugar Mixture
Before you can spread the filling, you need to prepare it. The classic cinnamon sugar filling is simple to make, but it’s important to get the right proportions to achieve that sweet, spicy flavor that pairs so well with soft, fluffy dough.
How to Make the Cinnamon Sugar Filling
1. Combine the dry ingredients:
Sugar: Typically, granulated sugar is used, though some recipes call for a mix of brown sugar for a deeper flavor.
Cinnamon: Use ground cinnamon for a smooth, even spread. Be sure to measure carefully to avoid clumping.
2. Add softened butter:
The butter is what allows the cinnamon-sugar mixture to stick to the dough and gives the rolls their rich, gooey texture.
Softened butter (not melted) is best for spreading. If it’s too hard, it won’t spread evenly, and if it’s too melted, it can make the filling runny and uneven.
Classic Cinnamon Sugar Filling Recipe
1/2 cup granulated sugar (or 1/4 cup brown sugar, if preferred)
2 tablespoons ground cinnamon
1/2 cup unsalted butter, softened
—
Step 2: Spread the Filling Evenly
Once your cinnamon sugar mixture is ready, it’s time to spread it over the rolled-out dough. This step requires a bit of care to ensure the filling stays even and doesn’t end up in clumps.
How to Apply the Cinnamon Sugar Filling
1. Start from the center of the dough:
Begin by placing small dollops of the cinnamon sugar filling in the center of the dough. This allows you to gradually spread it out to the edges without making a mess.
2. Use a spatula or the back of a spoon:
Gently spread the filling toward the edges of the dough. Apply even pressure as you spread, ensuring that it covers the entire surface.
Make sure to leave about 1/2-inch border around the edges of the dough to prevent the filling from spilling out when you roll it up.
3. Avoid overloading:
If you apply too much filling, it can make the rolls too sticky or even cause them to leak filling during baking. Aim for a thin, even layer.
Tip for Even Coverage
If the butter has softened but is too firm to spread easily, you can use your fingers or a silicone spatula to gently massage the filling into the dough for smoother coverage. Take your time to ensure no gaps or clumps form in the filling.
—
Step 3: The Right Amount of Filling
You want enough filling to create a flavorful cinnamon swirl but not so much that it makes the dough soggy or overpowers the dough’s natural taste. Even distribution is key to ensuring each cinnamon roll has a balanced amount of filling in every bite.
How Much Filling Should You Use?
1/2 cup of butter and 1/2 cup of sugar should be enough to cover a typical 16×10-inch sheet of dough (the standard size for most cinnamon roll recipes).
Less filling can be used for a lighter swirl, while more can give a richer, denser flavor, but remember that too much can make the dough soggy.
Tip for More Even Rolls
If you find that the filling is pooling in certain spots or slipping out during rolling, it’s a sign you might have used too much butter. In this case, try using a bit less next time or allow the dough to chill slightly to firm it up before spreading the filling.
—
Step 4: Spreading the Filling Along the Edges
The edges of the dough often get neglected when spreading the cinnamon sugar filling, but they’re just as important! To ensure an even flavor in every bite, make sure the filling is spread all the way to the edges of the dough.
How to Reach the Edges
Use your spatula or spoon to gently pull the filling out toward the edges of the dough. Don’t rush—work slowly to ensure the filling is evenly spread.
Avoid over-spreading the filling onto the edges—too much butter or sugar on the edges can cause the filling to leak out when the dough is rolled.
—
Step 5: Tips for a Perfect Swirl
Once you’ve evenly spread the cinnamon sugar filling, the next challenge is making sure the rolls retain their perfect swirl when you cut them. The evenness of the filling plays a huge role in this!
How to Keep the Swirl Consistent
1. Roll the dough gently but tightly: When rolling up the dough, make sure it’s rolled firmly but not overly tight. The cinnamon filling will create distinct layers, and the tighter the roll, the more distinct each swirl will be.
2. Use a serrated knife or dental floss to slice the rolls. A sharp, serrated knife will make a clean cut through the rolled dough without squeezing out the filling. If you use dental floss, pull the floss tightly across the dough to ensure a clean cut.
—
Why Evenly Spreading the Cinnamon Sugar Filling Matters
✔️ Even flavor distribution – Ensures each bite of cinnamon roll is equally sweet and spicy.
✔️ Perfectly defined swirls – Helps create that irresistible spiral pattern in every roll.
✔️ No soggy spots – Ensures that the dough isn’t overly soaked with butter, which can lead to an uneven texture or soggy rolls.
By following these steps, you’ll achieve beautiful, perfectly swirled cinnamon rolls with a delicious balance of cinnamon sugar filling in every bite!
Cutting and Arranging the Rolls for Baking: Ensuring Perfectly Shaped, Evenly Baked Cinnamon Rolls
Once you’ve rolled up your dough and spread the cinnamon sugar filling evenly, the next step is to cut the dough into individual rolls and arrange them in your baking dish. How you cut and arrange the rolls is just as important as the rolling and filling stages because it directly affects the shape, texture, and baking outcome of your cinnamon rolls.
In this section, we’ll go through the steps to cut your cinnamon rolls neatly and arrange them properly for baking so they bake evenly and rise beautifully.
—
Step 1: Choosing the Right Tool for Cutting the Rolls
When it comes to cutting the rolled-up dough into individual rolls, the tool you use matters. The wrong tool can cause the rolls to lose their shape or disrupt the filling.
Best Tools for Cutting Cinnamon Rolls
Serrated Knife: A sharp serrated knife works best for slicing through the rolled dough without squishing it. The teeth of the knife help gently cut through the dough while keeping the layers intact.
Dental Floss: Unflavored dental floss is another fantastic option for cutting cinnamon rolls. It slices cleanly through the dough without compressing or squashing it, leaving the rolls with a perfect round shape. Simply slide the floss underneath the dough log, cross the ends, and pull tightly to make a clean cut.
Sharp Chef’s Knife: While not as ideal as a serrated knife or floss, a sharp chef’s knife can also work if used carefully. Just be sure to slice gently without pressing down too hard.
—
Step 2: Slicing the Dough Into Rolls
The next important step is to slice the dough into individual rolls. Properly slicing the dough ensures that each roll has the right amount of filling and rises evenly.
How to Slice the Dough Evenly
1. Measure the Dough: You should aim for around 12-14 rolls from a standard-sized batch. If you prefer larger rolls, you can make fewer, but typically, 12 is a good number for even baking.
2. Make Cuts with Precision:
If using a serrated knife: Hold the knife at a slight angle, and gently saw through the dough without applying too much pressure.
If using dental floss: After placing the floss underneath the dough, pull tightly and cross the ends to slice through, keeping the roll as intact as possible.
3. Try to Keep the Rolls Even: Aim for uniform-sized rolls so that they all bake evenly. Uneven sizes can cause some rolls to bake faster than others, leading to inconsistencies in texture and flavor.
Tip: If the dough is sticking to the knife or floss, you can lightly flour the knife or floss to prevent this. Avoid using too much flour, as this can affect the dough’s texture.
—
Step 3: Arranging the Rolls in the Baking Dish
Now that your cinnamon rolls are sliced, the next step is arranging them in the baking dish. How you place the rolls is critical for their rise and final shape.
How to Arrange the Rolls for Optimal Baking
1. Choose the Right Baking Dish: A 9×13-inch pan is ideal for a standard batch of cinnamon rolls. If you prefer smaller, more individual rolls, you can use a slightly smaller pan or even a circular cake pan. The key is ensuring that the rolls fit snugly in the pan.
2. Place Rolls Close Together: Arrange the rolls so that they touch each other or are slightly spaced apart. This is important because cinnamon rolls rise best when they are crowded together. The rolls will rise more evenly, and the edges will bake up soft and tender instead of dry.
3. Leave Room for Expansion: While you want the rolls to be close, they should still have enough space to expand during baking. If they’re packed too tightly, they might not rise properly. You can use a gentle touch to spread the rolls out slightly if they’re too crowded.
Tip for Even Arrangement: Arrange the rolls in a way that exposes the cinnamon swirls on top. This not only helps with the visual appeal but also allows for even baking of the cinnamon filling. If any rolls are unevenly shaped, you can use your fingers to gently reshape them as needed.
—
Step 4: Preparing for the Final Rise
Once the rolls are arranged in the baking dish, it’s time to let them go through their final rise before baking. This step ensures they bake up light and fluffy.
How to Let the Rolls Rise
1. Cover the Rolls: Lightly cover the rolls with plastic wrap or a damp towel. This keeps the dough warm and prevents it from drying out.
2. Let Them Rise: Allow the rolls to rise for about 30 to 45 minutes, or until they’ve doubled in size and are lightly touching each other. This gives the yeast time to work its magic, ensuring a fluffy, airy texture.
3. Check the Rolls: Gently press your finger into the dough. If it leaves a slight indentation that doesn’t spring back immediately, it’s ready to bake.
Tip for Faster Proofing: If you’re in a rush, you can warm up your oven to 200°F (93°C) for about 5 minutes, then turn it off and place the covered rolls inside to rise more quickly. This trick provides a warm, cozy environment for the yeast to work efficiently.
—
Step 5: Troubleshooting Common Issues During Cutting and Arranging
Sometimes, things don’t go as planned during the cutting or arranging process. Here are a few common issues and how to fix them:
—
Why Proper Cutting and Arranging Matters
✔️ Even rise – Proper arrangement ensures that the rolls rise uniformly, leading to a soft, airy texture.
✔️ Consistent shape – Evenly sized rolls that are properly spaced bake up with neat, distinct swirls.
✔️ Golden, soft edges – By placing the rolls close together, the edges bake up tender instead of overcooked or dry.
With these steps, you’ll have perfectly arranged cinnamon rolls that bake up evenly and beautifully. Are you ready to move on to baking your cinnamon rolls?
Baking Your Cinnamon Rolls to Perfection
Best Oven Temperature and Baking Time: Achieving Perfectly Baked Cinnamon Rolls
The baking process is a critical step in making cinnamon rolls that are soft, golden, and delicious. The right oven temperature and baking time ensure that your rolls bake evenly, rise to perfection, and achieve that beautiful golden-brown crust without becoming dry or overcooked. In this section, we’ll dive into the ideal oven temperature and baking time, along with tips to make sure your rolls come out fluffy and tender on the inside and crispy on the outside.
—
Step 1: Preheating the Oven to the Perfect Temperature
To achieve the ideal texture, you need to preheat your oven to the right temperature before placing the cinnamon rolls inside. The key is to make sure the rolls bake thoroughly while maintaining a soft, light interior.
Ideal Oven Temperature for Baking Cinnamon Rolls
350°F (175°C) is the standard temperature for most cinnamon roll recipes. This temperature allows the dough to cook evenly without overbaking the exterior.
Preheat your oven to this temperature for about 10-15 minutes before you place your rolls inside. This ensures that the heat is evenly distributed and that the rolls start baking as soon as they enter the oven.
—
Step 2: Determining the Right Baking Time
The baking time for cinnamon rolls varies slightly depending on the size of the rolls, the type of pan, and how fluffy you want them. However, most cinnamon rolls bake perfectly in a relatively short time.
How Long Should You Bake Cinnamon Rolls?
For standard cinnamon rolls, bake at 350°F (175°C) for about 20 to 25 minutes.
The rolls should be golden brown on top and lightly browned on the edges.
Larger rolls or thicker rolls may need an additional 5-10 minutes of baking time. Conversely, smaller rolls may need less time.
Signs Your Cinnamon Rolls Are Ready
Golden brown tops: The rolls should have a nice, golden color on top. If they’re still pale after 20-25 minutes, continue baking for a few more minutes.
Firm but soft center: Press down gently on the center of one of the rolls. It should be firm yet slightly soft and springy to the touch.
Crispy edges: The edges of the rolls should be slightly crispy while the center remains soft and airy.
—
Step 3: Baking in Different Types of Pans
The type of baking pan you use can affect the baking time and evenness of your rolls. Different pans distribute heat differently, which can lead to slight variations in your rolls’ texture and cooking time.
Best Pans for Cinnamon Rolls
Glass Baking Pan: A 9×13-inch glass pan is a popular choice for baking cinnamon rolls. It allows for even heat distribution and ensures that the rolls have a moist, tender crumb. If you use a glass pan, keep an eye on the rolls, as they may bake a little faster than in metal pans.
Metal Baking Pan: Metal pans tend to create crispier edges, giving the rolls a slight crunch on the outside. They also promote more even browning, so the rolls will likely bake more quickly.
Round Cake Pan: For a slightly different presentation, you can bake your cinnamon rolls in a round cake pan or even an oval baking dish. The rolls will be more closely packed together, creating soft, pull-apart rolls. Just be mindful of the baking time, as the rolls may need a few extra minutes.
Non-stick Baking Pan: Non-stick pans help prevent sticking, but be cautious about cooking time, as the non-stick surface can sometimes cause the rolls to brown too quickly.
Adjusting for Different Pans
If you’re using a pan that is not a typical 9×13-inch dish, you may need to adjust the baking time. For example, if the pan is larger, your rolls will bake more quickly, so you might want to reduce the time by 2-3 minutes. On the other hand, smaller pans might require extra time to ensure the rolls are fully baked.
—
Step 4: Monitoring the Rolls While They Bake
It’s important to keep an eye on the cinnamon rolls while they bake to avoid overcooking or burning. Depending on your oven’s consistency and the type of pan used, the rolls can bake at slightly different rates.
Tips for Monitoring the Baking Process
1. Set a Timer: Use a timer to track the 20-25 minute range. Start checking around the 18-minute mark to ensure they’re not overbaking.
2. Rotate the Pan: If your oven has hot spots, rotate the pan halfway through baking to promote even browning.
3. Check the Bottoms: After 20 minutes of baking, lift one of the rolls to check the bottom. It should be lightly browned and crisp. If it’s still pale, continue baking for a few more minutes.
4. Watch for Overflowing Filling: If you notice that the cinnamon filling is bubbling over the edges of the pan and getting too dark, cover the rolls loosely with aluminum foil to prevent burning while the rest of the rolls finish baking.
—
Step 5: What to Do If the Rolls Are Browning Too Quickly
Sometimes, the rolls may start to brown too quickly, especially if you’re using a high-convection oven or if the pan is reflecting heat more intensely. This can lead to uneven baking.
How to Fix Over-Browning
Cover the rolls with foil: If the rolls are getting too dark, lightly cover them with aluminum foil during the last 5-10 minutes of baking. This will prevent the tops from burning while the inside finishes cooking.
Reduce oven temperature: If the rolls are browning too fast, you can reduce the temperature by 10-15°F and continue baking. This will help the rolls bake more slowly, allowing the interior to cook evenly without burning the exterior.
—
Step 6: Cooling the Rolls After Baking
Once your cinnamon rolls are perfectly baked, they need a few minutes to cool before you add the frosting or serve them.
How to Cool Cinnamon Rolls
1. Cool in the Pan: Let the rolls cool in the pan for about 5-10 minutes before serving. This allows the rolls to set and hold their shape.
2. Serve Warm: For the best experience, serve the rolls slightly warm, as this will enhance their fluffy texture and allow the cream cheese frosting to melt beautifully.
—
Why Oven Temperature and Baking Time Matter
✔️ Perfect texture – The right temperature and time ensure that the rolls rise properly and bake through, resulting in a soft, airy interior and golden-brown exterior.
✔️ Even baking – Helps the rolls bake evenly, preventing undercooked centers or overdone edges.
✔️ Gooey filling – Baking at the correct temperature ensures that the cinnamon-sugar filling becomes the perfect consistency—not too runny, but just gooey enough.
By following these guidelines for oven temperature and baking time, you’ll get cinnamon rolls that are beautifully baked every time! Ready to dive into the next section—frosting your cinnamon rolls?
How to Get That Soft, Gooey Center: Secrets to Perfect Cinnamon Rolls
One of the most coveted characteristics of a great cinnamon roll is its soft, gooey center. Achieving this perfect balance of tenderness and stickiness requires attention to detail during the preparation and baking process. It’s not just about the ingredients; it’s about how the dough is handled, how it’s baked, and how the cinnamon filling is made. In this section, we’ll reveal the best techniques and tips for getting that perfect, melt-in-your-mouth gooey interior.
—
Step 1: Use the Right Flour for a Tender Dough
The type of flour you use plays a critical role in the texture of your cinnamon rolls. All-purpose flour is the most common choice for cinnamon rolls, but to achieve the best soft, fluffy texture, you’ll want to handle it properly.
Why Flour Type Matters
All-purpose flour is ideal because it has just the right amount of protein content to provide structure without making the dough tough.
Avoid using bread flour, as it has more gluten, which can result in a chewier texture. A chewy cinnamon roll may not have the soft, gooey center you’re aiming for.
Cake flour has a very low protein content, which makes it too soft for cinnamon rolls, as it won’t provide enough structure to hold the filling and rise well.
Tip: For extra softness, you can substitute a small portion of the all-purpose flour with cake flour to achieve a more tender crumb.
—
Step 2: Add Enough Fat to Keep the Dough Moist
Fat is crucial in keeping cinnamon rolls soft and preventing them from becoming dry. The butter, milk, and eggs in the dough work together to create that rich, soft texture.
How Fat Affects the Dough
Butter adds richness and tenderness. The more butter you use, the softer your dough will be, contributing to that gooey center.
Milk and eggs help create a soft, pillowy dough. They provide moisture and fat, making sure the rolls don’t dry out during baking.
Tip: Use room-temperature butter in the dough, as it will blend more easily with the flour and create a smooth, soft dough. Be careful not to over-mix the dough, as this can make it too dense.
—
Step 3: Don’t Overwork the Dough – Handle Gently
While kneading is necessary to activate the gluten and give your dough structure, it’s important to avoid overworking the dough. Over-kneading can lead to tough rolls, which will be harder to achieve the soft, gooey texture you’re after.
Why Gentle Handling Matters
Over-kneading the dough can develop too much gluten, making the rolls more elastic and chewy instead of soft and tender.
When rolling out the dough, do so gently. If you roll the dough too thin, the rolls can turn out dense and dry because they won’t have enough dough to hold the filling.
Tip: When kneading, stop once the dough is smooth and slightly elastic, but not too firm. If the dough is too sticky, add a little flour, but don’t add too much as it can dry out the dough.
—
Step 4: Use the Right Cinnamon Filling for Gooeyness
The filling plays a significant role in achieving that gooey center. The cinnamon sugar mixture should be moist and rich to melt and create that gooey, sticky interior while baking.
Key Ingredients for a Gooey Filling
Butter: Use softened butter to create a thick paste that can be spread evenly across the dough. The butter will melt into the dough as it bakes, creating that signature gooeyness.
Brown sugar: Brown sugar has molasses in it, which adds moisture and makes the filling stickier and gooier. It creates a syrup-like consistency when it melts, which contributes to the gooey center.
Cinnamon: Use high-quality ground cinnamon for the best flavor. It should be mixed thoroughly with the butter and brown sugar to ensure it melts together seamlessly while baking.
Tip: For even more gooeyness, you can add a small spoonful of cornstarch to the cinnamon sugar mixture. This helps thicken the syrup formed during baking, preventing it from becoming too runny while still keeping the center soft.
—
Step 5: Allow the Rolls to Rise Properly
The second rise is critical for achieving soft and gooey cinnamon rolls. When cinnamon rolls rise correctly, they expand gently, creating a fluffy texture that’s soft and tender in the middle.
How to Get the Perfect Rise
Let the dough proof for long enough: Allow the rolls to double in size before baking. This ensures the dough has had time to form air pockets, which makes it soft and fluffy.
Proof at room temperature: After shaping your rolls, cover them with a towel or plastic wrap and let them rise in a warm area for 30 to 45 minutes. If the room is too cold, the dough will rise slowly or not enough, resulting in dense rolls.
Don’t over-proof: While it’s important to let the rolls rise, don’t let them sit for too long, as this can lead to overly airy rolls that won’t hold their shape or gooey center.
Tip: If you want to slow down the proofing process, you can place the rolls in the refrigerator for a longer rise overnight. This will give them more time to develop flavor and maintain their soft texture.
—
Step 6: Bake at the Right Temperature for Optimal Gooeyness
Baking at the correct temperature is crucial for ensuring that your rolls are soft, fluffy, and gooey on the inside while still having a golden, slightly crispy exterior.
Baking Time and Temperature for Soft, Gooey Rolls
Bake at 350°F (175°C) for about 20-25 minutes. This temperature allows the dough to bake evenly without the filling becoming too hard or too runny.
Keep an eye on the rolls as they bake. They should become golden brown on top and firm up slightly at the edges, while the center should remain soft and gooey.
Tip: If the rolls start to brown too quickly, cover them loosely with aluminum foil and continue baking for the remaining time. This helps preserve the soft center while allowing the edges to bake through.
—
Step 7: Adding the Final Touch – Frosting
A key component of a gooey cinnamon roll is the cream cheese frosting, which melts into the warm rolls, adding extra moisture and making the center even more decadent.
Frosting for Gooeyness
Cream cheese frosting is a classic topping that not only enhances the flavor but also adds creaminess and sweetness. The frosting should be spread generously while the rolls are still warm, allowing it to melt into the gooey center.
Whipped cream or a simple glaze can also be used for a lighter, less rich option.
Tip: Allow the rolls to cool for a few minutes before frosting so that the frosting doesn’t melt too quickly and can create a creamy topping that complements the gooey center.
—
Why the Gooey Center Matters
✔️ Texture – The gooey center adds a rich, melt-in-your-mouth quality that’s the hallmark of perfect cinnamon rolls.
✔️ Flavor – The combination of cinnamon, brown sugar, and butter in the filling creates a flavor-packed center that complements the soft dough perfectly.
✔️ Visual appeal – The gooey center provides an attractive pull-apart effect, making your rolls look as good as they taste.
By following these steps, you’ll be able to achieve the soft, gooey cinnamon rolls that everyone craves. The key is in the details, from choosing the right flour to baking at the perfect temperature. Ready to add that finishing touch with the frosting?
Avoiding Common Baking Mistakes: Ensure Perfect Cinnamon Rolls Every Time
Even the most experienced bakers can make mistakes when baking cinnamon rolls, especially when it comes to getting that perfect, soft, gooey texture. While some errors are easy to fix, others can have a lasting impact on the final product. In this section, we’ll explore the most common baking mistakes and how to avoid them so your cinnamon rolls come out perfect every time.
—
Mistake 1: Using Cold Ingredients
Using cold ingredients can negatively affect the texture and consistency of your dough, leading to cinnamon rolls that are dense or difficult to work with.
Why Cold Ingredients Are Problematic
Cold butter can be difficult to incorporate into the dough, which may result in a lumpy texture. When the butter is not softened properly, it can also prevent the dough from rising as expected, leading to dense rolls.
Cold milk and eggs can shock the dough when mixed with yeast, causing poor activation of the yeast and resulting in a dough that doesn’t rise well.
Solution:
Always bring butter to room temperature before using it in your dough. If you forget to take it out in advance, you can microwave it for a few seconds to soften it.
Allow milk and eggs to sit at room temperature for about 15-20 minutes before incorporating them into the dough.
—
Mistake 2: Not Activating the Yeast Properly
Yeast is the magic ingredient that gives cinnamon rolls their soft, fluffy texture, but if it’s not activated properly, your dough won’t rise.
Why This Happens
Yeast needs warm liquid to activate, typically between 100-110°F (37-43°C). If the liquid is too hot, it can kill the yeast; if it’s too cold, the yeast won’t activate properly.
Expired or dead yeast is another common issue. If the yeast is old, it won’t create the necessary rise for the dough.
Solution:
Always proof your yeast before using it by mixing it with warm water (around 100°F) and a pinch of sugar. Let it sit for about 5-10 minutes. If it bubbles and froths, it’s ready to go!
Check the expiration date on your yeast before using it to ensure it’s still active.
—
Mistake 3: Not Kneading the Dough Enough (or Too Much)
Kneading dough is essential for developing the gluten, which gives the cinnamon rolls their structure. However, it’s important to find the right balance between kneading enough to develop gluten and kneading too much, which can lead to dense rolls.
Why This Happens
Under-kneading the dough results in a lack of structure, which can lead to flat, undercooked cinnamon rolls. The dough may not rise properly because the gluten hasn’t formed enough to hold the gases created by the yeast.
Over-kneading makes the dough too tough, as it develops too much gluten, resulting in rolls that are chewy instead of soft and fluffy.
Solution:
Knead the dough for about 5-7 minutes by hand or using a stand mixer with a dough hook. The dough should be smooth and elastic but not overly stiff.
If the dough feels too sticky, add a small amount of flour, but avoid adding too much, as this can dry out the dough.
—
Mistake 4: Rolling the Dough Too Thin or Too Thick
The thickness of your dough can directly affect the texture and rise of your cinnamon rolls. If the dough is too thin, the rolls won’t have enough structure to hold the filling and may become flat during baking. If it’s too thick, the rolls may be dense and difficult to bake through.
Why This Happens
Too thin dough can result in rolls that are overly airy, with not enough filling or texture. The rolls will also be more likely to bake unevenly.
Too thick dough can result in rolls that are dense and dry, with a crusty exterior and undercooked center.
Solution:
Roll the dough to a 1/4-inch to 1/2-inch thickness, depending on how thick you like your rolls. The dough should be rolled evenly to ensure uniform baking.
Keep in mind that the dough will rise again during the second proofing stage, so don’t worry about it being too thin before baking.
—
Mistake 5: Not Letting the Dough Rise Properly
One of the most common mistakes when baking cinnamon rolls is not allowing the dough to rise enough. If the dough doesn’t have enough time to proof, it will be dense and lack the soft texture you’re hoping for.
Why This Happens
If the dough is not given enough time to rise, it will not expand properly, which can result in rolls that are too flat or chewy.
Rising in a cold environment can slow down the yeast activity, preventing the dough from fully proofing.
If you try to hurry the rise, you might rush the process and miss the crucial fermentation stage.
Solution:
Allow the dough to rise in a warm, draft-free area for 1 to 1.5 hours until it has doubled in size. If your kitchen is cold, you can place the dough in a slightly warm oven (with the light on) to speed up the process.
Be patient during the second rise after shaping the rolls—this step is crucial for the rolls to puff up properly.
—
Mistake 6: Overbaking the Rolls
It’s easy to overbake cinnamon rolls, especially if you’re not paying attention to the time. Overbaking can result in dry, tough rolls instead of soft, gooey ones.
Why This Happens
If you bake the rolls for too long, they can become dry and hard. Additionally, overbaking can cause the filling to caramelize too much and harden, making it difficult to achieve that soft, gooey center.
Not checking the rolls periodically can result in them becoming overbaked before you realize it.
Solution:
Bake the rolls at 350°F (175°C) for about 20 to 25 minutes or until they are golden brown on top. If you’re using a different type of pan or the rolls are larger, check them at the 20-minute mark and adjust the time accordingly.
If the tops of the rolls are browning too quickly, cover them loosely with aluminum foil for the last 5-10 minutes of baking to prevent burning.
—
Mistake 7: Skipping the Frosting
While the cinnamon rolls themselves are the star of the show, the frosting is what adds the final touch of flavor and moisture to make them irresistible. Skipping this step or using a frosting that is too thin can leave your rolls lacking in that creamy, sweet finish.
Why This Happens
The frosting is often an afterthought, but it should never be skipped. Without frosting, cinnamon rolls can feel incomplete, and the texture might lack the richness that you get from a sweet, creamy topping.
Thin frosting can be too runny and not give the rolls that delicious gooey finish.
Solution:
Use a thick, cream cheese frosting that can melt into the warm rolls and form a rich coating.
Generously spread the frosting over the rolls while they’re still warm, allowing it to seep into the layers for maximum gooeyness and flavor.
—
Mistake 8: Not Monitoring the Oven Temperature
Each oven is different, and a common mistake is not adjusting for oven inconsistencies. This can cause cinnamon rolls to bake unevenly or too quickly.
Why This Happens
Ovens can have hot spots, and failing to rotate your pan can lead to uneven baking.
Baking at a temperature that is too high or too low can also cause uneven results, either burning the rolls or leaving them undercooked.
Solution:
Invest in an oven thermometer to check that your oven is at the correct temperature.
Rotate your pan halfway through baking to ensure that the rolls bake evenly on all sides. If the rolls start to brown too quickly, lower the temperature slightly and cover them with foil.
—
By avoiding these common mistakes, you’ll be on your way to making the most fluffy, gooey, and flavorful cinnamon rolls every time. Remember, baking is an art, and with a little patience and practice, you’ll soon perfect your technique. Happy baking!
Making the Signature Cinnabon Cream Cheese Frosting
Mixing the Frosting for a Smooth Texture: Achieving the Perfect Cream Cheese Frosting
The frosting is the finishing touch that elevates your cinnamon rolls, making them irresistibly sweet and creamy. A smooth, silky frosting is essential for achieving the perfect cinnamon roll experience, as it melts into the warm dough, creating a rich, gooey layer of flavor. In this section, we’ll walk through the process of mixing the frosting to ensure it’s the perfect consistency, smooth texture, and deliciously creamy taste.
—
Step 1: Choose the Right Ingredients for the Best Texture
The texture of your cream cheese frosting depends largely on the quality and balance of your ingredients. Here’s what you need for the best frosting:
Key Ingredients for Smooth Frosting
Cream cheese: The star of the frosting, cream cheese gives the frosting its signature tangy flavor and rich creaminess. Make sure to use full-fat cream cheese for the best texture and flavor. Avoid low-fat cream cheese, as it can create a watery or grainy frosting.
Butter: Softened unsalted butter adds richness and helps achieve a smooth consistency. It also balances the tanginess of the cream cheese with a touch of sweetness.
Powdered sugar: This is the sweetening agent that dissolves easily into the frosting, giving it a smooth, silky texture. Powdered sugar ensures that the frosting will be lump-free and light.
Vanilla extract: Adds a touch of flavor and rounds out the cream cheese’s tanginess. Make sure to use pure vanilla extract for the best flavor.
Heavy cream or milk: A small amount of liquid helps achieve the ideal spreadable texture. Heavy cream adds a richness, while milk gives a lighter consistency. You can use either, depending on the texture you prefer.
—
Step 2: Softening the Cream Cheese and Butter
The first step to making smooth frosting is ensuring that both your cream cheese and butter are at the right temperature. Cold cream cheese and butter will cause lumps in your frosting, making it difficult to achieve the desired smooth texture.
Why Softened Ingredients Matter
Softened butter blends more easily into the cream cheese, allowing for a smoother consistency without the risk of clumps.
Cold cream cheese is harder to incorporate and may cause the frosting to have a lumpy texture.
How to Soften the Ingredients
Cream cheese: Take the cream cheese out of the refrigerator at least 30 minutes before using it, so it has time to soften. If you’re in a hurry, you can microwave it for 10-15 seconds.
Butter: Softened butter should be at room temperature, which typically takes about 30 minutes to an hour. If you’re short on time, cut the butter into small cubes and let it sit for a few minutes to soften more quickly.
—
Step 3: Beating the Butter and Cream Cheese Together
The next crucial step to achieving smooth frosting is to thoroughly beat the cream cheese and butter together. This step is essential for creating a fluffy, smooth base for your frosting.
Why Mixing Properly is Important
Properly creaming the butter and cream cheese helps break down the fat, ensuring that the frosting doesn’t have a greasy texture. This also helps to eliminate lumps and provides a light, smooth base for adding powdered sugar.
Avoid overmixing once the frosting is smooth. Overmixing can introduce air bubbles into the frosting, which might cause it to separate or become too light.
How to Mix
Start by placing softened cream cheese and softened butter into a large mixing bowl.
Use an electric mixer or stand mixer with a paddle attachment on medium speed to beat the ingredients together for about 3-4 minutes, or until the mixture is completely smooth and well-combined.
Scrape down the sides of the bowl occasionally to ensure all of the butter and cream cheese are fully incorporated.
—
Step 4: Gradually Adding the Powdered Sugar
Once the cream cheese and butter are perfectly mixed, it’s time to add the powdered sugar. Adding the powdered sugar gradually helps prevent the frosting from becoming too thick or too sweet.
Why Gradually Adding Powdered Sugar Works
If you add powdered sugar all at once, it can cause clumps or make the frosting too sweet. Gradually incorporating it ensures a smooth, creamy texture that is easy to spread.
The powdered sugar dissolves easily when added slowly, helping you achieve that velvety texture without lumps.
How to Add Powdered Sugar
Add about 1/2 cup of powdered sugar at a time while mixing.
Beat the mixture on low speed until the sugar is incorporated, then increase to medium speed. Continue adding the rest of the powdered sugar in small increments, scraping the bowl as needed to ensure all the sugar is fully mixed in.
Taste the frosting as you go to ensure it’s sweet enough for your preference. You can always adjust the amount of powdered sugar.
—
Step 5: Adding Vanilla Extract for Flavor
Vanilla extract enhances the flavor of the cream cheese frosting, adding depth to the sweetness and balancing the tang of the cream cheese. This small but important addition can transform your frosting from good to great.
How Vanilla Enhances the Frosting
Vanilla adds a warm, aromatic flavor that complements the tangy cream cheese and the rich butter.
The depth of vanilla helps to round out the flavors, making the frosting taste more balanced and less one-dimensional.
How to Add Vanilla Extract
Once the powdered sugar is fully incorporated, add about 1 teaspoon of vanilla extract to the frosting.
Mix on low speed for about 30 seconds to evenly distribute the vanilla.
—
Step 6: Adjusting the Consistency with Liquid
The consistency of your cream cheese frosting can be adjusted by adding a small amount of heavy cream or milk. This ensures that the frosting has the perfect texture for spreading on your cinnamon rolls.
Why Adjusting Consistency Is Important
If the frosting is too thick, it will be hard to spread, and it might clump on the cinnamon rolls instead of melting into them.
If the frosting is too thin, it will run off the rolls and won’t give you that creamy, gooey finish.
How to Adjust Consistency
Add a tablespoon of heavy cream or milk at a time, mixing well after each addition.
Test the frosting by spreading it on a small piece of cooled cinnamon roll. It should be smooth and easy to spread without being too runny.
If the frosting is too thick, continue adding liquid until you reach your desired consistency. If it’s too thin, add a little more powdered sugar to thicken it up.
—
Step 7: Finishing the Frosting and Storing
Once your frosting is smooth and creamy, it’s ready to be spread on your cinnamon rolls. If you’re not using it immediately, proper storage is important to keep it fresh.
Storage Tips
If you’re not frosting the rolls right away, store the frosting in an airtight container in the refrigerator for up to 3 days.
When you’re ready to use it, bring the frosting to room temperature before spreading it on the rolls. If it has thickened too much in the fridge, you can whisk it or add a touch of milk to loosen it up.
—
Why the Smooth Texture Matters
✔️ Visual Appeal: A smooth, creamy frosting gives your cinnamon rolls an appealing glossy finish, making them more attractive and tempting.
✔️ Taste: The smooth texture allows the frosting to melt into the warm rolls, blending perfectly with the cinnamon sugar filling and enhancing the flavor.
✔️ Spreadability: A well-mixed, smooth frosting is easy to spread, ensuring that each cinnamon roll gets an even layer of frosting that’s neither too thick nor too runny.
By following these steps, you can create the perfect cream cheese frosting for your cinnamon rolls, ensuring that every bite is smooth, creamy, and full of flavor.
How to Apply the Frosting for the Best Flavor: Perfecting the Cinnamon Roll Finish
The way you apply the frosting can make a big difference in achieving that perfect balance of flavor and texture in your cinnamon rolls. A generous layer of frosting can transform your rolls from delicious to utterly irresistible, but it’s important to apply it correctly to get the best results. In this section, we’ll explore how to apply the frosting in a way that enhances the flavor, texture, and overall experience of your homemade cinnamon rolls.
—
1. Frost While the Rolls Are Warm
One of the key factors in getting the best flavor from your frosting is to apply it while your cinnamon rolls are still warm, but not too hot. This ensures the frosting melts slightly into the rolls, creating a rich, gooey texture that enhances the overall experience.
Why Frosting on Warm Rolls Works
When the cinnamon rolls are warm, the frosting will soften and melt just enough to seep into the layers, creating that signature gooey texture. The warmth of the rolls helps the cream cheese frosting blend perfectly with the cinnamon and sugar filling, enhancing both flavor and texture.
The melted frosting doesn’t just sit on top; it infuses the rolls with creamy sweetness, making each bite even more indulgent.
How to Do It
Wait until your cinnamon rolls have cooled slightly (about 5 to 10 minutes) after baking, just long enough for them to hold their shape but still warm.
Use a spoon or offset spatula to spread the frosting generously on each roll. Don’t be afraid to apply a thick layer—this is what makes your cinnamon rolls extra special!
—
2. Spread Evenly, but Leave Some to Drip
For a visually appealing finish, you want to spread the frosting evenly over the cinnamon rolls, but it’s also important to leave some of it to drip down the sides, creating a beautiful, rustic look.
Why Dripping Frosting Enhances the Look and Flavor
Allowing the frosting to drip down the sides creates an appealing visual effect that highlights the gooey, decadent nature of the rolls. It gives the rolls a homemade, indulgent appearance, tempting everyone to dive in.
The slight drippage can also help distribute some of the flavor more evenly throughout the roll, so every bite has a touch of sweet, creamy goodness.
How to Do It
After spreading the frosting over the top, gently spread it towards the edges of the rolls, allowing some to drip down naturally.
Don’t overdo it, as too much frosting dripping down the sides might make the rolls too sweet. Instead, aim for just enough to enhance the look and balance the sweetness.
—
3. Don’t Forget the Inside Layers
While it’s tempting to focus on frosting the top of the rolls, the inside layers are where the most flavor happens! A good layer of frosting applied to the middle of each roll will elevate the overall taste.
Why It’s Important to Frost the Inside Layers
The interior of the roll is where all the cinnamon sugar magic happens, and adding frosting to this part of the roll enhances the sweet, creamy flavor right where it counts.
Frosting the inside of each roll allows the flavor to be balanced throughout. Without it, you might end up with bites that are drier or lack the richness that frosting provides.
How to Do It
After applying frosting to the top of the rolls, carefully pull the rolls apart just enough to get frosting on the interior layers.
You can either use a small spoon or knife to spread a thin layer of frosting on the inside or simply let the frosting melt into the layers as you assemble the rolls.
—
4. Don’t Over-Frost (Moderation is Key)
While frosting is the star of the show, it’s important to apply it in moderation. Over-frosting can overwhelm the cinnamon rolls, making them too sweet and masking the delicate flavor of the dough.
Why Over-Frosting Can Be a Problem
Too much frosting can make the rolls overly sweet, masking the flavors of the cinnamon and sugar filling.
Excess frosting can also result in a sticky, messy texture that can detract from the soft, fluffy dough and the contrast between the gooey interior and the light, airy exterior.
How to Do It
Focus on applying just enough frosting to enhance the rolls without drowning them. A generous, even layer on top should suffice.
Taste your frosting as you go and make adjustments, but remember that the goal is balance—you want the rolls to be sweet and creamy, not overly sugary.
—
5. Garnish for Extra Flavor and Visual Appeal
For an added touch of flavor and to make your cinnamon rolls look even more indulgent, consider adding a simple garnish on top of the frosting. This can elevate the overall experience and make your rolls look more like a special treat.
Why Garnishes Matter
A simple garnish can bring an extra burst of flavor and texture, like a sprinkle of cinnamon, a dusting of powdered sugar, or even some chopped nuts. This adds dimension to the taste and makes the rolls more aesthetically pleasing.
A garnish can also help to highlight the flavors in the cinnamon rolls, whether it’s adding a touch of spice, some crunch, or even a fresh citrus zest.
How to Do It
After frosting the rolls, lightly dust the top with cinnamon or powdered sugar for a classic look.
For a bit of crunch, consider adding chopped walnuts or pecans on top of the frosting for texture.
For a twist, a zest of lemon or orange can provide a refreshing contrast to the richness of the cinnamon and cream cheese frosting.
—
6. Serve Immediately for the Best Experience
Cinnamon rolls are best served fresh, while the frosting is still soft and melty. If you’ve taken the time to perfect the frosting and apply it just right, it’s important to serve the rolls right away so that the frosting stays luscious and gooey.
Why Immediate Serving is Ideal
Freshly frosted cinnamon rolls are at their most indulgent when the frosting is still slightly melted and gooey.
Letting the rolls sit for too long can cause the frosting to firm up and lose its creamy texture, which could affect the overall eating experience.
How to Do It
Once the frosting is applied, serve the cinnamon rolls immediately to enjoy the frosting at its peak.
If you must wait, cover the rolls loosely with plastic wrap or foil to keep the warmth in, but be prepared to reheat them briefly before serving to restore that melt-in-your-mouth experience.
—
Conclusion
The way you apply the frosting to your cinnamon rolls is just as important as the flavor and texture of the rolls themselves. By following these tips and taking the time to frost your rolls with care, you’ll ensure every bite is perfectly balanced, sweet, creamy, and indulgent. From applying the frosting while the rolls are still warm to using a light touch with garnishes, each step enhances the overall flavor and presentation of your cinnamon rolls, making them a true showstopper.
Customizing the Frosting with Extra Flavors: Elevate Your Cinnamon Rolls with Unique Twists
One of the best things about homemade cinnamon rolls is that you can personalize the experience to suit your taste. While classic cream cheese frosting is always a favorite, there’s plenty of room to get creative and add extra flavors to the frosting, making your cinnamon rolls even more special. Whether you’re looking for a tangy twist, a touch of decadent richness, or an extra layer of sweet complexity, customizing the frosting is a fun way to take your rolls to the next level. In this section, we’ll explore a variety of ways to enhance the flavor of your frosting with unique additions.
—
1. Adding Citrus Zest for a Bright, Refreshing Flavor
One of the simplest and most effective ways to customize your frosting is by adding citrus zest. Whether you choose lemon, orange, or even lime, citrus zest brings a refreshing, aromatic quality to your frosting that cuts through the richness and adds brightness to the rolls.
Why Citrus Works in Frosting
Citrus zest balances the creamy, sweet flavor of the cream cheese frosting with a touch of tanginess and fresh flavor.
The natural oils in the zest add a wonderful fragrance and a layer of complexity, making the frosting feel more lively and exciting.
Citrus zest pairs perfectly with cinnamon and sugar, enhancing the flavors already present in the rolls.
How to Do It
Use a zester or grater to finely grate the zest from one lemon, orange, or lime. Be sure to only grate the colored part of the peel, as the white pith can be bitter.
Add the zest to the frosting in small increments. Start with 1 teaspoon and taste the frosting, adjusting the amount to your liking.
For an even more vibrant citrus flavor, consider adding a splash of fresh citrus juice (just a teaspoon) to the frosting for extra tang.
—
2. Infusing with Vanilla Bean or Almond Extract
While vanilla extract is a classic addition, switching it out with a more unique flavor like vanilla bean paste or almond extract can offer a subtle yet sophisticated twist to your frosting. These extracts are especially complementary to the warm, spicy flavors of cinnamon.
Why These Extracts Work
Vanilla bean paste has a more complex, natural flavor compared to regular vanilla extract, offering a richer and more aromatic taste.
Almond extract gives the frosting a slightly nutty, sweet undertone, which pairs wonderfully with the cinnamon and buttery dough of the rolls.
Both options provide depth and character, making your frosting more nuanced.
How to Do It
For vanilla bean paste, start with 1 teaspoon and mix it into the frosting. You’ll notice small flecks of vanilla seeds in the frosting, which add to the visual appeal and natural flavor.
For almond extract, use a small amount—½ teaspoon—because it has a strong flavor. You can add more if you prefer a more prominent almond taste, but be careful not to overpower the other flavors.
Taste the frosting after each addition to ensure it’s balanced to your liking.
—
3. Adding Salted Caramel for a Sweet and Salty Twist
For an indulgent, dessert-like frosting, consider incorporating salted caramel into your cream cheese frosting. This combination of sweet and salty adds a decadent richness that’s perfect for anyone who loves a more complex, multi-dimensional flavor profile.
Why Salted Caramel is a Game-Changer
Salted caramel brings a warm, buttery sweetness to the frosting, contrasting beautifully with the tangy cream cheese and the spicy cinnamon.
The addition of salt provides a savory counterpoint to the sweetness, creating a balanced flavor that’s irresistible.
The caramel flavor also intensifies the overall comforting, dessert-like quality of the cinnamon rolls.
How to Do It
Use store-bought salted caramel sauce or make your own by simmering sugar, butter, and a pinch of sea salt until it reaches a thick, syrupy consistency.
Stir in about 2-3 tablespoons of salted caramel sauce into the frosting mixture. Adjust the amount depending on how sweet and caramel-flavored you want it to be.
For extra saltiness, sprinkle a small pinch of flaky sea salt over the top of the frosting once it’s applied to the rolls.
—
4. Adding Spices for Extra Warmth
If you love the warmth of cinnamon but want to experiment with other spices, try adding a dash of nutmeg, cloves, or cardamom to your frosting. These spices can deepen the flavor profile of the frosting, making it more aromatic and perfect for cozy, fall-inspired treats.
Why Spices Enhance the Frosting
Nutmeg and cloves bring out a sweet, warm flavor that complements the cinnamon in the rolls, making the whole experience more comforting.
Cardamom adds a unique, exotic twist, with a subtle citrusy and floral note that pairs beautifully with the richness of the frosting.
These spices work well if you want to make your cinnamon rolls feel even more like a spiced holiday treat.
How to Do It
Add about ¼ teaspoon of ground nutmeg, cloves, or cardamom to the frosting and taste as you go. You can always add more, but a little goes a long way with these potent spices.
Be careful not to overpower the cinnamon and other flavors. A light hand with the spices will ensure a balanced flavor profile.
—
5. Incorporating Chocolate for a Rich, Decadent Frosting
For chocolate lovers, adding cocoa powder or melted chocolate to your frosting creates a rich, indulgent layer of flavor that pairs beautifully with the cinnamon rolls. This addition is perfect for creating chocolate cinnamon rolls or adding a chocolatey twist to the classic recipe.
Why Chocolate Works in Frosting
Cocoa powder provides a deep, rich flavor that complements the cinnamon without overpowering it. It adds a subtle, velvety taste to the frosting.
Melted chocolate offers a creamy texture and an extra layer of sweetness, making the frosting richer and more decadent.
How to Do It
Cocoa powder: Add 2-3 tablespoons of unsweetened cocoa powder to the frosting mixture and blend well. This will turn your frosting into a chocolate cream cheese frosting.
Melted chocolate: Melt about 2 ounces of dark or semi-sweet chocolate and fold it into the frosting for a smooth, glossy finish. Be sure to let the chocolate cool slightly before mixing it in to avoid melting the frosting.
—
6. Adding Coffee or Espresso for a Bold, Deep Flavor
If you love coffee, adding a splash of strong brewed coffee or espresso to your frosting can introduce a bold, deep flavor that pairs well with the sweetness of the rolls. The coffee enhances the other flavors without overwhelming them, giving the frosting a bit of complexity.
Why Coffee Enhances Frosting
Coffee complements the richness of the cream cheese and the cinnamon, while adding depth and a slight bitterness that balances the sweetness.
A hint of espresso can elevate the frosting to a more gourmet level, bringing out the full complexity of the other ingredients.
How to Do It
Brew a small amount of strong coffee or espresso and let it cool. Add 1 tablespoon at a time into the frosting until you achieve your desired flavor.
Taste as you go, and be mindful not to add too much, as coffee is potent and can easily overpower the sweetness.
—
Conclusion
Customizing your cream cheese frosting allows you to create a unique flavor profile for your cinnamon rolls, tailoring the taste to your preferences or the occasion. Whether you’re in the mood for something bright and citrusy, decadent and caramelized, or rich with chocolate, there are endless possibilities for enhancing your frosting. Experiment with these additions and discover the perfect combination that will make your homemade cinnamon rolls even more special. Each extra flavor brings its own twist to the classic cinnamon roll, ensuring that every bite is a delightful, unforgettable experience.
Conclusion: The Ultimate Cinnamon Rolls Await
Making homemade cinnamon rolls from scratch is a labor of love, and the frosting is the final touch that brings everything together. Whether you stick with the classic cream cheese frosting, add a burst of citrus zest, or indulge in a rich salted caramel twist, customizing your frosting opens up a world of delicious possibilities. By following the right steps for making, rolling, and baking your rolls, combined with the perfect frosting application, you can create a batch of cinnamon rolls that’s irresistibly warm, gooey, and full of flavor.
With these tips, you’ll be able to perfect your cinnamon rolls every time, experimenting with different frosting flavors to match your mood or the occasion. The joy of making and sharing these sweet, comforting treats is hard to beat, and now that you know how to get the best frosting, your cinnamon rolls are bound to be a hit in your kitchen.
So go ahead—let your creativity shine, and enjoy the delicious rewards of these homemade cinnamon rolls, topped with frosting that’s truly customized to perfection!
1 thought on “Cinnabon Recipe: How to Make Warm, Fresh Cinnamon Rolls from Scratch”