
If you’ve ever strolled through the streets of Greece, you’ve likely been tempted by the irresistible aroma of sizzling gyro meat wrapped in warm, fluffy pita bread. A Greek gyro wrap is a perfect combination of juicy, flavorful meat, creamy tzatziki sauce, and fresh toppings, making it one of the most beloved Greek street foods.
The best part? You don’t need a trip to Greece to enjoy an authentic gyro wrap! With the right ingredients and techniques, you can make the perfect pita sandwich at home. In this guide, we’ll walk you through everything—from choosing the right meat and seasoning it with Mediterranean flavors to assembling a gyro like a pro.
Ready to bring a taste of Greece to your kitchen? Let’s dive in!
Essential Ingredients for an Authentic Greek Gyro
The Origins of the Gyro and Its Place in Greek Street Food
The gyro (pronounced “yee-roh”) is one of Greece’s most famous street foods, known for its flavorful, seasoned meat, creamy tzatziki sauce, and warm pita wrap. But where did this beloved dish originate, and how did it become a staple of Greek cuisine?
The History Behind the Gyro
The word “gyro” comes from the Greek word γύρος (gýros), meaning “turn” or “revolution,” referring to the rotating spit used to cook the meat. The dish is believed to have roots in the Ottoman Empire, drawing influence from Turkish döner kebab and Middle Eastern shawarma. However, gyros as we know them today evolved in Greece in the early 20th century, when Greek immigrants returning from Turkey brought their own version of spit-roasted meat.
Originally, gyros were made exclusively with lamb—similar to döner kebab—but over time, Greek vendors adapted the recipe, introducing pork and chicken, which became more popular due to local availability. Today, you’ll find gyros made from a mix of pork, chicken, beef, or lamb, depending on regional preferences.
The Rise of Gyros in Greek Street Food Culture
Gyros quickly became a staple of Greek street food, especially in Athens and Thessaloniki, where small family-owned shops and street vendors began selling them as a quick, affordable, and satisfying meal. The combination of spiced, juicy meat sliced from the rotisserie, paired with fresh vegetables and creamy tzatziki sauce, made gyros an instant favorite among both locals and tourists.
Over time, the gyro spread across Greece and eventually the world, gaining recognition as a must-try Mediterranean dish. It’s now commonly served not just in Greece but in Greek restaurants and food trucks worldwide, often customized with local twists, such as adding fries inside the wrap or serving it as a plated dish with rice and salad.
How Gyros Compare to Similar Dishes
While gyros share similarities with Turkish döner kebabs and Middle Eastern shawarma, there are distinct differences:
Gyros are typically seasoned with Greek flavors like oregano, garlic, and lemon juice, and are served with tzatziki sauce.
Döner kebabs use a different spice blend, often incorporating cumin, sumac, and red pepper, and are commonly served in flatbread or pita with yogurt-based sauces.
Shawarma is a spicier and more heavily marinated version, popular in the Middle East, often served with tahini, hummus, or garlic sauce.
Why Gyros Remain a Global Favorite
Gyros continue to be a comfort food for many, offering a perfect balance of savory, tangy, and creamy flavors in a handheld meal. Whether enjoyed as a quick street snack in Greece or as a homemade dish, gyros represent the heart of Greek culinary tradition, bringing people together with every bite.
Now that we’ve explored its history, let’s move on to the essential ingredients that make a Greek gyro wrap truly authentic!
Key Ingredients That Make Up a Traditional Gyro Wrap
A Greek gyro wrap is much more than just a sandwich—it’s a harmonious blend of flavors and textures that make every bite satisfying. From tender, spiced meat to creamy tzatziki sauce and soft, pillowy pita bread, each ingredient plays a crucial role in creating the authentic gyro experience. Let’s break down the key components that make a traditional Greek gyro wrap truly special.
—
1. Gyro Meat: The Heart of the Wrap
The gyro meat is the star of the dish, cooked on a vertical rotisserie until it’s crispy on the outside and juicy on the inside. Traditionally, gyros are made with:
Pork: The most common choice in Greece, offering a rich and slightly fatty flavor.
Lamb: Often used in Middle Eastern and Turkish variations, it has a gamey and robust taste.
Chicken: A leaner alternative, popular for its lighter flavor and healthier profile.
Beef or a Lamb-Beef Mix: Found in many Greek-American restaurants, combining the tenderness of beef with the deep flavors of lamb.
The meat is seasoned with a mix of oregano, garlic, cumin, coriander, paprika, salt, and pepper, then slow-roasted or pan-seared to mimic the traditional rotisserie method at home.
—
2. Pita Bread: The Perfect Wrap
The base of every gyro wrap is soft, slightly chewy pita bread, which acts as the perfect vehicle for all the fillings. Greek pita is different from Middle Eastern pita—it’s thicker, softer, and doesn’t have a pocket. The best gyro pita should be:
Fresh and warm (lightly toasted or grilled for extra flavor).
Soft and pliable to easily wrap around the fillings without tearing.
Lightly brushed with olive oil before warming up to enhance its taste.
Some variations also use whole wheat pita or grilled flatbread for a different texture.
—
3. Tzatziki Sauce: The Creamy, Garlicky Essential
No gyro is complete without a generous drizzle of tzatziki sauce, a cooling and tangy yogurt-based condiment that enhances the wrap’s flavors. Traditional tzatziki is made with:
Greek yogurt: Thick and creamy, providing a rich base.
Cucumber: Grated and squeezed to remove excess water for freshness.
Garlic: Finely minced for a bold kick.
Dill or mint: Adding an aromatic, herbaceous touch.
Lemon juice and olive oil: Bringing brightness and smooth texture.
The tzatziki balances out the savory, spiced meat with its cool, tangy, and garlicky notes.
—
4. Fresh Toppings: The Crunchy and Juicy Contrast
A great gyro wrap is all about balance, and fresh toppings add the necessary crunch, juiciness, and slight sweetness to contrast the rich meat and creamy tzatziki. The most common toppings include:
Red onion: Thinly sliced for a sharp, slightly sweet bite.
Tomato: Diced or sliced, adding a juicy, fresh element.
Lettuce: (Optional) Used in some variations for an extra crunch.
Feta cheese: (Optional) Adds a salty, creamy boost for those who love extra Greek flavors.
Some street-style gyros in Greece also include a handful of crispy fries inside the wrap, adding a delicious crunch and extra heartiness to the meal.
—
5. Olive Oil and Lemon: The Finishing Touches
To tie all the flavors together, gyros are often finished with a drizzle of olive oil and a squeeze of fresh lemon juice, enhancing the Mediterranean flavors. High-quality extra virgin olive oil adds richness, while lemon juice brightens up the dish with a zesty, tangy kick.
—
Bringing It All Together
When these key ingredients—seasoned gyro meat, warm pita, creamy tzatziki, and fresh toppings—come together, they create the perfect Greek gyro wrap. The combination of savory, tangy, fresh, and crunchy elements makes gyros one of the most satisfying street foods in the world.
Now that you know what goes into a traditional gyro, let’s move on to the next step—how to prepare the perfect gyro meat!
Difference Between Gyros, Shawarma, and Döner Kebab
Gyros, shawarma, and döner kebab are often confused because they share a common origin and preparation method—seasoned meat cooked on a vertical rotisserie and sliced thin for serving. However, while these dishes look similar, they each have distinct flavors, ingredients, and cultural influences. Let’s explore what makes them unique.
—
1. Greek Gyros: A Mediterranean Classic
Origin: Greece
The gyro (γύρος, pronounced “yee-roh”) originated in Greece and was heavily influenced by the Turkish döner kebab. Greek immigrants adapted the dish, using local ingredients and flavors to create the gyro we know today.
Meat:
Gyros are traditionally made with pork in Greece, though chicken, lamb, or beef are also used in other regions. The meat is seasoned with Greek herbs and spices, including:
Oregano
Garlic
Lemon juice
Olive oil
Thyme
Paprika
The meat is cooked on a vertical spit, shaved off in thin slices, and usually served inside warm Greek pita bread with tzatziki sauce, fresh tomatoes, red onions, and sometimes fries.
Signature Sauce:
Tzatziki sauce—a creamy blend of Greek yogurt, cucumber, garlic, olive oil, and dill or mint—is what sets gyros apart. It adds a cool, tangy, and refreshing contrast to the savory meat.
How It’s Served:
Wrapped in pita with toppings and tzatziki
As a plated meal with pita, salad, and fries
—
2. Middle Eastern Shawarma: Rich and Spiced
Origin: The Middle East
Shawarma comes from the Levant region (Lebanon, Syria, Israel, and surrounding areas) and has strong ties to the Ottoman Empire. It is one of the most popular street foods in the Middle East.
Meat:
Shawarma is made from lamb, chicken, beef, or turkey and is seasoned with a complex blend of warm, earthy spices, including:
Cumin
Coriander
Cardamom
Cloves
Cinnamon
Allspice
Sumac
Unlike gyros, shawarma has a deeper, spicier, and smokier flavor due to its intense seasoning and longer marination time.
Signature Sauce:
Shawarma can be served with various sauces, depending on the region:
Garlic sauce (toum): A creamy, garlicky paste made from garlic, oil, and lemon juice (popular in Lebanese cuisine).
Tahini sauce: A sesame-based sauce, commonly used in Middle Eastern cuisine.
Hummus: A blend of chickpeas, tahini, garlic, and lemon juice, sometimes spread inside the wrap.
How It’s Served:
Wrapped in thin flatbread (like laffa or saj bread) with pickles, tomatoes, cucumbers, and onions.
As a plate with rice, salad, and grilled vegetables.
—
3. Turkish Döner Kebab: The Original Inspiration
Origin: Turkey
The döner kebab is the original Ottoman-era dish from which both gyros and shawarma evolved. It was invented in Turkey and means “rotating roast”, referring to the vertical spit on which the meat is cooked.
Meat:
Traditional döner kebab is made from lamb or beef, though chicken is also popular. The meat is seasoned with Turkish spices, including:
Sumac
Cumin
Paprika
Black pepper
Garlic
Unlike shawarma, döner kebab seasoning is more subtle, focusing on the natural taste of the meat rather than heavy spices.
Signature Sauce:
Döner kebab is served with a variety of sauces, depending on the country and region:
Garlic yogurt sauce (a simple blend of yogurt, garlic, and lemon juice)
Red chili sauce for a spicy kick
Cacik (similar to tzatziki but thinner and more garlicky)
How It’s Served:
Wrapped in flatbread or Turkish pide
As a döner plate with rice, bulgur, and salad
In a sandwich (especially in Germany, where the döner kebab is hugely popular in Turkish-German cuisine)
—
Key Differences at a Glance
—
Which One Should You Try?
If you love fresh, tangy, and creamy flavors, Greek gyros with tzatziki are a must-try.
If you prefer bold, spiced flavors with rich sauces, go for shawarma.
If you enjoy simpler, lightly seasoned meats with classic Turkish flavors, döner kebab is the way to go.
While all three dishes share a common ancestry, they each offer a unique taste experience. Whether you’re craving a Greek gyro wrap, a Middle Eastern shawarma, or a Turkish döner kebab, you’re guaranteed a flavorful and satisfying meal!
Now that you know the differences, let’s move on to the essential ingredients for making an authentic Greek gyro wrap at home!
Essential Ingredients for an Authentic Greek Gyro
Gyro Meat: The Star of the Wrap
The gyro meat is the heart of a delicious Greek gyro wrap. It’s known for its savory, well-seasoned, and slightly crispy texture, achieved through slow roasting on a vertical rotisserie. This cooking method allows the outer layers of meat to develop a deep golden-brown crust while keeping the inside juicy and tender. But what exactly makes gyro meat so special? Let’s dive into its traditional preparation, seasoning, and at-home cooking methods to understand why it’s the star of the dish.
—
1. What Kind of Meat is Used in Gyros?
The type of meat used in gyros varies depending on the region:
Pork – The most traditional and commonly used meat in Greek-style gyros. It has a rich, slightly fatty texture that stays moist and flavorful when cooked.
Chicken – A leaner and lighter option, often marinated in lemon, garlic, and Mediterranean spices before grilling or roasting.
Lamb – A classic choice, especially in Middle Eastern or Turkish-style gyros (similar to shawarma or döner kebab). It has a distinct, gamey flavor.
Beef – Not as traditional in Greece but often used in Greek-American gyros, sometimes mixed with lamb for a balance of flavor and tenderness.
In Greek-American restaurants, gyros are often made from a seasoned ground meat mixture (usually lamb and beef) that is shaped into a cone and roasted on a vertical spit. In contrast, Greek street food vendors typically use whole cuts of pork or chicken, layered and stacked before roasting.
—
2. Traditional Seasoning for Gyro Meat
What makes gyro meat so flavorful is its bold Mediterranean seasoning, a mix of herbs and spices that infuse the meat with warmth and aroma. Here are the key ingredients:
Classic Gyro Spice Blend
Oregano – Adds a signature Greek flavor with an earthy, slightly bitter taste.
Garlic – Enhances the richness and depth of the meat.
Onion powder – Provides a subtle sweetness and umami flavor.
Paprika – Gives a mild smokiness and slight sweetness.
Cumin – Adds warmth and a nutty, slightly peppery flavor.
Coriander – Brings a hint of citrus and spice.
Salt and black pepper – Essential for bringing out the flavors.
Olive oil – Used to marinate the meat, keeping it moist while cooking.
Lemon juice – Provides brightness and helps tenderize the meat.
For chicken gyros, Greek yogurt is often added to the marinade, helping to keep the meat moist and tender while absorbing the flavors of the spices.
—
3. How Gyro Meat is Cooked
Authentic Rotisserie Method (Street-Style Gyros)
Traditional Greek gyros are made by stacking marinated slices of meat onto a vertical rotisserie spit. The layers are slowly roasted as the spit rotates in front of a heat source, allowing the outer layers to become crispy and golden brown.
As the meat cooks, it is shaved off in thin slices, ensuring each piece has the perfect balance of crispy, charred edges and juicy, tender inside. This method is what gives street-style gyros their unique texture and depth of flavor.
—
4. How to Make Gyro Meat at Home (Without a Rotisserie)
If you don’t have a rotisserie at home, you can still achieve delicious gyro-style meat with a few different methods:
A. Oven-Roasted Gyro Meat (Best for Ground Meat Mixtures)
Greek-American gyros are often made with a seasoned lamb-and-beef ground meat mixture, which can be baked in the oven and sliced into strips.
Steps to Make Oven-Baked Gyro Meat:
1. Mix the Meat & Spices: Combine ground lamb (or beef), finely chopped onion, garlic, and seasonings in a food processor. Process until the mixture becomes a smooth paste.
2. Shape & Bake: Press the mixture into a loaf pan, then bake at 350°F (175°C) for 45–50 minutes until firm and cooked through.
3. Slice & Sear: Once cooled, slice the meat into thin strips and sear them in a hot pan for crispy edges.
This method mimics the texture of shaved rotisserie meat while making it easy to prepare at home.
—
B. Pan-Seared or Grilled Gyro Meat (Best for Sliced Meat)
For a more traditional approach, you can use thinly sliced pork, chicken, lamb, or beef and cook it on a skillet or grill.
Steps to Make Pan-Seared Gyro Meat:
1. Marinate the Meat: Toss sliced pork or chicken in a marinade of olive oil, lemon juice, garlic, oregano, and paprika. Let it sit for at least 2 hours (or overnight) for deeper flavor.
2. Sear in a Hot Skillet: Heat a cast-iron skillet or grill pan over high heat and cook the meat in batches, letting it develop a crispy golden-brown crust.
3. Serve Immediately: The meat is best served fresh, stuffed inside warm pita bread with tzatziki and toppings.
This method closely resembles Greek-style street gyros and is perfect for those who don’t have a rotisserie.
—
5. Vegetarian and Vegan Gyro Meat Alternatives
For those looking for a plant-based gyro option, there are plenty of delicious alternatives:
Seitan Gyro Meat – Seitan (a high-protein wheat gluten) can be seasoned with traditional gyro spices and cooked to mimic the texture of meat.
Mushroom Gyros – Portobello mushrooms, marinated in gyro spices, provide a meaty, umami-rich alternative.
Jackfruit Gyros – Young jackfruit has a shredded texture that works well with Greek seasonings and grilling.
Chickpea & Lentil Patties – A spiced, falafel-like patty can replace meat in a gyro wrap.
These options offer a flavorful, hearty alternative while keeping the essence of a traditional gyro.
—
Bringing It All Together
Gyro meat is what makes a gyro truly irresistible—whether it’s the crispy, juicy layers of rotisserie-cooked pork, the herb-marinated seared chicken, or a plant-based version. No matter how you prepare it, the key to authentic gyro flavor lies in the right spices, the right cooking technique, and a balance of textures.
Now that we’ve covered how gyro meat is made, let’s move on to the key ingredients that complete the perfect gyro wrap!

Pita Bread: The Essential Wrap for a Greek Gyro
Pita bread is a key component of a Greek gyro, acting as the perfect vessel for holding the flavorful, juicy gyro meat, fresh vegetables, and creamy tzatziki sauce. This soft, slightly chewy, and lightly charred flatbread not only enhances the overall taste but also plays a vital role in making gyros easy to eat on the go.
In this section, we’ll explore what makes pita unique, its ingredients, traditional preparation methods, and how to make it at home for an authentic Greek gyro experience.
—
1. What is Pita Bread?
Pita bread is a round, soft flatbread that originates from the Mediterranean and Middle Eastern regions. While pita can be found in different variations across various cultures, the Greek-style pita used for gyros is slightly thicker, softer, and doesn’t always have a pocket like other types of pita.
Greek Pita vs. Other Types of Pita
Greek Pita Bread: Thicker, softer, and pliable, ideal for wrapping gyros. It doesn’t always puff up to create a pocket.
Middle Eastern Pita: Thinner, more hollow, and usually forms a pocket when baked at high temperatures, making it better for stuffing rather than wrapping.
Greek pita is grilled or pan-toasted before serving, giving it a slight crisp on the outside while remaining soft and warm on the inside—perfect for holding gyro fillings without breaking.
—
2. Traditional Ingredients in Greek Pita Bread
The beauty of pita bread lies in its simplicity. Made from just a few ingredients, it has a mild flavor that complements the bold, spiced gyro meat and creamy tzatziki sauce.
Basic Ingredients for Greek Pita Bread:
Flour – All-purpose or bread flour provides structure and chewiness.
Yeast – Helps the dough rise and gives the pita its soft, airy texture.
Water – Hydrates the flour and activates the yeast.
Olive oil – Adds richness, tenderness, and a hint of Mediterranean flavor.
Salt – Enhances taste and balances the flavors.
Sugar – (Optional) Feeds the yeast, aiding in fermentation for better texture.
Unlike some other flatbreads, Greek pita often has a slightly chewy texture with a bit of elasticity, making it easy to fold around the gyro filling.
—
3. How Greek Pita Bread is Traditionally Made
In Greek tavernas and homes, pita bread is made fresh daily and served warm. Here’s how it’s traditionally prepared:
Step-by-Step Traditional Pita Bread Process
1. Mixing the Dough – Flour, yeast, water, olive oil, and salt are combined and kneaded into a soft, elastic dough.
2. Letting it Rise – The dough is left to rise for 1-2 hours until it doubles in size, making the pita light and fluffy.
3. Dividing and Rolling – The dough is divided into smaller portions and rolled into thin, round discs about 6-8 inches in diameter.
4. Cooking the Pita – Instead of baking, Greek pita is traditionally grilled on a hot pan or open flame, developing light charring and soft, golden brown spots.
This process gives Greek pita its signature texture—soft with a slight chew and a touch of crispiness on the outside.
—
4. How to Make Greek Pita Bread at Home
Making homemade pita bread is surprisingly simple and requires minimal ingredients. Here’s a quick and easy recipe:
Easy Homemade Greek Pita Recipe
Ingredients:
2 cups all-purpose flour (or bread flour)
1 teaspoon salt
1 teaspoon sugar
1 teaspoon instant yeast
¾ cup warm water
1 tablespoon olive oil
Instructions:
1. Activate the Yeast – Mix warm water, sugar, and yeast in a bowl. Let it sit for 5-10 minutes until foamy.
2. Make the Dough – In a large bowl, mix flour and salt. Add the yeast mixture and olive oil. Knead until the dough is smooth and elastic (about 8-10 minutes).
3. Let it Rise – Cover and let the dough rise for 1-2 hours, or until doubled in size.
4. Divide and Roll – Divide the dough into 4-6 equal pieces, then roll each into a thin circle (about ¼-inch thick).
5. Cook the Pita – Heat a dry skillet over medium-high heat. Cook each pita for 1-2 minutes per side, until golden brown with bubbles and slight charring.
6. Serve Warm – Keep the pita wrapped in a clean kitchen towel to stay soft.
Fresh, homemade pita makes a huge difference in taste and is well worth the effort when preparing authentic Greek gyros.
—
5. How to Store and Reheat Pita Bread
To keep pita bread fresh and soft, follow these storage tips:
Room Temperature: Store in an airtight bag for 2-3 days.
Refrigeration: Keeps for up to 5-6 days, though it may dry out slightly.
Freezing: Freeze pita in a zip-lock bag for up to 3 months. Reheat in a hot pan or oven before serving to restore its soft texture.
How to Reheat Pita for Gyros:
Pan Method: Brush with a little olive oil and warm in a dry skillet over medium heat for 30 seconds per side.
Oven Method: Wrap in foil and warm at 350°F (175°C) for 5-7 minutes.
Microwave Method: Wrap in a damp paper towel and heat for 15-20 seconds to soften.
Reheating pita properly ensures it stays soft, warm, and pliable, making it easier to fold around the gyro filling.
—
6. Pita Alternatives for Gyros
If you don’t have Greek pita, here are a few substitutes:
Naan Bread – Similar in thickness and texture but slightly sweeter.
Flatbread – A thinner alternative that can still wrap around the filling.
Tortilla Wraps – A last resort, though they lack the chewiness and flavor of pita.
For the best gyro experience, Greek-style pita is always the preferred choice due to its soft texture, slightly chewy bite, and mild flavor that complements the fillings.
—
Final Thoughts
Pita bread is more than just a wrap—it’s a crucial part of the gyro experience, bringing texture, warmth, and authenticity to this beloved Greek dish. Whether you’re making it from scratch or using store-bought, warming the pita before serving is essential to achieving that perfectly soft and flexible wrap for your gyro.
Now that we’ve covered the importance of pita bread, let’s move on to the delicious toppings and sauces that complete a Greek gyro!
Tzatziki Sauce: The Cool and Creamy Essential for a Greek Gyro
Tzatziki sauce is the refreshing, tangy, and creamy condiment that ties all the elements of a Greek gyro together. Made primarily from Greek yogurt, cucumber, garlic, olive oil, lemon juice, and fresh herbs, this sauce balances the bold, spiced flavors of the gyro meat with its cool, slightly tangy, and garlicky taste.
In this section, we’ll explore the history of tzatziki, its key ingredients, traditional preparation methods, and how to make it at home for the most authentic gyro experience.
—
1. What is Tzatziki Sauce?
Tzatziki is a classic Greek condiment that has been enjoyed for centuries. It is commonly served with grilled meats, pita bread, souvlaki, and, of course, gyros. The sauce is known for its creamy texture, cooling effect, and vibrant flavor, making it a staple in Mediterranean cuisine.
The Role of Tzatziki in a Gyro
Adds a refreshing contrast to the rich, spiced gyro meat.
Provides a creamy texture that binds the ingredients together.
Enhances the authentic Greek flavor of the dish.
Tzatziki is similar to other yogurt-based sauces found in Middle Eastern, Turkish, and Indian cuisines, such as raita (India) and cacık (Turkey), but it has a distinctly Greek character due to its unique balance of garlic, dill, and lemon.
—
2. Key Ingredients in Traditional Tzatziki
Tzatziki is made with a few simple, fresh ingredients, each playing an important role in creating its signature flavor and texture.
Essential Ingredients:
Greek Yogurt: The base of tzatziki, providing a thick, creamy, and tangy texture. Full-fat yogurt is preferred for richness and authenticity.
Cucumber: Adds freshness and a slight crunch. It is usually grated and drained to remove excess moisture.
Garlic: A key ingredient that gives tzatziki its signature punch. It is finely minced or crushed into a paste.
Olive Oil: Enhances the flavor and adds smoothness to the sauce.
Lemon Juice: Provides a bright acidity that balances the creaminess. Some variations use vinegar instead.
Fresh Dill or Mint: Traditional tzatziki usually includes dill, but mint can be used for a slightly different flavor profile.
Salt and Pepper: Seasoning to enhance the overall taste.
Each ingredient plays a crucial role, and the quality of ingredients directly impacts the taste of tzatziki. Using high-quality, thick Greek yogurt and fresh cucumbers ensures the best results.
—
3. How Traditional Tzatziki is Made
Authentic Greek tzatziki is simple to make but requires proper preparation to achieve the perfect creamy consistency without being watery.
Step-by-Step Traditional Tzatziki Process:
1. Grate the Cucumber – Using a box grater, finely grate the cucumber.
2. Remove Excess Water – Place the grated cucumber in a clean towel or fine sieve and squeeze out as much liquid as possible to prevent a watery sauce.
3. Prepare the Garlic – Mince the garlic finely or crush it into a smooth paste with a little salt.
4. Mix the Ingredients – In a bowl, combine Greek yogurt, drained cucumber, garlic, olive oil, lemon juice, and fresh dill or mint.
5. Chill for Better Flavor – Let the tzatziki sit in the refrigerator for at least 30 minutes to 1 hour before serving to allow the flavors to meld.
Tzatziki should be thick, creamy, and well-balanced, with a perfect combination of tanginess from the yogurt and lemon, freshness from the cucumber, and warmth from the garlic.
—
4. How to Make the Best Tzatziki at Home
Making tzatziki at home is quick, easy, and far better than store-bought versions.
Authentic Greek Tzatziki Recipe
Ingredients:
1 cup full-fat Greek yogurt
½ cucumber, grated and drained
1 clove garlic, minced or crushed
1 tablespoon olive oil
1 tablespoon fresh lemon juice (or white wine vinegar)
1 tablespoon chopped fresh dill (or mint)
½ teaspoon salt
Black pepper, to taste
Instructions:
1. Grate the cucumber, then squeeze out excess liquid using a cheesecloth or paper towel.
2. In a bowl, mix the Greek yogurt, cucumber, garlic, olive oil, lemon juice, and fresh dill.
3. Season with salt and black pepper. Adjust flavors if needed.
4. Chill for at least 30 minutes before serving for the best taste.
This homemade tzatziki is rich, flavorful, and perfect for gyros, grilled meats, and dipping warm pita bread.
—
5. Tips for the Best Tzatziki Sauce
For the most authentic and delicious tzatziki, keep these tips in mind:
Use full-fat Greek yogurt – This ensures a thick, creamy consistency. Regular yogurt is too thin and may require straining.
Drain the cucumber well – Removing excess moisture prevents a watery sauce.
Let it rest before serving – Chilling tzatziki allows the flavors to blend and intensify.
Adjust the garlic to taste – Some prefer a milder garlic flavor, while others love a strong punch.
Experiment with herbs – Dill is the traditional choice, but mint offers a fresh twist.
—
6. How to Store Tzatziki and Keep it Fresh
Tzatziki is best enjoyed fresh, but it can be stored for later use:
Refrigerator: Store in an airtight container for up to 3-4 days. Stir before serving.
Freezing: Not recommended, as yogurt tends to separate when frozen.
For the best texture and taste, make tzatziki fresh and consume it within a few days.
—
7. Other Uses for Tzatziki Beyond Gyros
While tzatziki is famous for being a gyro sauce, it’s a versatile condiment that pairs well with many dishes:
As a Dip: Serve with pita bread, fresh vegetables, or chips.
With Grilled Meats: Complements chicken souvlaki, lamb kebabs, or grilled fish.
On Salads: Drizzle over a fresh Greek salad for extra flavor.
As a Spread: Use on sandwiches, burgers, or wraps for a creamy touch.
Its cool, tangy, and garlicky taste makes tzatziki an all-purpose sauce perfect for any Mediterranean-inspired meal.
—
Final Thoughts
Tzatziki sauce is more than just a condiment—it’s an essential part of the gyro experience, adding creaminess, freshness, and balance to the bold, spiced meat. Whether you’re making it from scratch or using store-bought, a great tzatziki sauce can elevate your homemade gyros to an authentic Greek delight.
Now that we’ve covered tzatziki, let’s move on to the fresh toppings that complete a perfect Greek gyro!
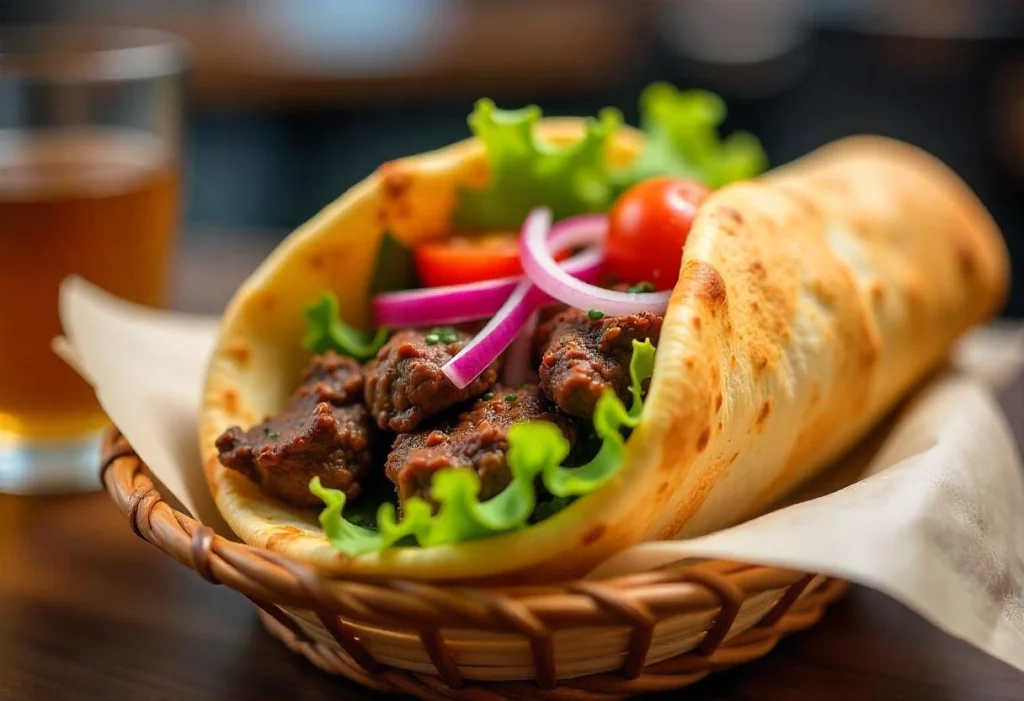
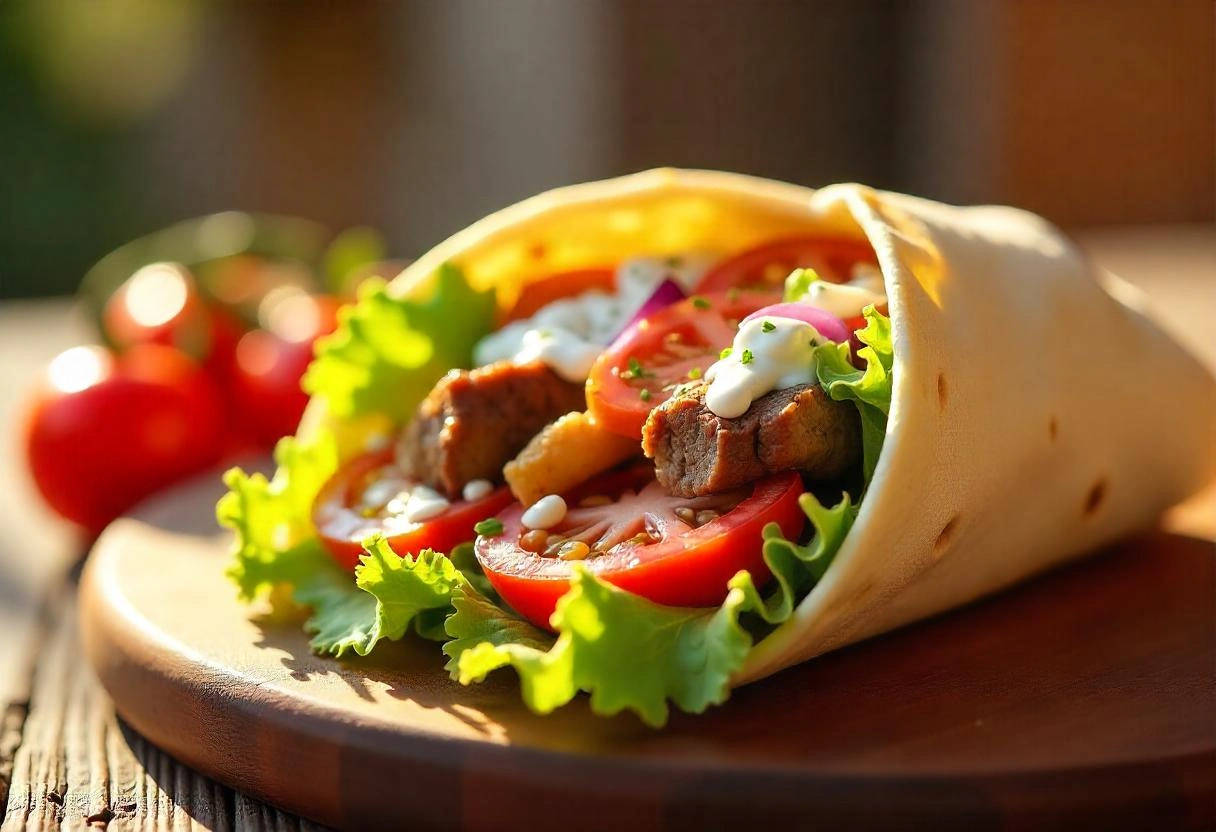
Fresh Toppings: The Perfect Finishing Touch for a Greek Gyro
A gyro wouldn’t be complete without its fresh, flavorful toppings, which add texture, crunch, and balance to the rich, spiced meat and creamy tzatziki sauce. These toppings enhance the gyro’s taste and authenticity, ensuring every bite is a perfect mix of savory, tangy, and refreshing flavors.
In this section, we’ll explore the essential fresh toppings for a traditional Greek gyro, their roles in the wrap, and some creative variations to personalize your gyro experience.
—
1. The Essential Fresh Toppings for a Classic Greek Gyro
A traditional Greek gyro is topped with a handful of simple, fresh ingredients that complement the flavorful gyro meat, warm pita, and cooling tzatziki sauce. Here are the key toppings that define an authentic Greek gyro wrap:
Tomatoes: Juicy and Sweet
Why it’s important: Fresh tomatoes add a burst of sweetness and juiciness, balancing the savory and spiced elements of the gyro.
Best type to use: Ripe, red tomatoes such as Roma or vine-ripened tomatoes work best due to their firm texture and sweet flavor.
How to prepare: Thinly sliced or diced, allowing the juices to mix with the other ingredients without making the pita soggy.
Red Onions: Sharp and Zesty
Why it’s important: Red onions provide a sharp, slightly spicy crunch that cuts through the richness of the gyro meat and tzatziki.
Best type to use: Red onions are preferred for their milder sweetness compared to white or yellow onions.
How to prepare: Thinly sliced into rings or half-moons. To reduce sharpness, soak the slices in cold water or vinegar for 10 minutes before using.
Lettuce: Crisp and Refreshing
Why it’s important: Lettuce adds a light, refreshing crunch to balance the dense textures of meat and pita.
Best type to use: Romaine or iceberg lettuce works well due to their crisp texture and neutral flavor.
How to prepare: Shredded or roughly chopped to distribute evenly in the gyro.
Feta Cheese: Creamy and Salty (Optional but Delicious!)
Why it’s important: Feta cheese provides a tangy, salty contrast that enhances the gyro’s overall taste.
Best type to use: Traditional Greek feta made from sheep’s milk for the most authentic flavor.
How to prepare: Crumbled over the other ingredients for a creamy, slightly briny touch.
French Fries: A Greek Street Food Tradition
Why it’s important: Fries add a warm, crispy texture and soak up the tzatziki and meat juices, making the gyro extra satisfying.
Best type to use: Thin-cut fries or hand-cut potato wedges, lightly salted.
How to prepare: Fried until crispy and added directly into the gyro wrap.
—
2. Alternative and Modern Toppings for a Unique Twist
While traditional toppings keep the gyro authentic, some variations incorporate additional flavors to create unique and exciting versions of this Greek classic.
Cucumbers: Extra Cool and Crunchy
Adds an extra layer of freshness, complementing the tzatziki sauce.
Best used thinly sliced or julienned for a light, refreshing crunch.
Pickled Vegetables: A Tangy Kick
Pickled red onions, cucumbers, or banana peppers add a zesty acidity that brightens the gyro’s flavors.
Perfect for those who enjoy a more complex, slightly tangy bite.
Roasted Red Peppers: Sweet and Smoky
Roasted red peppers bring a mild sweetness and smokiness that pairs well with spiced gyro meat.
Best sliced thinly and layered over the other toppings.
Olives: A Mediterranean Favorite
Kalamata olives add a briny, slightly fruity depth of flavor.
Best used sliced or whole, depending on personal preference.
Hot Sauce or Spicy Mayo: For a Fiery Kick
While not traditional, a drizzle of spicy sauce (like harissa, sriracha, or a spicy yogurt-based sauce) can add an exciting heat level to the gyro.
Works well for those who prefer a bold, spicy contrast.
—
3. How to Properly Layer Fresh Toppings for the Perfect Gyro
Layering toppings in the right order ensures the best texture, balance, and flavor in every bite. Here’s the ideal way to assemble your gyro:
1. Start with the warm pita bread, slightly toasted for flexibility and warmth.
2. Spread a generous layer of tzatziki sauce directly on the pita.
3. Add the gyro meat, ensuring an even distribution.
4. Layer fresh toppings in this order for the best balance:
Lettuce (if using)
Tomatoes
Red onions
French fries (if included)
Feta cheese (optional)
5. Drizzle extra tzatziki or a light dressing (optional).
6. Wrap it up tightly, securing with foil or parchment paper.
This layering technique prevents sogginess while ensuring each bite is full of flavor and texture.
—
4. Tips for the Best Gyro Toppings Experience
Use fresh, high-quality ingredients for the best flavors.
Slice toppings thinly to ensure they blend well without overwhelming the wrap.
Drain excess liquid from tomatoes and cucumbers to prevent a soggy pita.
Experiment with new flavors to create your own signature gyro variation.
—
Final Thoughts
Fresh toppings are what make a gyro truly vibrant, flavorful, and satisfying. Whether you stick with the classic Greek combination or explore modern twists, the key is to balance textures and flavors for the ultimate gyro experience.
Now that we’ve covered the essential toppings, let’s move on to how to assemble and wrap your perfect Greek gyro!
How to Prepare the Perfect Gyro Meat
Seasoning the Meat with Mediterranean Flavors
The key to a perfect Greek gyro lies in its bold, aromatic seasoning, which gives the meat its distinctive savory, slightly smoky, and herbaceous flavor. Mediterranean spices and herbs are at the heart of this dish, blending earthy, tangy, and slightly warm notes to create a rich and authentic taste.
In this section, we’ll explore the essential spices and herbs used in traditional gyro meat, how to properly season it, and some variations to suit different preferences.
—
1. Essential Mediterranean Spices for Gyro Meat
A traditional gyro is made with marinated and seasoned meat that slowly roasts on a vertical spit. The seasoning mix plays a crucial role in developing deep, well-balanced flavors that pair perfectly with pita, tzatziki, and fresh toppings.
Here are the essential spices that bring out the best in gyro meat:
Garlic: The Base of Mediterranean Flavor
Adds a rich, pungent depth to the meat.
Used in both fresh minced form and powdered form for a balanced intensity.
Oregano: The Quintessential Greek Herb
Offers a slightly earthy, citrusy, and peppery taste.
Greek oregano is preferred for its robust and slightly bitter flavor.
Thyme: Earthy and Slightly Floral
Contributes a woody and aromatic note that complements the meat.
Best used dried, as it intensifies the flavors during cooking.
Rosemary: A Bold Mediterranean Accent
Adds a slightly piney, woody essence to balance the richness of the meat.
Works well in small amounts, either chopped finely or in dried form.
Paprika: For Sweet and Smoky Depth
Sweet paprika adds mild warmth and enhances the meat’s natural juices.
Smoked paprika can be used for a richer, more intense flavor.
Cumin: A Warm and Earthy Undertone
Brings a subtle nutty and smoky warmth to the seasoning mix.
Works best in combination with paprika and black pepper.
Black Pepper: A Mild, Spicy Kick
Adds a bit of heat without overpowering other spices.
Freshly ground black pepper offers the best intensity.
Salt: Enhancing All Flavors
A good amount of kosher or sea salt ensures that all the spices penetrate the meat evenly.
Salt also helps retain moisture, keeping the meat tender and juicy.
Optional: Cinnamon and Allspice for a Hint of Warmth
A pinch of cinnamon or allspice can be added to bring a subtle, sweet warmth that enhances the depth of flavors.
These spices are used sparingly to complement rather than dominate the overall taste.
—
2. Marinating the Meat for Maximum Flavor
Proper marination is key to ensuring the meat absorbs all the rich Mediterranean flavors. Whether using lamb, beef, chicken, or pork, marinating the meat for several hours (or overnight) allows the seasoning to fully penetrate the protein.
Best Ingredients for a Flavorful Marinade
In addition to dry spices, a well-balanced marinade includes acid, fat, and aromatics to tenderize the meat and enhance its taste:
Olive Oil: Helps bind the spices to the meat and adds a rich, smooth mouthfeel.
Lemon Juice or Red Wine Vinegar: Adds tanginess and helps break down tough fibers, ensuring tenderness.
Greek Yogurt (for Chicken Gyro): Acts as a tenderizer while keeping the meat moist.
Minced Garlic & Onion: Releases natural juices that deepen the umami flavors of the meat.
How to Marinate Gyro Meat
1. In a large bowl, combine the olive oil, lemon juice, and seasonings.
2. Coat the meat evenly with the marinade, ensuring all pieces are well covered.
3. Refrigerate for at least 4 hours, preferably overnight, for maximum flavor infusion.
4. Before cooking, let the meat sit at room temperature for 30 minutes to ensure even cooking.
—
3. Cooking Methods to Enhance Mediterranean Seasonings
The way the seasoned gyro meat is cooked affects how well the flavors develop. While traditional gyro meat is roasted on a vertical spit, home cooks can achieve similar results using different methods.
1. Rotisserie Cooking (Closest to Traditional Gyro)
Slowly roasts the meat, allowing the spices to infuse deeply while keeping it juicy.
The outer layer develops a crispy, caramelized crust full of flavor.
Works best with stacked layers of seasoned meat, similar to a gyro spit.
2. Oven Roasting (Easy Home Method)
Meat is shaped into a loaf and baked, then sliced thinly for serving.
Helps retain moisture while evenly cooking the seasoned meat.
A great option for ground beef or lamb mixtures.
3. Grilling (Best for Chicken and Pork Gyro Meat)
High heat sears the meat quickly, locking in the seasonings.
Adds a slightly smoky, charred flavor that enhances the Mediterranean spices.
Works well for chicken thighs, pork, or steak strips.
4. Stovetop Searing (Quick and Flavorful Alternative)
Meat is sliced thinly and cooked in a hot pan for a quick gyro-style result.
Cooking in a cast-iron skillet or grill pan creates a nice caramelized crust.
Best when combined with a quick splash of olive oil and lemon juice before serving.
—
4. Alternative Spice Variations for Different Tastes
While the classic Greek seasoning mix remains a timeless favorite, some variations can be made for different flavor profiles:
Spicy Gyro Seasoning
Add cayenne pepper or red chili flakes for a spicier kick.
Works well with chicken or beef gyros.
Herb-Forward Gyro Seasoning
Increase the amount of oregano, thyme, and rosemary for a fresher, greener taste.
Ideal for lamb or pork gyros.
Middle Eastern-Inspired Gyro Seasoning
Add cardamom, coriander, and sumac for a deeper, tangier flavor.
Brings the seasoning profile closer to shawarma or doner kebab.
—
Final Thoughts
The seasoning is what defines the gyro’s signature Mediterranean taste. By combining the right blend of spices, fresh herbs, and tangy marinades, you can create authentic, restaurant-quality gyro meat at home. Whether you prefer classic, spicy, or herb-infused flavors, the secret lies in allowing the meat to marinate well and cook using the right method.
Now that we’ve covered how to season and prepare gyro meat, let’s move on to assembling the perfect Greek gyro wrap!
Cooking Methods: How to Achieve the Perfect Gyro Meat Texture
Cooking gyro meat properly is key to achieving its signature tender-yet-crispy texture. Traditional Greek gyros are slow-roasted on a vertical rotisserie, allowing the meat to develop a flavorful crust while remaining juicy inside. However, if you’re making gyros at home, you can still achieve a similar taste and texture using various cooking techniques.
In this section, we’ll explore the best methods for cooking gyro meat, including traditional and home-friendly alternatives, along with tips to enhance flavor and texture.
—
1. Traditional Vertical Rotisserie (Authentic Gyro Cooking Method)
The traditional way of cooking gyro meat is on a vertical rotisserie (gyro spit). This method is commonly used in Greek restaurants and street food stalls to create that iconic stacked meat appearance.
How It Works:
Large pieces of seasoned lamb, beef, pork, or chicken are stacked on a rotating spit.
The rotisserie slowly turns, cooking the outer layers of the meat as it rotates.
As the outer layer becomes crispy and golden brown, it is shaved off thinly and served in pita wraps.
The exposed inner layers continue to cook, ensuring a constant supply of freshly roasted meat.
Why It Works Well:
✔️ Even Cooking – Slow rotation ensures all sides of the meat get evenly roasted.
✔️ Crispy Outer Layer – The gradual roasting creates a crispy, caramelized crust.
✔️ Moist & Juicy Inside – The vertical stacking allows fat to drip down, naturally basting the meat.
Challenges for Home Cooks:
❌ Requires a specialized rotisserie machine, which isn’t common in home kitchens.
❌ Long cooking time (several hours) due to the slow-roasting process.
If you have access to a rotisserie machine or grill attachment, this is the best method for authentic results. However, for home cooks without a vertical spit, the following methods can replicate the texture and taste of traditional gyro meat.
—
2. Oven Roasting (Best for Ground Gyro Meat Loaf)
Oven-roasting is one of the easiest and most effective ways to make gyro meat at home. It is particularly useful for ground meat mixtures, allowing them to be shaped into a loaf and baked until firm, juicy, and sliceable.
How to Cook Gyro Meat in the Oven:
1. Preheat the oven to 350°F (175°C).
2. Shape the seasoned ground lamb, beef, or mixed meat into a tight loaf.
3. Place the loaf on a baking sheet or in a loaf pan.
4. Bake for 45–60 minutes or until the internal temperature reaches 165°F (75°C).
5. Remove from the oven and let it rest for 10–15 minutes before slicing.
6. Once cooled, slice thinly and sear in a hot pan for a crispy, caramelized edge.
Why It Works Well:
✔️ Great for ground meat versions of gyros.
✔️ Easy to make at home with standard kitchen equipment.
✔️ Can be prepared in advance and stored for later use.
Pro Tip:
For a more authentic texture, blend the ground meat mixture in a food processor before shaping it into a loaf. This helps create a dense, smooth texture similar to restaurant-style gyro meat.
—
3. Grilling (Best for Chicken and Pork Gyro Strips)
Grilling is a great alternative for making sliced or chunked gyro meat, especially when using chicken, pork, or lamb steaks. The high heat of the grill adds a smoky, charred flavor, similar to rotisserie-cooked gyros.
How to Grill Gyro Meat:
1. Preheat the grill to medium-high heat (375–400°F or 190–200°C).
2. Slice the marinated meat into thin strips or leave it in whole pieces (for easier grilling).
3. Brush the grill with a little olive oil to prevent sticking.
4. Place the meat on the grill and cook for 4–6 minutes per side, until fully cooked and slightly charred.
5. Remove from the grill, let it rest for 5 minutes, and then slice into thin pieces.
Why It Works Well:
✔️ Adds a delicious smoky, grilled flavor.
✔️ Quick cooking time compared to other methods.
✔️ Great for lean meats like chicken or pork.
Pro Tip:
Use a cast-iron grill pan if you don’t have an outdoor grill to get similar char marks.
For extra juiciness, baste the meat with olive oil and lemon juice while grilling.
—
4. Stovetop Cooking (Best for Quick & Easy Gyro Meat)
If you’re short on time, pan-searing gyro meat on the stovetop is a quick and simple method. This works best for pre-cooked gyro slices (from an oven-roasted loaf) or thinly sliced marinated meat.
How to Cook Gyro Meat on the Stovetop:
1. Heat a cast-iron skillet or frying pan over medium-high heat.
2. Add a little olive oil and let it heat up.
3. Place thin slices of pre-cooked gyro meat (or marinated raw meat) into the pan.
4. Cook for 2–3 minutes per side, until golden brown and crispy.
5. Remove from heat and serve immediately in pita wraps.
Why It Works Well:
✔️ Fast and efficient – great for a quick gyro meal.
✔️ Enhances texture – browning adds a crispy, caramelized crust.
✔️ Perfect for reheating pre-cooked gyro meat.
Pro Tip:
If using pre-cooked gyro loaf slices, don’t overcrowd the pan—this ensures even browning.
Deglaze the pan with a splash of lemon juice for an extra burst of flavor.
—
5. Air Fryer Method (Modern Alternative for Crispier Texture)
For those who love crispy, evenly cooked meat, the air fryer can be a great alternative. It circulates hot air around the meat, creating a crispy outer layer similar to rotisserie-cooked gyros.
How to Cook Gyro Meat in an Air Fryer:
1. Preheat the air fryer to 375°F (190°C).
2. Place thin slices of seasoned gyro meat (or a small loaf) into the air fryer basket.
3. Cook for 8–10 minutes, shaking halfway through to ensure even crispiness.
4. Remove and let rest before serving in pita wraps.
Why It Works Well:
✔️ Healthier option – requires little to no oil.
✔️ Creates a crispy texture without deep frying.
✔️ Faster than oven roasting.
Pro Tip:
Spray a little olive oil over the meat before air frying for extra crispiness.
—
Final Thoughts
Cooking gyro meat at home is easier than you think, and you don’t need a professional vertical spit to achieve authentic, flavorful results. Whether you choose to oven-roast, grill, pan-sear, or even air-fry, each method has its unique advantages.
For the most authentic results → Try a rotisserie or oven-roasted meat loaf.
For a smoky, charred flavor → Use grilling.
For a quick and crispy texture → Use a stovetop skillet or air fryer.
Now that we’ve covered the best ways to cook gyro meat, let’s move on to assembling and wrapping the perfect Greek gyro!

Slicing and Assembling the Gyro for the Best Texture
Once your gyro meat is cooked to perfection, how you slice and assemble it plays a crucial role in achieving the authentic texture and mouthfeel that makes Greek gyros so irresistible. The goal is to create thin, tender slices of flavorful meat that blend harmoniously with the pillowy pita, creamy tzatziki, and fresh toppings. Let’s go step by step to ensure you get the best results.
—
1. Slicing the Gyro Meat the Right Way
The way you slice your gyro meat determines how well it absorbs flavors and how enjoyable the texture is in every bite.
Key Techniques for Slicing Gyro Meat:
✅ Thin and Even Slices – Gyro meat should be sliced as thinly as possible to achieve the traditional texture. Thin slices allow for better layering inside the pita and ensure each bite has the perfect balance of meat and toppings.
✅ Against the Grain – Always slice the meat against the grain to keep it tender and easy to chew. This prevents toughness and allows the slices to soak up the sauce and seasonings.
✅ Shaving Off Crispy Layers – If using a vertical rotisserie, only shave off the outer, crispy layers and leave the rest to continue roasting. This maintains a steady supply of freshly cooked meat with the perfect balance of crisp edges and juicy interior.
✅ Reheating for Extra Crispiness – If you’re using pre-cooked or oven-baked gyro meat, you can lightly sear the slices in a hot skillet for a few seconds. This adds a crispy texture and enhances the flavor before assembling the wrap.
—
2. Choosing and Preparing the Pita Bread
The pita bread is just as important as the meat when assembling a gyro. A soft, warm, and slightly chewy pita enhances the eating experience and ensures the wrap holds together without falling apart.
How to Prepare the Pita:
✔️ Use Greek-style pita: Unlike regular pocket pita, Greek pita is thicker and softer, making it ideal for wrapping gyros.
✔️ Warm the pita before assembling: Lightly toast or heat the pita on a dry skillet for 15–30 seconds per side. This makes it more pliable and adds a hint of charred flavor.
✔️ Brush with olive oil for extra flavor: Before warming the pita, brushing it with a little olive oil can enhance its taste.
—
3. Assembling the Gyro for the Best Texture and Flavor Balance
Assembling a gyro wrap is an art—it’s about layering the right textures and flavors to create a well-balanced bite every time. Here’s the best order for assembling your gyro:
Step 1: Spread the Tzatziki Sauce
Start by spreading a generous layer of tzatziki sauce directly onto the warm pita.
This creates a moist base that enhances the juiciness of the wrap while adding a tangy, refreshing contrast to the rich meat.
Step 2: Layer the Sliced Gyro Meat
Arrange the thin slices of gyro meat on top of the sauce.
Stack them in a slightly overlapping pattern so they don’t fall apart when wrapped.
Pro Tip: If using pan-seared or grilled meat, sprinkle a little fresh lemon juice over the slices before assembling to brighten the flavors.
Step 3: Add Fresh Toppings for Crunch and Contrast
Sliced tomatoes – Adds juiciness and a hint of natural sweetness.
Sliced red onions – Provides a sharp, slightly spicy contrast.
Shredded lettuce (optional) – Adds a crisp texture without overpowering the flavors.
French fries (optional) – Traditional Greek-style gyros often include a few crispy fries inside for extra crunch.
Step 4: Extra Drizzle of Sauce and Herbs
Drizzle more tzatziki sauce over the top for extra creaminess.
Sprinkle some fresh chopped parsley or oregano to enhance the Mediterranean flavors.
—
4. Wrapping the Gyro the Right Way
A gyro wrap should be tight enough to hold everything together but not so tight that the pita rips. Here’s how to do it:
1. Fold one side of the pita over the filling, using your fingers to tuck the ingredients inside.
2. Roll the pita tightly while keeping the filling in place.
3. Wrap the bottom half in parchment paper or foil to help hold the shape and make it easier to eat.
4. Serve immediately while everything is warm and fresh!
—
Final Tips for the Best Gyro Experience
✔️ Balance the textures – Crispy meat, soft pita, creamy sauce, and crunchy toppings should all come together harmoniously.
✔️ Don’t overfill – Too much filling can make the wrap difficult to eat and cause the ingredients to spill out.
✔️ Serve fresh – Gyros taste best when freshly assembled, so avoid letting them sit too long before serving.
By following these slicing and assembling techniques, you’ll create a perfectly textured, flavorful Greek gyro wrap that rivals any street food stand in Greece!
How to Assemble a Greek Gyro Wrap Like a Pro
Warming the Pita Bread for the Best Texture
A gyro is only as good as the pita that holds it all together. The perfect pita is soft, warm, slightly chewy, and pliable enough to wrap around the delicious gyro fillings without tearing or falling apart. Warming the pita properly enhances its texture, making it more enjoyable to bite into while also bringing out its subtle flavors. Below, we’ll go through the best methods for warming pita bread and how to achieve restaurant-quality results at home.
—
1. Why Warming the Pita is Important
Freshly made pita is naturally soft and flexible, but store-bought or refrigerated pita can become dry, stiff, or brittle. If you try to wrap a gyro using cold or unheated pita, it may:
Crack or tear when folded
Feel tough or chewy rather than soft and tender
Absorb less tzatziki sauce, affecting the overall taste
Warming the pita softens the texture, makes it more aromatic, and allows it to hold the fillings better, creating a much more authentic gyro experience.
—
2. Best Methods for Warming Pita Bread
There are several ways to warm pita bread effectively. Choose a method based on your kitchen setup and how much time you have.
A. Skillet or Pan (Best for Authentic Flavor and Texture)
This method closely mimics the traditional way pitas are warmed in Greek street food stalls.
✅ How to do it:
1. Preheat a dry skillet or pan over medium heat. No oil is needed.
2. Place the pita flat on the pan and warm for about 30 seconds per side until soft and lightly golden.
3. For extra flavor, brush with olive oil and heat for an additional 10-15 seconds per side.
4. Keep warm by stacking the pitas and wrapping them in a clean kitchen towel.
✅ Why use this method?
Adds a subtle charred flavor similar to fresh-off-the-grill pitas
Keeps the pita soft but not soggy
Quick and easy for small batches
—
B. Open Flame (Best for Smoky, Authentic Char Marks)
This is the method used in many Greek restaurants and street vendors to achieve a slightly smoky flavor.
✅ How to do it:
1. Turn on a gas stove burner to medium-low heat.
2. Using tongs, place the pita directly over the flame.
3. Heat for 10-15 seconds per side, flipping carefully to prevent burning.
4. Once warm with a few charred spots, remove and wrap in foil or a clean towel.
✅ Why use this method?
Gives a smoky, grilled taste
Creates beautiful char marks for a rustic look
Very fast (less than a minute per pita)
❗ Caution:
Don’t leave the pita unattended, as it can burn quickly.
Avoid this method if using pre-packaged pitas with preservatives, as they may burn too fast.
—
C. Oven (Best for Large Batches)
If you’re warming multiple pitas at once, the oven is the easiest option.
✅ How to do it:
1. Preheat the oven to 350°F (175°C).
2. Wrap the pitas in aluminum foil to prevent them from drying out.
3. Place on the middle rack and heat for 5-7 minutes.
4. Remove, unwrap, and serve immediately.
✅ Why use this method?
Great for heating multiple pitas at once
Keeps them soft and evenly warm
Perfect if preparing gyros for a crowd or meal prep
—
D. Microwave (Fastest Method, But Use with Caution)
If you’re short on time, a microwave can warm pita quickly, but it’s easy to overdo it, making the bread chewy or tough.
✅ How to do it:
1. Place the pita on a microwave-safe plate.
2. Cover with a damp paper towel to retain moisture.
3. Microwave on high for 10-15 seconds.
4. Check for warmth—if needed, heat for 5-10 seconds more.
✅ Why use this method?
Super fast and convenient
Keeps the pita soft and warm
Works well for one or two pitas at a time
❗ Caution:
Microwaved pitas cool down and harden quickly, so serve immediately.
Overheating can make them rubbery or tough.
—
3. How to Keep Pita Warm and Soft
Once warmed, keeping the pita soft is just as important as heating it properly.
✔️ Stack and wrap: As soon as the pitas come off the heat, stack them and wrap them in a clean kitchen towel or aluminum foil. This traps heat and moisture, keeping them soft.
✔️ Serve immediately: Pita is best fresh and warm, so time your preparation to match when you’ll be assembling the gyros.
✔️ Reheat gently if needed: If the pitas cool down before serving, reheat quickly in a skillet or microwave for a few seconds to restore warmth and flexibility.
—
Final Thoughts
Warming your pita the right way makes a huge difference in the overall texture and taste of your gyro wrap. Whether you prefer the grilled flavor from a gas flame, the crispiness from a skillet, or the soft warmth from the oven, the key is to keep the pita warm, flexible, and slightly chewy. Mastering this simple step will elevate your homemade gyros and bring you closer to the authentic Greek street food experience!
Layering the Ingredients for a Balanced Bite
A well-assembled gyro isn’t just about piling ingredients into a pita—it’s about creating the perfect balance of flavors and textures in every bite. When layered correctly, each mouthful delivers the juicy, spiced meat, creamy tzatziki, fresh vegetables, and soft, warm pita in just the right proportions.
Below, we’ll break down the best order for layering ingredients, explain why each step matters, and provide tips to prevent a messy or uneven wrap.
—
1. Start with a Base of Tzatziki Sauce
✅ Why?
Spreading a layer of tzatziki sauce directly onto the pita acts as a flavorful foundation.
It helps keep the meat moist while also adding a cool, creamy contrast to the warm, spiced gyro meat.
The sauce prevents dryness and ensures that every bite is packed with its tangy, garlicky flavor.
✅ How to do it:
Use a spoon or spatula to spread tzatziki evenly over the center of the warm pita.
Avoid putting too much, as excess sauce can make the pita soggy.
—
2. Layer the Gyro Meat Evenly
✅ Why?
The meat is the star of the gyro, so it should be distributed evenly to ensure each bite has the right amount.
Placing the meat directly on top of the tzatziki helps it soak up the flavors while keeping it juicy and tender.
✅ How to do it:
Slice the gyro meat thinly for easy folding and layering.
Arrange the slices in a slightly overlapping pattern so that every part of the wrap has an even amount of meat.
If you like extra crispy edges, consider adding a few well-seared pieces on top for contrast.
—
3. Add Fresh Vegetables for Crunch and Brightness
✅ Why?
Fresh toppings add contrast to the rich, seasoned meat and creamy tzatziki.
They provide a mix of textures, making the gyro more refreshing.
✅ Best vegetables to include:
Sliced tomatoes – Adds juiciness and slight sweetness to balance the savory meat.
Thinly sliced red onions – Provides a sharp, slightly spicy bite that cuts through the richness.
Shredded lettuce (optional) – Adds a light, crisp texture without overpowering the other flavors.
Sliced cucumbers (optional) – Enhances the cool, refreshing element of the tzatziki.
✅ How to do it:
Distribute the veggies evenly over the meat—don’t pile them all in one spot.
Avoid overloading, as too many toppings can make the wrap difficult to fold.
—
4. Sprinkle with Fresh Herbs and Seasonings
✅ Why?
Fresh herbs like parsley or oregano add an authentic Mediterranean touch.
A light sprinkle of seasoning enhances the depth of flavor.
✅ How to do it:
Use chopped fresh parsley or a pinch of dried oregano for an earthy aroma.
A light squeeze of lemon juice over the meat can brighten up the flavors.
A small pinch of salt or sumac can enhance the natural flavors of the veggies.
—
5. (Optional) Add a Few Crispy French Fries
✅ Why?
In traditional Greek-style gyros, a few crispy French fries are added inside the wrap for extra texture.
They soak up the tzatziki and meat juices, making each bite even more satisfying.
✅ How to do it:
Place 3-4 fries on top of the veggies before folding the gyro.
If you prefer extra crispiness, use seasoned or spiced fries.
—
6. Drizzle Extra Tzatziki or Sauce for More Flavor
✅ Why?
A final light drizzle of tzatziki sauce on top helps balance the flavors.
If you want a spicier gyro, you can add a dash of hot sauce or a spicy yogurt-based sauce.
✅ How to do it:
Use a small spoon or squeeze bottle to control the amount of sauce.
Avoid using too much, or the wrap may become soggy.
—
7. Wrap It Up the Right Way
✅ Why?
A properly wrapped gyro keeps all the ingredients in place and makes it easier to eat.
It also ensures that each bite has the perfect balance of flavors.
✅ How to do it:
1. Fold one side of the pita over the fillings, then gently roll it up like a burrito.
2. Use a piece of parchment paper or foil to wrap the bottom half, making it easier to hold.
3. Serve immediately while everything is fresh and warm.
—
Final Tips for a Perfectly Layered Gyro
✔️ Keep the ingredient ratios balanced – Too much meat, sauce, or toppings can make the wrap fall apart.
✔️ Layer evenly – Every part of the pita should have a good mix of flavors.
✔️ Warm the pita first – A soft, flexible pita makes wrapping easier and enhances the texture.
✔️ Serve fresh – Gyros taste best right after assembly, while the pita is warm and the toppings are crisp.
By following this layering technique, you’ll create a gyro wrap that’s not only delicious but also well-structured, flavorful, and satisfying in every bite!
Wrapping and Rolling Techniques to Keep Everything Intact
The way you wrap and roll your gyro is just as important as how you layer the ingredients. An improperly wrapped gyro can lead to spillage, uneven bites, or worse—a messy meal. The goal is to create a sturdy, neatly rolled wrap that keeps all the ingredients intact, so every bite has a balanced amount of meat, sauce, veggies, and pita. Here’s a detailed guide on how to wrap and roll your gyro for a perfectly held-together sandwich that’s easy to eat, flavorful, and satisfying.
—
1. Use the Right Size Pita
✅ Why?
A too-small pita won’t allow you to fold and roll properly, leading to spillage or unbalanced layering.
A larger pita offers more surface area to distribute the ingredients evenly and create a tight, secure wrap.
✅ How to do it:
Choose a medium to large-size pita (about 8 inches or larger in diameter). This size provides enough room to add all your ingredients and still fold comfortably.
Ensure the pita is fresh, soft, and warm, as it’s easier to fold without cracking.
—
2. Position the Fillings Properly for Easy Rolling
✅ Why?
The placement of ingredients directly impacts the ease of wrapping. You want everything to be positioned in a way that keeps the wrap together and doesn’t cause the pita to rip or overflow.
✅ How to do it:
Place the fillings near the center of the pita, leaving about 1.5 to 2 inches of space at both ends.
Avoid overstuffing—too many toppings can make the wrap difficult to roll and may cause the fillings to spill out.
—
3. The First Fold – Tuck and Roll
✅ Why?
The first fold is essential in sealing the ingredients inside the pita. Without this step, your gyro could unravel and fall apart.
✅ How to do it:
Gently tuck in one side of the pita (usually the side facing you) over the fillings. This creates a seam and begins to form a cylinder shape.
As you tuck the pita, press the fillings inward slightly to keep them packed tightly.
The aim is to form a tight, neat roll without too much air space inside, which could lead to loose ingredients.
—
4. The Roll – Keep it Tight and Secure
✅ Why?
Rolling tightly is crucial to keeping all the fillings together, especially when the gyro is filled with juicy meats or sauces. A loose wrap will likely result in soggy pita, or worse, ingredients spilling out as you eat.
✅ How to do it:
After tucking one side of the pita, roll it over the fillings, tightening as you go, ensuring the contents stay in place.
Keep your hands firm and use a bit of pressure as you roll to ensure the gyro holds together securely.
Roll towards the other side, aiming to make the wrap as tight as possible without squeezing the fillings out.
—
5. Fold the Bottom End – Seal the Bottom
✅ Why?
Folding the bottom end creates a barrier that prevents the fillings from slipping out of the open bottom of the pita. This keeps the gyro secure and helps it maintain its shape as you hold it.
✅ How to do it:
After rolling the gyro halfway, take the bottom edge of the pita (the side closest to the filling) and fold it upwards towards the center.
The fold should tuck the fillings inside the wrap, ensuring that everything stays tightly packed.
Once folded, continue rolling until you reach the top edge of the pita.
—
6. Wrap with Paper or Foil for Easy Handling
✅ Why?
Wrapping your gyro in parchment paper or foil makes it easier to hold, prevents any sauce from dripping, and keeps the wrap together. This also helps in serving the gyro, especially if you’re preparing multiple at once.
✅ How to do it:
Cut a piece of parchment paper or aluminum foil that’s large enough to wrap around the gyro and create a neat parcel.
Wrap the gyro tightly with the paper or foil, leaving the open end exposed for easy access.
The paper also helps the gyro maintain its warmth while keeping everything intact, so you won’t end up with a messy lap while eating.
—
7. Tips for Ensuring a Neat, Stable Wrap
Don’t overstuff: Adding too many ingredients can make the wrapping process difficult, and could lead to the gyro falling apart.
Keep the wrap tight: Tightly rolled gyros hold together better and are less likely to unravel as you eat.
Use a slight angle: When folding, try rolling at a slight angle (instead of straight up), which can help with keeping everything inside and making the wrap more compact.
Work quickly, but carefully: The longer you wait, the more the ingredients can shift. Rolling swiftly will help maintain the balance of flavors.
—
8. Final Check – Test for Integrity
✅ Why?
After wrapping and rolling, check to ensure the gyro is firm and well-sealed. This ensures that nothing will fall out during eating.
✅ How to do it:
Gently press the gyro to see if it holds its shape. If it feels too loose or unstable, you may need to tighten the roll or adjust the filling proportions.
Make sure the bottom fold is secure, so none of the fillings escape.
—
Final Thoughts
By using the proper wrapping and rolling techniques, you’ll create a gyro that’s not only delicious but easy to hold and eat. Ensuring the ingredients stay intact helps keep the flavors balanced in every bite, making for a much more enjoyable meal. With practice, you’ll be able to wrap the perfect gyro every time!
Tips for Serving and Storing Gyros
What to Serve with Gyros
Gyros are a flavorful, filling meal that can be paired with various sides to create a well-rounded, satisfying experience. Whether you’re hosting a Mediterranean-inspired dinner or enjoying a quick meal on your own, there are several options to complement the rich, savory flavors of the gyro. Below, we’ll explore the best side dishes, salads, dips, and drinks that elevate the gyro experience and make it even more memorable.
—
1. Greek Salad
✅ Why?
A Greek salad is a classic pairing with gyros because its freshness and lightness provide a refreshing contrast to the rich, spiced meat. The combination of cucumbers, tomatoes, olives, onions, and feta cheese is a perfect match for the Mediterranean flavors of the gyro.
The tangy vinaigrette enhances the gyro’s taste, adding a zesty element that cuts through the richness of the meat.
✅ How to make it:
Combine sliced cucumbers, tomatoes, red onions, black olives, and feta cheese in a bowl.
Dress the salad with a simple mixture of olive oil, lemon juice, oregano, salt, and pepper.
Serve it fresh alongside your gyro for a vibrant, crunchy side.
—
2. Hummus and Pita Chips
✅ Why?
Hummus is another great addition, offering a creamy, earthy dip that pairs well with the savory and spiced meat in the gyro. Its richness adds a nice texture contrast, and it enhances the Mediterranean flavors in the wrap.
Pita chips are the perfect vehicle for dipping into hummus. Their crispiness provides a satisfying crunch and complements the soft texture of the gyro filling.
✅ How to make it:
Serve store-bought or homemade hummus in a small bowl with a drizzle of olive oil and a sprinkle of paprika.
Pair it with crispy pita chips, which can be easily made by cutting pita into triangles and baking them with a bit of olive oil and sea salt.
—
3. French Fries (Greek Style)
✅ Why?
A classic and beloved side for gyros, French fries add a comforting, crispy texture that contrasts beautifully with the tender, flavorful gyro meat.
In Greek-style gyros, fries are often placed inside the wrap, adding a satisfying crunch and a soft, starchy element. However, serving fries as a side dish is just as delicious.
✅ How to make it:
Make crispy homemade fries by cutting potatoes into thick wedges, tossing them with olive oil, oregano, garlic powder, and salt, then roasting them until golden.
Alternatively, you can deep fry the fries for an extra crispy texture. Serve them with a sprinkle of feta cheese or a squeeze of lemon juice for added flavor.
—
4. Tzatziki Sauce (Extra)
✅ Why?
If you can’t get enough of the creamy, tangy flavor, extra tzatziki sauce on the side is always a welcome addition. It acts as a refreshing dip, balancing the spice of the gyro meat and adding a cool, cucumber-based flavor.
It’s also great for dipping your fries, pita chips, or even vegetables like carrot sticks or celery.
✅ How to make it:
Prepare tzatziki sauce by mixing Greek yogurt, grated cucumber, garlic, lemon juice, olive oil, dill, and a pinch of salt and pepper.
Serve it as a side in a bowl, and enjoy the extra burst of flavor.
—
5. Spanakopita (Spinach Pie)
✅ Why?
Spanakopita, or Greek spinach pie, is a traditional Greek pastry filled with spinach, feta cheese, and herbs, wrapped in crispy phyllo dough.
The flaky texture and savory filling of spanakopita make it an ideal side dish to accompany gyros, adding another level of flavor and texture to your meal.
✅ How to make it:
Spanakopita is available in many grocery stores, but you can also make it at home.
Preheat the oven and layer phyllo dough with a mixture of sautéed spinach, feta cheese, onions, and a few herbs like dill or oregano. Bake until golden and crispy, then slice it into small triangles for serving.
—
6. Roasted Vegetables
✅ Why?
Roasted Mediterranean vegetables, such as zucchini, eggplant, bell peppers, and onions, are a healthy and flavorful complement to gyros. Their sweetness and slight char from roasting make them a delicious contrast to the savory meat.
Roasting the vegetables also brings out their natural flavors and makes them soft with a caramelized exterior that’s both tender and crispy.
✅ How to make it:
Chop the vegetables into bite-sized pieces and toss them with olive oil, garlic, oregano, salt, and pepper.
Roast them in a preheated oven at around 400°F (200°C) until golden and tender, about 20-25 minutes.
—
7. Greek-style Lemon Potatoes
✅ Why?
Lemon potatoes are a tangy, herb-infused side dish that brings a burst of citrus flavor to your meal. They pair perfectly with gyros because the zesty lemon and fresh herbs cut through the richness of the meat, creating a harmonious balance.
The crispy outer layer and tender inside make these potatoes incredibly satisfying.
✅ How to make it:
Slice potatoes into wedges and toss them with olive oil, garlic, lemon juice, oregano, and paprika.
Roast at 400°F (200°C) until golden and crispy, about 30-35 minutes.
—
8. Greek Wine or Ouzo
✅ Why?
A glass of Greek wine, such as Assyrtiko (a crisp white) or Agiorgitiko (a rich red), can elevate the flavors of the gyro and provide a refreshing, slightly tart contrast to the meal.
Alternatively, Ouzo, a Greek anise-flavored spirit, is a classic drink choice to pair with gyros. Its distinctive licorice flavor is perfect for cutting through the richness of the meat and complementing the Mediterranean spices.
✅ How to serve:
Serve wine chilled or at room temperature, depending on the variety.
For Ouzo, serve it chilled with a bit of water on the side to dilute it to your preferred strength.
—
Final Thoughts
By pairing gyros with these delicious sides, you’ll create a balanced, Mediterranean-inspired meal that satisfies the taste buds and enhances the flavors of the gyro itself. Whether you opt for a refreshing Greek salad, crispy fries, or tangy lemon potatoes, these sides perfectly complement the savory, spiced gyro and round out the meal in the best way possible.
Storing Leftovers and Reheating Tips to Maintain Freshness
Gyros are a delicious, satisfying meal, but often, you may find yourself with leftovers. Properly storing and reheating your gyro ensures that the flavors and textures stay as close to the original as possible. While gyros are best enjoyed fresh, with a few tips and tricks, you can enjoy them the next day without sacrificing too much of their quality. Here’s how to properly store and reheat your gyro leftovers to maintain their freshness.
—
1. Storing Leftovers
✅ Wrap the Gyro Properly
To store your leftover gyro, it’s important to wrap it securely to prevent the pita from drying out and the ingredients from spilling. If you’ve already assembled the gyro with the sauce and toppings, you’ll want to wrap it tightly in wax paper or plastic wrap. You can also store the components separately (meat, pita, and toppings) to preserve freshness.
✅ Separate the Ingredients
If you want to keep the flavors and textures at their best, consider separating the ingredients. Store the gyro meat in an airtight container or ziplock bag in the refrigerator to prevent it from becoming dry. Fresh toppings like tomatoes, onions, and lettuce should be stored in a separate container to prevent them from getting soggy.
✅ Tzatziki Sauce Storage
Tzatziki sauce is best stored in its own container. Ensure it’s tightly sealed and refrigerated. If the sauce is too watery after being stored, you can drain any excess moisture before serving.
✅ Refrigeration Time
Leftover gyros should be eaten within 2-3 days. Beyond that, the pita bread and the toppings can lose their freshness and the meat may become tough and dry.
—
2. Reheating the Gyro Meat
✅ Using a Skillet
The best way to reheat gyro meat and maintain its flavor and texture is by using a skillet. Heat the skillet on medium heat and add a small amount of olive oil. Once the pan is hot, add the gyro meat and sauté it for a few minutes, turning occasionally. This method helps to keep the meat moist while also giving it a slightly crispy edge, which mimics the texture of freshly cooked gyro meat.
✅ Reheating in the Oven
If you have a larger amount of gyro meat, you can reheat it in the oven. Preheat your oven to 350°F (175°C), and place the gyro meat on a baking sheet. Cover it with aluminum foil to prevent it from drying out. Heat for about 10-15 minutes, checking every 5 minutes to make sure it doesn’t get overcooked.
✅ Microwave (Quick Option)
While not the ideal method, you can also use the microwave for reheating. Place the gyro meat on a microwave-safe plate and cover it with a damp paper towel. Heat for about 1 minute on high, checking the meat to see if it’s warmed through. Be cautious, as microwaving can sometimes make the meat rubbery if overdone.
—
3. Reheating the Pita Bread
✅ Using the Skillet or Grill
To preserve the soft and pillowy texture of the pita bread, avoid microwaving it, as it will become tough and chewy. Instead, heat a skillet or grill pan over medium-high heat. Warm the pita for 30-45 seconds per side, pressing gently to ensure even heating. This method will help restore some of the pita’s original fluffiness and prevent it from becoming dry.
✅ Oven Option
Alternatively, you can wrap the pita bread in foil and heat it in a preheated oven at 350°F (175°C) for about 5-10 minutes. This helps soften the pita while retaining its moisture.
—
4. Reheating Fresh Toppings and Tzatziki Sauce
✅ Fresh Toppings
For fresh vegetables like lettuce, tomatoes, and onions, it’s best to eat them cold as they’re not ideal for reheating. If they’ve been stored separately, simply add them back to your gyro before serving. If you find that they’ve lost some of their crispness, you can refresh them by sprinkling a bit of cold water over them, or refrigerating them for a little longer before serving.
✅ Tzatziki Sauce
Tzatziki sauce should also be eaten cold, and it can be stored in the refrigerator for a few days. If the sauce has become a bit watery during storage, drain any excess liquid before using it. You can also stir in a little extra Greek yogurt if you want to freshen up the consistency.
—
5. Freezing Gyros for Long-Term Storage
If you have a large batch of leftover gyros that you don’t plan to eat within a few days, you can freeze the gyro meat and pita bread separately for longer storage. Here’s how to do it:
✅ Freezing the Gyro Meat
Wrap the meat tightly in plastic wrap or place it in a freezer-safe container or ziplock bag.
Label the bag with the date so you know when it was frozen.
For the best texture, try to eat the frozen meat within 1-2 months.
✅ Freezing Pita Bread
Wrap the pita in plastic wrap or place it in a freezer bag.
You can also layer a piece of parchment paper between the pitas to keep them from sticking together.
Freeze for up to 2 months for optimal freshness.
—
Final Thoughts
By storing and reheating your leftover gyros carefully, you can maintain the freshness and flavors for a few days or even weeks. When storing gyro meat, pita bread, and toppings separately, each component will retain its texture and taste, ensuring that your leftovers still feel like a treat. Whether you’re reheating in a skillet, oven, or microwave, these tips will help you enjoy your gyro leftovers with minimal loss of quality.
Creative Variations on the Classic Gyro Wrap
While the traditional Greek gyro wrap is a beloved classic, there’s plenty of room for creativity when it comes to customizing this dish. From incorporating different meats to experimenting with toppings and sauces, the gyro is incredibly versatile. Whether you want to make a unique version to cater to specific tastes or introduce a fun twist to the classic, there are plenty of ways to create variations that will delight your taste buds.
—
1. Alternative Meats for the Gyro
✅ Chicken Gyro
One of the most popular variations of the classic gyro is the chicken gyro. The chicken is often seasoned with similar spices, like oregano, garlic, and lemon, to maintain the Mediterranean flavor profile. This variation is perfect for those who prefer leaner meat or simply enjoy the tender texture of grilled chicken. It can be served with the same traditional toppings, such as tzatziki sauce, tomatoes, and onions, or you can add extra ingredients like avocado for a creamy touch.
✅ Lamb and Beef Blend
While lamb is traditionally used in gyros, some recipes mix beef and lamb for a richer, more flavorful blend. The beef brings a slightly earthier flavor, while the lamb adds tenderness and moisture. This version keeps the classic gyro flavor intact, but with a slight variation in the meat’s depth of taste. It’s perfect for those who love the flavor of lamb but prefer a milder bite.
✅ Pork Gyro
In some regions of Greece, pork is a common meat for gyros, and it’s often seasoned with a mix of oregano, garlic, and olive oil. Pork has a slightly richer flavor than chicken and pairs wonderfully with the freshness of the toppings and tzatziki sauce. A slow-roasted pork gyro is often incredibly tender, making it a fantastic alternative for gyro lovers looking for something a bit different.
✅ Vegetarian and Vegan Gyros
For a plant-based take on the gyro, vegetarian and vegan versions are gaining popularity. You can swap out the meat for ingredients like grilled portobello mushrooms, falafel, or tofu. The mushrooms have a meaty texture and earthy flavor, making them an ideal substitute. Falafel, made from ground chickpeas and spices, offers a crunchy contrast to the creamy tzatziki and soft pita. Tofu, when marinated and grilled, becomes a flavorful alternative for vegans. Don’t forget to load up on fresh veggies like cucumbers, tomatoes, and lettuce for added texture and flavor.
—
2. Different Toppings and Additions
✅ Pickled Vegetables
Adding pickled vegetables, such as pickled cucumbers, onions, or peppers, can provide a tangy contrast to the savory gyro meat. The acidity from the pickling helps balance the richness of the meat and sauces, making each bite more exciting. Pickled red onions are especially popular, giving a slightly sweet and tangy crunch to the wrap.
✅ Cheese Variations
While the classic gyro typically doesn’t include cheese, you can experiment with various cheeses to add flavor. Feta cheese, crumbled on top of the gyro, is a popular option in Greek cuisine and can give a briny, tangy punch to the wrap. For a different twist, try adding halloumi cheese, which is salty and firm, or even mozzarella for a milder, creamier texture.
✅ Avocado or Guacamole
For a creamy, modern twist, add avocado or a dollop of guacamole to the gyro. Avocado complements the tzatziki sauce perfectly and adds richness without overwhelming the other flavors. The smoothness of avocado also works well with the crispy meat, giving the gyro a balanced texture.
✅ Spicy Elements
If you enjoy a bit of heat, you can incorporate spicy ingredients into your gyro. A drizzle of harissa, sriracha, or a few slices of jalapeño peppers can elevate the dish with some spicy kick. These spicy toppings can add complexity to the traditional gyro, appealing to those who enjoy bold flavors.
—
3. Unique Sauces to Experiment With
✅ Tahini Sauce
Instead of the usual tzatziki sauce, consider using tahini sauce, which is made from ground sesame seeds and is rich and nutty. It’s a great alternative for those who are looking for a dairy-free sauce or a slightly different flavor. Tahini pairs especially well with grilled chicken or lamb and complements fresh, crisp veggies like cucumber and tomato.
✅ Spicy Feta Sauce
If you love the tang of feta but want something with a bit more zest, spicy feta sauce is an excellent option. Made by blending feta with red chili flakes, garlic, and olive oil, this sauce adds both creaminess and heat to the gyro. It’s particularly good when paired with grilled meats like chicken or beef.
✅ Garlic Aioli
For a garlicky alternative, try adding garlic aioli to your gyro. This creamy, garlic-flavored mayonnaise is a simple and flavorful option that pairs beautifully with the richness of the gyro meat. The smoothness of aioli contrasts nicely with the crunchiness of the fresh vegetables, creating a balanced bite.
—
4. Fusion Gyros
✅ Greek-Mexican Fusion: The Gyro Burrito
For those who enjoy fusing different culinary traditions, try creating a gyro burrito. Instead of a traditional pita, you can use a flour tortilla to wrap your gyro fillings. Add in classic Mexican ingredients like sour cream, guacamole, and salsa, and you’ve got a fun fusion of Mediterranean and Mexican flavors. This twist on the gyro offers a new way to enjoy the familiar taste, with a bit of flair.
✅ BBQ Gyro
If you’re a fan of BBQ, try adding a smoky twist to your gyro with BBQ sauce and grilled vegetables. Marinate the gyro meat in your favorite BBQ sauce before grilling, or drizzle some on top for a smoky, tangy finish. You can also add grilled corn, bell peppers, or zucchini for extra flavor.
✅ Breakfast Gyro
For a creative breakfast version, try a breakfast gyro with scrambled eggs, bacon, and cheese in place of the traditional gyro meat. Top it off with a light drizzle of sriracha aioli or your favorite hot sauce. This variation transforms the gyro into a hearty, satisfying breakfast or brunch option.
—
5. Healthier Gyro Options
✅ Low-Carb Gyro
If you’re following a low-carb diet, consider replacing the pita with a lettuce wrap. This variation is light, but still packs in all the delicious gyro flavors. Simply wrap the gyro fillings in crisp lettuce leaves for a crunchy, fresh substitute that reduces carbs while still offering satisfying texture and flavor.
✅ Grilled Veggie Gyro
For a lighter option, you can focus on grilled vegetables as the main filling of your gyro. Chargrilled eggplant, zucchini, bell peppers, and mushrooms make a flavorful and satisfying filling. Add in some feta cheese and tzatziki sauce, and you have a light yet fulfilling meal.
—
Final Thoughts
The classic gyro is a versatile dish that can be easily customized to suit different tastes, dietary preferences, and creative cravings. Whether you’re exploring new meats, experimenting with fresh toppings, or trying unique sauces, the gyro is a canvas for countless delicious variations. These creative takes on the gyro allow you to enjoy this beloved street food in new and exciting ways, making it perfect for every palate and occasion.