
A perfectly baked potato is crispy on the outside and light, fluffy on the inside. But achieving that ideal texture isn’t just about tossing a potato in the oven—it requires the right type of potato, the correct baking method, and a few simple tricks.
Russet potatoes are the best choice for baking because of their high starch content, which results in a soft and airy interior. However, other varieties like Yukon Gold or Idaho potatoes can also work, depending on your preference.
In this guide, you’ll learn how to bake the perfect potato step by step, from choosing the right spud to getting that irresistibly crispy skin. Whether you prefer classic toppings like butter and sour cream or creative additions like avocado and Greek yogurt, this method will ensure a flawless baked potato every time.
Choosing the Best Potatoes for Baking
Russet vs. Yukon Gold vs. Idaho – Which One is Best?
Choosing the right type of potato is the first step to achieving a perfectly baked potato. While any potato can technically be baked, not all varieties will yield the same crispy skin and fluffy interior. Let’s compare the three most popular types—Russet, Yukon Gold, and Idaho—to determine which one is best for baking.
Russet Potatoes: The Classic Choice
Russet potatoes are the gold standard for baking. Their high starch content and low moisture make them ideal for creating that sought-after fluffy texture inside. The thick skin crisps up beautifully when brushed with oil and baked at high heat. If you want a traditional baked potato with a soft, airy center and a crispy shell, Russet is your best bet.
Pros:
High starch content = extra fluffy interior
Thick skin crisps up well
Absorbs butter, sour cream, and other toppings beautifully
Cons:
Can become dry if overbaked
Doesn’t have a naturally buttery flavor like Yukon Gold
Yukon Gold Potatoes: A Creamier Alternative
Yukon Gold potatoes have a medium starch content and a naturally creamy, buttery texture. While they don’t bake up as light and airy as Russets, they offer a rich flavor that some people prefer. Their skin is thinner and less crispy when baked, but Yukon Golds can still be a good choice for those who enjoy a more tender bite.
Pros:
Naturally buttery flavor
Creamier texture than Russets
Holds its shape well after baking
Cons:
Thinner skin doesn’t crisp as much
Less fluffy interior compared to Russet potatoes
Idaho Potatoes: A Special Type of Russet
Idaho potatoes are actually a type of Russet grown in Idaho’s unique climate and soil conditions. They have the same high starch content as regular Russet potatoes, making them equally excellent for baking. Some argue that Idaho-grown Russets have an even better texture and flavor due to the state’s ideal potato-growing conditions.
Pros:
Same benefits as Russet potatoes
Premium quality due to growing conditions in Idaho
Cons:
More expensive than regular Russets
Availability may vary by region
Which One Should You Choose?
For the ultimate baked potato with a crispy skin and fluffy inside, Russet potatoes (including Idaho varieties) are the best choice. If you prefer a creamier texture with a naturally buttery taste, Yukon Gold potatoes can be a good alternative, though the skin won’t be as crispy.
If you’re aiming for the classic steakhouse-style baked potato, stick with Russet or Idaho potatoes. They deliver the ideal balance of crunch and fluff, making them perfect for loading up with butter, sour cream, cheese, and other toppings.
Why the Potato’s Size and Starch Content Matter
The size and starch content of a potato play a crucial role in determining its texture, cooking time, and overall quality when baked. Choosing the right potato ensures that you get a crispy skin, a fluffy interior, and even cooking throughout.
Starch Content: The Key to a Fluffy Interior
Potatoes are generally classified into three categories based on their starch content: high-starch, medium-starch, and low-starch.
High-starch potatoes (e.g., Russet, Idaho) – These have a dry, mealy texture that makes them ideal for baking. The high starch content absorbs moisture and expands when cooked, creating a light, fluffy interior. This is why Russet potatoes are the best choice for classic baked potatoes.
Medium-starch potatoes (e.g., Yukon Gold) – These have a balance of starch and moisture, resulting in a creamier, denser texture. While they work for baking, they won’t achieve the same airy interior as Russets.
Low-starch, waxy potatoes (e.g., Red potatoes, New potatoes) – These contain more moisture and hold their shape well, making them great for roasting or boiling but not ideal for baking. They tend to turn dense rather than fluffy when cooked whole.
Why does starch matter? When a high-starch potato is exposed to heat, the starch granules absorb water, swell, and eventually burst, creating a soft, airy structure inside the potato. This process is what makes a baked Russet potato light and fluffy.
Potato Size: How It Affects Baking Time & Texture
The size of the potato affects how long it takes to bake and how evenly it cooks.
Small potatoes (under 6 ounces) – Bake faster but may dry out if overcooked. These are good for smaller portions or for making “baked potato bites.”
Medium potatoes (6–10 ounces) – The ideal size for baking. They cook evenly, develop a crispy skin, and maintain a fluffy texture inside.
Large potatoes (over 10 ounces) – Require a longer baking time, and if not baked properly, the inside can remain undercooked while the outside overcooks. Large potatoes may need to be rotated in the oven for even cooking.
Pro Tip: If you’re baking multiple potatoes at once, try to choose ones of similar size so they cook evenly. Mixing small and large potatoes in the oven may result in some being overcooked while others remain underdone.
Best Choice for Baking
For the best baked potato, choose a medium-to-large Russet potato (about 8–10 ounces) with high starch content. This will ensure you get a soft, fluffy interior while achieving a crispy, golden-brown skin. If using a different variety like Yukon Gold, expect a denser, creamier texture instead of the classic airy fluffiness of a Russet.
Should You Wash and Dry Potatoes Before Baking?
Yes! Washing and drying your potatoes properly before baking is an essential step to ensure food safety, crispy skin, and even cooking. Let’s break down why this step is crucial and how to do it correctly.
Why Washing Potatoes Is Important
Potatoes grow underground, so their skins are often covered in dirt, bacteria, and sometimes pesticide residues (especially if they are not organic). Since baked potatoes are often eaten with the skin on, skipping the washing step can lead to unwanted grit or contaminants in your meal.
Even if the potatoes look clean, they may still have invisible dirt or germs. Washing them thoroughly helps remove:
Soil and dust from the growing process
Pesticide residues (if not organic)
Potential bacteria from handling and transportation
Pro Tip: If you’re buying organic potatoes, you still need to wash them, as they can have natural soil residues and bacteria from storage.
How to Wash Potatoes Properly
1. Rinse Under Cold Running Water – Hold the potato under running water and rub the surface with your hands to remove loose dirt.
2. Use a Vegetable Brush (If Available) – A stiff brush helps scrub away stubborn dirt lodged in the crevices of the potato skin.
3. Avoid Using Soap or Harsh Chemicals – Potatoes are porous, and soap residues can seep into the flesh, affecting flavor and safety.
4. Check for Any Green Spots or Sprouts – If you see green areas or sprouting eyes, cut them off before baking, as they contain solanine, a natural toxin that can cause digestive issues in large amounts.
Why Drying the Potatoes Matters
After washing, drying the potatoes completely is just as important as washing them. Any excess moisture on the skin can prevent crisping and cause the potatoes to steam instead of bake.
To dry potatoes properly:
Use a clean kitchen towel – Pat the potatoes thoroughly to absorb any surface moisture.
Let them air dry for a few minutes – If you have time, leave them out for 5–10 minutes before baking to ensure any remaining moisture evaporates.
Avoid baking wet potatoes – Damp skin can turn soggy in the oven instead of crisping up.
Pro Tip: If you want extra-crispy skin, after drying the potatoes, rub them lightly with olive oil and sprinkle with sea salt before baking. This enhances both texture and flavor.
Final Verdict
Always wash and dry your potatoes before baking to remove dirt and bacteria and to help achieve that perfect crispy skin. Taking an extra few minutes to do this step properly will improve both the taste and texture of your baked potatoes.
The Best Way to Bake a Potato – Step-by-Step Guide
Oven Temperature and Baking Time for Perfect Results
Getting the oven temperature and baking time right is essential for achieving a crispy skin and a fluffy interior. Too low of a temperature can result in a leathery skin and an unevenly cooked potato, while too high can burn the skin before the inside is fully cooked. Let’s break down the ideal oven settings, baking times, and some pro tips for the perfect baked potato.
What’s the Best Oven Temperature for Baking Potatoes?
The ideal temperature for baking a potato is 400–425°F (200–220°C). This range ensures that the potato cooks evenly while allowing the skin to crisp up nicely.
400°F (200°C) – Produces a perfectly baked potato with a balance between crispy skin and a fluffy inside.
425°F (220°C) – Speeds up cooking slightly and enhances skin crispiness but requires closer monitoring to prevent over-browning.
Lower than 375°F (190°C) – Will cook the potato, but it may take much longer, and the skin may not crisp up as well.
Higher than 450°F (230°C) – Can burn the skin before the inside is fully cooked, resulting in a tough exterior and uneven texture.
How Long to Bake a Potato?
Baking time depends on the size of the potato:
Small potatoes (under 6 ounces) – 35–45 minutes at 400°F (200°C)
Medium potatoes (6–10 ounces) – 50–60 minutes at 400°F (200°C)
Large potatoes (over 10 ounces) – 60–75 minutes at 400°F (200°C)
Pro Tip: If baking multiple potatoes, try to choose ones of similar size so they cook evenly. Large potatoes may take longer, so check for doneness by piercing them with a fork or knife.
How to Tell When a Baked Potato is Done?
A baked potato is ready when:
The skin is crisp and golden brown – It should feel firm to the touch but not too hard.
A fork or knife slides in easily – There should be no resistance when piercing through the center.
The internal temperature reaches 205°F–210°F (96°C–99°C) – If you have a kitchen thermometer, this is the perfect temperature range for a fluffy texture.
Pro Tip: If your potato isn’t quite done after the recommended time, continue baking in 5-minute intervals until it reaches the right texture.
Should You Flip Potatoes While Baking?
Yes, flipping the potatoes halfway through baking helps them cook evenly. It prevents the bottom from becoming too dark or leathery while ensuring uniform crispiness on all sides.
Final Verdict
For the best results, bake your potatoes at 400–425°F (200–220°C) for 50–60 minutes, depending on size. Check for doneness by testing with a fork or thermometer, and flip them halfway through for even cooking. If you follow these steps, you’ll get a perfectly crispy-skinned, fluffy-centered baked potato every time!
Foil or No Foil? The Truth About Wrapping Potatoes
One of the most debated topics in baking potatoes is whether or not to wrap them in aluminum foil. Some people swear by foil-wrapped potatoes, claiming it helps them cook faster and keeps them moist, while others argue that foil ruins the crispy skin that makes a baked potato so delicious. Let’s break down the pros and cons of each method so you can decide what works best for you.
Baking Potatoes with Foil: Does It Help?
Wrapping a potato in foil traps steam, which creates a softer skin and a more moist interior. While this might sound appealing, it actually changes the texture of the potato significantly. Instead of getting a crispy, golden-brown skin, you end up with a steamed potato that lacks the classic baked potato texture.
Pros of Using Foil:
Helps retain moisture, preventing the potato from drying out
Keeps the potato warm for longer after baking (great if serving later)
Can be useful if baking in a lower-temperature oven (below 375°F)
Cons of Using Foil:
Steams the potato instead of baking it – The trapped moisture prevents the skin from getting crispy
Can lead to a soggy exterior – Instead of a firm, crackly skin, you get a softer, slightly wet texture
Slows down the baking process – Contrary to popular belief, foil actually insulates the potato, making it take longer to cook through
Baking Potatoes Without Foil: The Best Method for Crispy Skin
If you want a true steakhouse-style baked potato with a crispy, flavorful skin and a light, fluffy inside, do not wrap it in foil. Baking potatoes uncovered allows the heat of the oven to dry out the skin, helping it become crisp and golden-brown.
How to Get the Best Results Without Foil:
1. Wash and dry the potatoes thoroughly – Removing excess moisture is key to crispy skin.
2. Prick the potatoes with a fork – This prevents them from bursting as they cook.
3. Rub with oil and salt – A light coating of olive oil or vegetable oil enhances the crispiness, and salt adds flavor.
4. Bake directly on the oven rack or a baking sheet – This ensures even air circulation around the potato, promoting a well-baked, crispy skin.
Pros of Baking Without Foil:
Produces a crispy, flavorful skin
Allows moisture to escape, giving you a fluffier interior
Cooks more evenly without trapping steam
Avoids the risk of excess moisture making the skin soggy
Cons of Baking Without Foil:
The potato may cool down faster once removed from the oven
The skin might be too crispy or dry for those who prefer a softer texture
Final Verdict: To Wrap or Not to Wrap?
For the best crispy-skinned baked potato, skip the foil and bake the potato directly on the oven rack or a baking sheet. If you prefer a softer, steamed texture, you can wrap it in foil, but be aware that this will result in a less crispy skin.
If you must wrap your potatoes in foil (for example, to keep them warm for longer), do so after baking, not before. This way, you can enjoy a perfectly crispy skin while still retaining heat inside.
Should You Poke Holes in the Potato Before Baking?
One of the most common questions when baking potatoes is whether or not you should poke holes in them before putting them in the oven. Some people always do it, while others skip this step entirely. But does it really make a difference? Let’s dive into why poking holes in your potato matters and the best way to do it.
Why Poking Holes in a Potato is Important
Potatoes contain water, and as they bake, that water turns into steam. If there’s no way for the steam to escape, pressure can build up inside the potato. In rare cases, this can cause the potato to burst, creating a mess in your oven.
By pricking the skin with a fork or a knife, you create small vents that allow steam to escape gradually, preventing any risk of explosion. While potato explosions are uncommon, they can happen, especially with larger potatoes that hold more moisture.
Key Benefits of Poking Holes in a Potato:
Prevents bursting – Creates small escape routes for steam buildup
Helps even cooking – Allows steam to escape, reducing excess moisture inside
Enhances texture – Less trapped steam means a fluffier inside instead of a gummy or overly moist texture
How to Poke Holes in a Potato the Right Way
If you decide to poke holes in your potato before baking, follow these simple steps to do it properly:
1. Use a fork or sharp knife – A fork is the easiest tool, but a small paring knife also works well.
2. Prick the potato 4–6 times – Space the holes evenly around the surface to allow steam to escape from all sides.
3. Don’t go too deep – About ¼ to ½ inch deep is enough. Avoid stabbing all the way through, as this can release too much moisture and make the potato dry out.
4. Be gentle – Press just enough to pierce the skin without crushing the potato.
Pro Tip: If you’re baking small potatoes, you might not need to poke them, as they have less moisture and are less likely to explode. However, for large russet or Idaho potatoes, it’s always a good idea.
What Happens If You Don’t Poke Holes?
In most cases, nothing bad will happen. The potato might cook just fine without bursting, especially if it’s not overly large or packed with moisture. However, there is a risk, particularly with bigger or fresher potatoes that contain more water.
Potential Downsides of Skipping This Step:
The potato might burst – Rare but possible, creating a mess in the oven
Moisture can get trapped inside – This could lead to a slightly denser, less fluffy texture
Longer cooking time – Since moisture stays inside, the heat takes longer to penetrate the center
Final Verdict: To Poke or Not to Poke?
For safety and better texture, it’s best to poke holes in your potatoes before baking. While explosions are rare, they do happen, and a few quick pricks with a fork can prevent any risk. Plus, allowing some steam to escape helps create a fluffier, more evenly cooked potato.
So, when in doubt—poke! It only takes a few seconds and ensures a perfect baked potato every time.
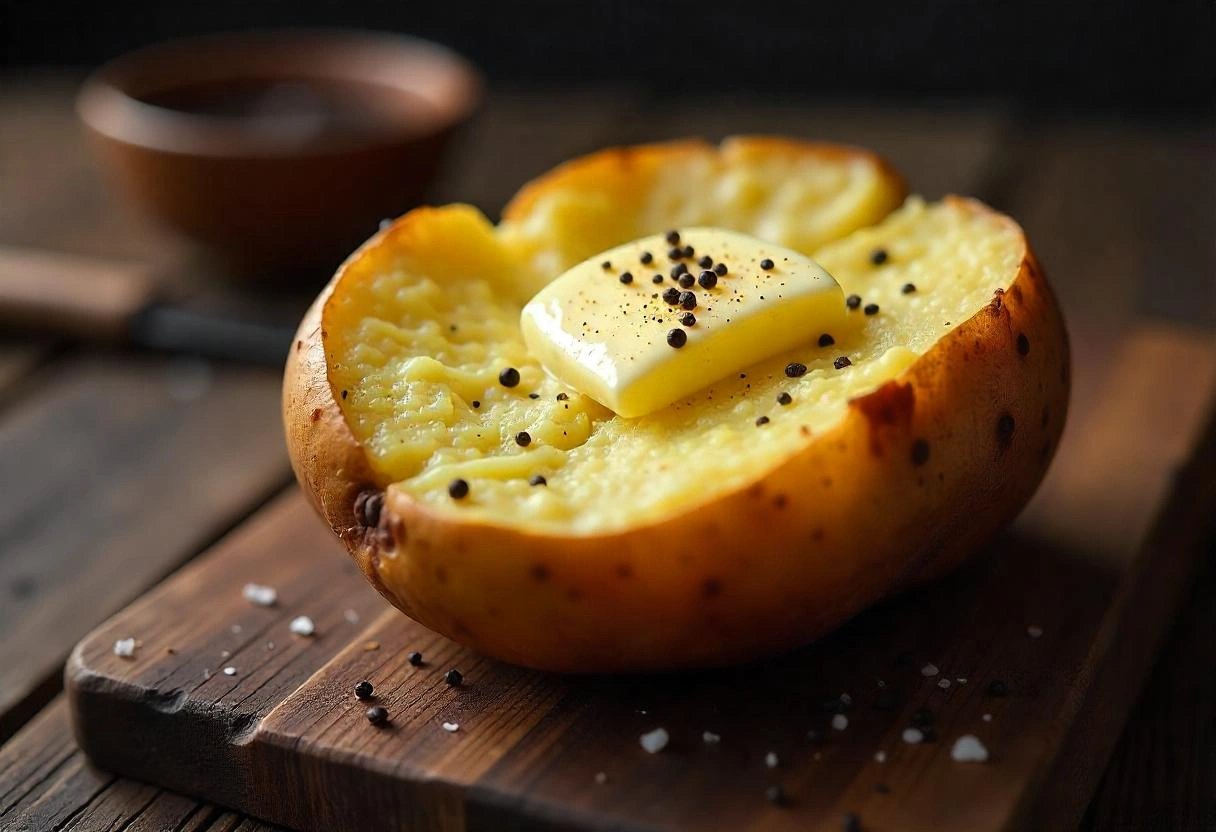
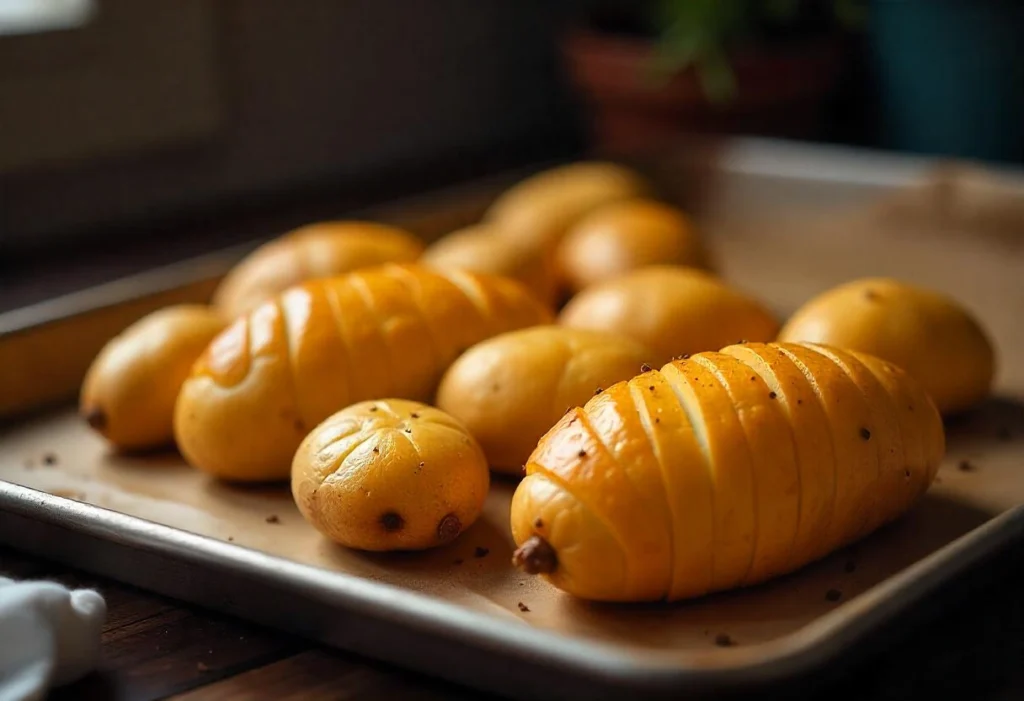
How to Get Crispy Skin on a Baked Potato
The Role of Olive Oil, Butter, and Sea Salt
Adding olive oil, butter, and sea salt to your baked potato isn’t just about flavor—it also affects texture, crispiness, and moisture retention. Each of these ingredients plays a unique role in elevating the final result. Whether you want a crispy skin, a rich buttery finish, or just a well-balanced seasoning, knowing when and how to use them can make a significant difference.
Olive Oil: Enhancing Crispiness and Flavor
Brushing or rubbing a potato with olive oil before baking is one of the best ways to achieve a golden, crispy skin. The oil helps the skin dehydrate evenly, promoting a crackly texture while also adding a mild, earthy flavor.
Benefits of Using Olive Oil on Baked Potatoes:
Promotes crispiness – Helps create a thin, crunchy layer on the outside
Enhances flavor – Adds a subtle richness to complement the natural potato taste
Locks in moisture – Prevents excessive drying while still allowing the inside to become fluffy
How to Apply Olive Oil:
Before baking – Rub a thin layer of olive oil on the skin for maximum crispiness.
After baking – Drizzle a little olive oil before serving for an added boost of flavor.
Best type of olive oil? – Extra virgin olive oil works well, but you can also use avocado oil for a neutral taste.
Pro Tip: If you prefer an ultra-crispy skin, apply the olive oil midway through baking instead of at the start. This prevents the oil from burning and intensifies the crunch.
Butter: Richness and Softness
Butter adds creaminess, richness, and a classic comfort-food flavor to baked potatoes. While it doesn’t help much with crisping the skin, it enhances the soft, fluffy interior by melting into the potato’s natural starches.
Benefits of Using Butter on Baked Potatoes:
Adds rich, buttery flavor – A must-have for a classic baked potato experience
Softens the interior – Helps create a smooth, velvety texture when mixed in
Pairs well with toppings – Complements cheese, sour cream, chives, and other seasonings
How to Apply Butter:
After baking – Place a pat of butter inside the potato as soon as you cut it open so it melts perfectly.
Before baking? – You can rub butter on the skin, but it may burn at high temperatures. Olive oil is better for crisping.
Alternative options – If you want a richer taste, try using garlic butter or herb-infused butter for extra depth of flavor.
Sea Salt: Bringing Out the Best in Your Potato
Salt is a crucial ingredient in any baked potato, as it enhances natural flavors and contributes to a crisp, well-seasoned skin. Sea salt is particularly popular because of its mineral-rich taste and larger crystals, which provide a slight crunch.
Benefits of Using Sea Salt on Baked Potatoes:
Boosts natural potato flavor – Helps balance the potato’s starchiness
Creates a delicious, crispy skin – Forms a light crust when applied before baking
Works well with other seasonings – Can be combined with garlic powder, smoked paprika, or black pepper for extra flavor
How to Apply Sea Salt:
Before baking – Sprinkle sea salt over an oiled potato skin for an even coating.
After baking – Add a pinch of flaky sea salt to taste for a final flavor boost.
Best type of salt? – Use coarse sea salt or kosher salt instead of fine table salt for a better texture.
Should You Use All Three?
For the ultimate baked potato, consider using all three ingredients strategically:
1. Olive oil + salt before baking → For crispy, well-seasoned skin
2. Butter after baking → For a rich, creamy interior
3. Final sprinkle of sea salt → To enhance overall flavor
This combination creates the perfect balance of crispness, moisture, and seasoning, making every bite flavorful and satisfying.
Why High Heat and Proper Air Circulation Matter
Achieving the perfect baked potato isn’t just about choosing the right variety or seasoning it well—it also comes down to how you bake it. Two crucial factors that influence the texture and overall quality of a baked potato are high oven temperature and proper air circulation. If the heat is too low or the potato isn’t positioned correctly, you may end up with a dense, unevenly cooked, or soggy potato instead of the crispy-skinned, fluffy masterpiece you’re aiming for.
The Role of High Heat in Baking Potatoes
Baking at a high temperature (400°F to 450°F / 200°C to 230°C) is essential for two reasons:
1. Crispy, golden-brown skin – Higher heat helps draw out moisture from the skin, allowing it to crisp up.
2. Fluffy, tender interior – Heat activates the potato’s starches, causing them to break down into a light and airy texture.
If you bake at a lower temperature (below 375°F / 190°C), the potato may take longer to cook, but the skin won’t crisp up as well. Instead, it could turn leathery, trapping steam inside and leading to a denser, slightly gummy interior.
How Proper Air Circulation Affects Texture
Even heat distribution is just as important as temperature. Poor air circulation can result in uneven cooking, leaving some parts of the potato overcooked while others remain hard. Ensuring good airflow allows the heat to surround the potato evenly, leading to consistent texture throughout.
Best Practices for Air Circulation:
Place potatoes directly on the oven rack – This allows hot air to circulate all around the potato, preventing a soggy bottom.
Use a baking sheet with a wire rack – If you prefer to use a baking sheet, place the potatoes on a wire rack set inside the sheet to promote airflow underneath.
Avoid overcrowding – If you’re baking multiple potatoes, leave at least an inch of space between each one to ensure proper heat distribution.
No foil wrapping – Wrapping potatoes in foil traps steam, preventing the skin from crisping and interfering with heat circulation.
How High Heat and Air Circulation Work Together
When you combine high heat with good airflow, you get the best of both worlds:
A perfectly crispy, golden-brown skin – Dry heat removes excess moisture, enhancing the crunch.
A soft, fluffy interior – Evenly circulated heat ensures that the inside cooks uniformly.
Efficient cooking time – High temperatures and proper spacing allow the potatoes to cook faster and more evenly.
If you want steakhouse-style baked potatoes, resist the temptation to lower the heat or wrap them in foil. Instead, let the potatoes bake uncovered at a high temperature with plenty of space between them, and you’ll get that perfect balance of crispy on the outside and soft on the inside.
Should You Bake Potatoes on a Rack or a Baking Sheet?
When baking potatoes, the way you position them in the oven significantly impacts their texture. Some people place them directly on the oven rack, while others prefer using a baking sheet. Each method has its own advantages, and choosing the right one depends on whether you prioritize crispiness, even cooking, or convenience.
Let’s break down the pros and cons of baking potatoes on a rack versus a baking sheet to help you decide the best method for achieving that perfect crispy skin and fluffy interior.
—
Baking Potatoes on an Oven Rack: The Best for Crispy Skin
Placing potatoes directly on the oven rack is one of the best ways to ensure even cooking and a crispy exterior. This method allows heat to circulate freely around the entire potato, ensuring uniform baking from all sides.
Benefits of Baking on an Oven Rack
Better Air Circulation – Heat surrounds the potato on all sides, ensuring even cooking.
Crispier Skin – With no contact with a baking surface, moisture evaporates efficiently, creating a crispier crust.
Prevents a Soggy Bottom – Since the potato isn’t resting on a flat surface, steam can escape evenly instead of getting trapped underneath.
How to Bake Potatoes on an Oven Rack
1. Preheat the oven to 400°F–450°F (200°C–230°C).
2. Scrub and dry the potatoes to remove dirt and excess moisture.
3. Rub with olive oil and salt for a crispier, well-seasoned skin.
4. Place the potatoes directly on the oven rack, leaving space between them for proper airflow.
5. Bake for 45–60 minutes, depending on size, until crispy on the outside and fork-tender inside.
Pro Tip: Place a baking sheet on the lower rack to catch any drips from the potatoes, especially if you oiled them. This prevents messes and keeps your oven clean.
—
Baking Potatoes on a Baking Sheet: The Most Convenient Method
Using a baking sheet is another common method, often preferred for convenience and easy cleanup. However, this method can sometimes lead to softer skin, especially if moisture builds up underneath the potatoes.
Benefits of Baking on a Baking Sheet
Easier to Handle – No risk of potatoes slipping through oven grates.
Prevents Oven Drips – Any oil or moisture stays on the baking sheet.
Great for Batch Baking – Useful when baking multiple potatoes at once.
Potential Drawbacks
❌ Less Airflow – The bottom of the potato rests on a solid surface, which can trap moisture and prevent full crisping.
❌ Skin May Not Be as Crispy – Direct contact with the sheet can lead to a slightly softer texture compared to using a rack.
How to Improve Results on a Baking Sheet:
Use a wire rack inside the baking sheet – Elevating the potatoes off the surface improves airflow and crispiness.
Flip the potatoes halfway through baking – This helps them cook evenly on all sides.
Avoid overcrowding – Give each potato space to allow heat to circulate.
—
Rack vs. Baking Sheet: Which One Should You Use?
Use the oven rack if you want the crispiest skin and don’t mind placing the potatoes directly on the grates.
Use a baking sheet if you want easy handling and less mess, but consider adding a wire rack for better airflow.
For the best of both worlds, place a wire rack inside a baking sheet to get both crispiness and convenience.
If crispy skin is your priority, baking directly on the oven rack is the best choice. If you prefer a softer texture or want easier cleanup, a baking sheet with a wire rack is the next best option. Either way, making sure your potatoes have enough space and proper airflow will ensure perfectly baked results every time.
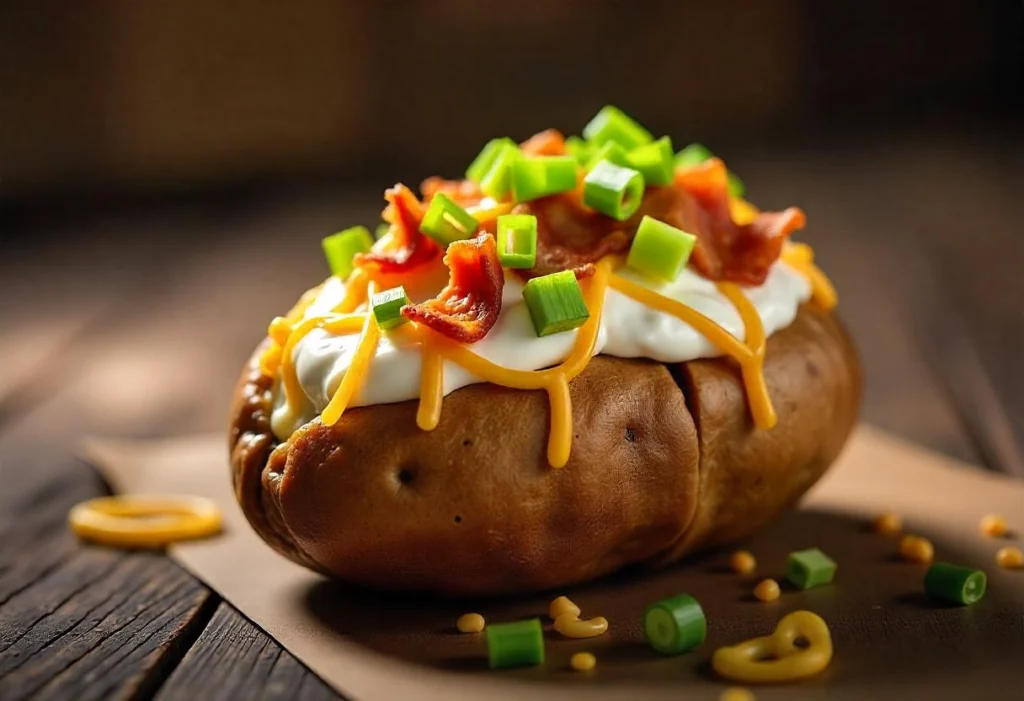
Best Toppings for a Perfect Baked Potato
Classic Toppings: Butter, Sour Cream, and Cheese
A perfectly baked potato is delicious on its own, but what truly elevates it to comfort food perfection are the toppings. Classic toppings like butter, sour cream, and cheese add richness, creaminess, and flavor that transform a simple baked potato into a satisfying dish. Each topping contributes a unique texture and taste, making them timeless favorites.
Let’s dive into how these toppings enhance baked potatoes and explore some variations to customize your perfect potato.
—
Butter: The Foundation of Flavor
Melted butter is often the first thing people reach for when dressing up a baked potato. It seeps into the fluffy interior, adding richness and moisture while enhancing the natural earthy taste of the potato.
Best Ways to Use Butter on a Baked Potato:
Classic Salted Butter: A simple pat of salted butter instantly adds creaminess and depth.
Garlic Butter: Mixing butter with minced garlic or garlic powder creates a flavorful, aromatic twist.
Herb-Infused Butter: Blend butter with fresh or dried herbs like parsley, chives, or thyme for a gourmet touch.
Compound Butter: Pre-mixed flavored butter (such as butter with roasted garlic or Parmesan) can take your potato to the next level.
Pro Tip: For an extra luxurious texture, slice your potato open while it’s still hot, then add the butter right away. This ensures it melts perfectly into the fluffy interior.
—
Sour Cream: The Perfect Tangy Contrast
Sour cream adds a cool, creamy, and slightly tangy contrast to the warm, starchy potato. Its acidity balances the richness of the butter and cheese, making it an essential topping.
How to Use Sour Cream Creatively:
Classic Dollop: A spoonful of plain sour cream enhances the potato’s creaminess.
Herbed Sour Cream: Mix in fresh chives, dill, or green onions for extra flavor.
Spicy Kick: Stir in a little hot sauce, cayenne, or chipotle powder for a spicy variation.
Greek Yogurt Alternative: If you want a healthier option, substitute sour cream with Greek yogurt for a similar tang but with more protein and less fat.
Pro Tip: For an extra smooth texture, allow the sour cream to come to room temperature before adding it to your potato.
—
Cheese: The Ultimate Comfort Topping
Cheese brings a gooey, melty, and savory component to baked potatoes. The warmth of the potato helps melt the cheese, creating a rich, satisfying experience.
Best Cheese Choices for Baked Potatoes:
Cheddar Cheese: A sharp, aged cheddar adds depth and tang.
Mozzarella: A mild, creamy option that melts beautifully.
Parmesan: Adds a nutty, salty touch—perfect for a sophisticated twist.
Pepper Jack: For a spicy kick, use Pepper Jack or add a sprinkle of crushed red pepper.
Blue Cheese or Feta: If you like bold flavors, crumbled blue cheese or feta adds a tangy, salty bite.
How to Add Cheese to Your Potato:
Grate cheese on top of a hot baked potato so it melts naturally.
Melt cheese into a creamy sauce with milk and butter for an indulgent experience.
Broil for a crispy cheese crust by placing the potato under a broiler for 1–2 minutes after adding cheese.
Pro Tip: For an extra creamy cheese experience, mix your cheese with a little warm milk or cream before adding it to the potato.
—
How to Combine These Classic Toppings
For the ultimate loaded baked potato, layer your toppings strategically:
1. Start with butter – It melts into the potato, creating a rich base.
2. Add sour cream – A generous dollop balances the richness with a tangy contrast.
3. Top with cheese – Either shredded or melted, cheese adds the final touch of indulgence.
For even more flavor, sprinkle on chopped chives, crispy bacon bits, or freshly ground black pepper to complete your perfect baked potato.
—
Final Thoughts
Classic toppings like butter, sour cream, and cheese have stood the test of time because they create a perfect balance of richness, creaminess, and flavor. Whether you keep it simple with just butter or go all out with a loaded potato, these ingredients turn an ordinary baked potato into a hearty, satisfying meal.
So, next time you bake a potato, don’t just stop at salt and pepper—dress it up with these timeless toppings for the ultimate comfort food experience.
Healthy Alternatives: Greek Yogurt, Avocado, and Herbs
If you’re looking for healthier alternatives to classic baked potato toppings like butter, sour cream, and cheese, you don’t have to sacrifice flavor. Ingredients like Greek yogurt, avocado, and fresh herbs offer a nutritious way to enhance your baked potato while adding creaminess, richness, and depth.
These alternatives provide more protein, fiber, and essential nutrients, making them great choices for those following a health-conscious, low-fat, or plant-based diet. Let’s explore how each of these toppings can elevate your baked potato.
—
Greek Yogurt: A High-Protein Creamy Substitute
Greek yogurt is one of the best healthy swaps for sour cream. It has a similar tangy flavor and creamy texture, but it’s packed with protein, probiotics, and calcium while being lower in fat.
Why Greek Yogurt Works as a Topping
Lower in fat, higher in protein – Keeps you full longer.
Adds gut-friendly probiotics – Supports digestion and gut health.
Similar taste to sour cream – But with a nutritional boost.
Ways to Use Greek Yogurt on a Baked Potato
Plain & Simple – Just add a dollop of plain Greek yogurt as you would with sour cream.
Herbed Yogurt Sauce – Mix Greek yogurt with garlic, dill, chives, or lemon juice for a fresh and tangy topping.
Spicy Kick – Stir in a bit of hot sauce or smoked paprika for a flavorful twist.
Cucumber Yogurt (Tzatziki-Inspired) – Blend Greek yogurt with grated cucumber, garlic, and mint for a refreshing topping.
Pro Tip: Use full-fat or 2% Greek yogurt for the creamiest texture, as nonfat varieties can be too tart and watery.
—
Avocado: A Nutrient-Dense Creamy Addition
If you love rich, buttery flavors but want a healthier alternative to butter, mashed or sliced avocado is a fantastic option. Avocados are high in heart-healthy monounsaturated fats, fiber, and vitamins, making them a great choice for a nutrient-dense topping.
Why Avocado Is a Great Topping for Baked Potatoes
Healthy fats – Supports heart health and keeps you full.
Creamy and satisfying – Provides a smooth, buttery texture without dairy.
Packed with fiber – Helps with digestion and gut health.
Ways to Use Avocado on a Baked Potato
Mashed Avocado – Mash an avocado with a bit of salt and lemon juice for a creamy topping.
Avocado Slices – Simply add fresh avocado slices on top for a fresh, rich texture.
Guacamole Twist – Mix mashed avocado with diced tomatoes, onions, lime juice, and cilantro for a Mexican-inspired potato topping.
Avocado Yogurt Sauce – Blend avocado with Greek yogurt and lime juice for a creamy, tangy sauce.
Pro Tip: For the best texture, use ripe avocados that are slightly soft to the touch but not mushy.
—
Herbs: Fresh Flavor Without the Calories
Fresh herbs are an easy, calorie-free way to add bold flavor and color to your baked potato. Whether sprinkled on top or mixed into a sauce, herbs enhance the taste without extra fat or sodium.
Best Herbs for Baked Potatoes
Chives – A classic topping that adds a mild onion-like flavor.
Parsley – Bright and fresh, it balances the richness of other toppings.
Cilantro – Great for a Mexican or Southwestern-style baked potato.
Basil – Pairs well with Italian-inspired flavors like tomato and garlic.
Rosemary or Thyme – Adds an earthy, aromatic touch.
Ways to Use Herbs on a Baked Potato
Simple Herb Garnish – Chop fresh herbs and sprinkle them over the potato.
Herbed Greek Yogurt Sauce – Blend yogurt with fresh herbs, garlic, and lemon for a tangy, flavorful topping.
Garlic & Herb Olive Oil Drizzle – Infuse olive oil with fresh garlic and herbs, then drizzle over the baked potato.
Pesto Twist – Spread a spoonful of basil pesto over the potato for an Italian-inspired touch.
Pro Tip: Use fresh herbs whenever possible for the best flavor, but dried herbs can work in a pinch.
—
Combining These Healthy Toppings for Maximum Flavor
For a nutritious and satisfying baked potato, try combining these toppings for an extra boost of flavor and health benefits:
Greek Yogurt + Chives + Lemon Zest – A creamy, tangy, and refreshing combo.
Mashed Avocado + Cilantro + Lime Juice – A zesty, creamy, and slightly tropical topping.
Herbed Yogurt Sauce + Fresh Parsley + Garlic – A Mediterranean-inspired, savory topping.
Avocado + Pesto + Cherry Tomatoes – A bright and bold Italian-inspired twist.
—
Final Thoughts
Greek yogurt, avocado, and fresh herbs are delicious, nutrient-rich alternatives to traditional baked potato toppings. They add flavor, texture, and health benefits while keeping your meal light and satisfying. Whether you want high-protein, heart-healthy fats, or fresh herbal flavors, these toppings offer endless possibilities for creating a baked potato that’s both delicious and nutritious.
Next time you bake a potato, skip the butter and sour cream—and try one (or a combination) of these healthy, flavorful toppings!
Loaded Baked Potato Ideas for Maximum Flavor
A simple baked potato is delicious, but a loaded baked potato takes things to the next level with bold flavors, rich textures, and satisfying toppings. Whether you’re craving classic comfort food, a protein-packed meal, or a gourmet twist, the right combination of ingredients can turn a humble baked potato into a restaurant-worthy dish.
Here are some delicious loaded baked potato ideas to inspire your next meal.
—
1. Classic Fully Loaded Baked Potato
This is the ultimate comfort food version of a loaded baked potato, featuring rich, creamy, and savory toppings.
What You Need:
Butter – Melts into the fluffy potato for a rich base.
Sour Cream – Adds a tangy, creamy contrast.
Cheddar Cheese – A sharp, gooey topping that enhances every bite.
Crispy Bacon Bits – Smoky, crunchy, and packed with flavor.
Chives or Green Onions – A fresh, mild onion-like kick.
Salt & Pepper – Simple but essential for balancing flavors.
Pro Tip: To get the cheese extra melty, add it while the potato is hot, then pop it under the broiler for a minute.
—
2. Tex-Mex Loaded Baked Potato
If you love bold, spicy flavors, this Mexican-inspired baked potato is a must-try.
What You Need:
Taco-Seasoned Ground Beef or Chicken – Adds protein and a spicy kick.
Black Beans – Provides fiber and a creamy texture.
Shredded Cheddar or Pepper Jack Cheese – Melts beautifully with Tex-Mex flavors.
Salsa or Pico de Gallo – Brings freshness and tanginess.
Guacamole or Sliced Avocado – A creamy, nutrient-rich addition.
Sour Cream or Greek Yogurt – Cools down the spice while adding creaminess.
Jalapeño Slices – For an extra kick of heat.
Cilantro – A fresh, herbaceous touch.
Pro Tip: For extra crunch, sprinkle crushed tortilla chips on top.
—
3. BBQ Pulled Pork or Chicken Baked Potato
This hearty, smoky, and slightly sweet potato is perfect for BBQ lovers.
What You Need:
Pulled Pork or Shredded BBQ Chicken – Slow-cooked and coated in tangy BBQ sauce.
Sharp Cheddar or Monterey Jack Cheese – Melts into the pulled meat for extra richness.
Caramelized Onions – Adds a deep, sweet-savory flavor.
Crispy Fried Onions – Provides crunch and texture.
Coleslaw – Balances out the richness with a fresh, tangy crunch.
BBQ Sauce Drizzle – Ties everything together with smoky sweetness.
Pro Tip: Use smoked paprika or chipotle powder to enhance the smoky BBQ flavor.
—
4. Mediterranean-Style Loaded Baked Potato
For a lighter, fresher twist, try Mediterranean flavors packed with herbs, healthy fats, and vibrant ingredients.
What You Need:
Hummus or Tzatziki Sauce – Adds creaminess and a Mediterranean flair.
Crumbled Feta Cheese – Provides a salty, tangy kick.
Diced Cucumbers and Tomatoes – Adds freshness and crunch.
Kalamata Olives – Brings a bold, briny flavor.
Chopped Red Onions – A little sharpness for extra depth.
Drizzle of Olive Oil and Lemon Juice – Enhances all the flavors.
Fresh Parsley or Dill – For a bright, herby finish.
Pro Tip: Serve with a side of warm pita bread for a complete meal.
—
5. Buffalo Chicken Loaded Baked Potato
If you love spicy buffalo wings, this zesty, creamy, and cheesy baked potato is for you.
What You Need:
Shredded Buffalo Chicken – Toss cooked chicken in buffalo sauce for a spicy kick.
Ranch or Blue Cheese Dressing – Cools down the heat while adding tang.
Crumbled Blue Cheese or Shredded Mozzarella – Melts beautifully into the potato.
Celery & Carrots (Finely Chopped) – Adds crunch and freshness.
Green Onions or Chives – A mild, onion-like bite.
Extra Buffalo Sauce Drizzle – For that bold, spicy finish.
Pro Tip: Add crispy bacon bits for an extra layer of smoky flavor.
—
6. Breakfast-Style Loaded Baked Potato
Turn your baked potato into a hearty breakfast dish packed with protein and flavor.
What You Need:
Scrambled or Fried Egg – Adds protein and richness.
Crumbled Breakfast Sausage or Bacon – Brings a savory, smoky element.
Shredded Cheddar or Pepper Jack Cheese – Melts into the potato for gooey goodness.
Sautéed Spinach or Peppers – A healthy veggie boost.
Hot Sauce or Ketchup – For an extra kick of flavor.
Pro Tip: Top with avocado slices for a creamy, nutritious twist.
—
7. Vegan Loaded Baked Potato
For a plant-based alternative, this dairy-free, veggie-packed version delivers big on taste and nutrition.
What You Need:
Cashew Cream or Dairy-Free Sour Cream – A creamy, tangy alternative.
Roasted Chickpeas or Black Beans – Adds protein and crunch.
Nutritional Yeast or Vegan Cheese – Mimics cheesy flavor without dairy.
Sautéed Mushrooms and Spinach – Brings earthy, umami richness.
Avocado Slices or Guacamole – Adds creaminess and healthy fats.
Toasted Sunflower or Pumpkin Seeds – For a satisfying crunch.
Pro Tip: Drizzle with lemon-tahini sauce for extra depth and creaminess.
—
Final Thoughts
A baked potato is a blank canvas that can be transformed into an indulgent comfort dish, a protein-packed meal, or a light and fresh Mediterranean-style delight. By choosing the right toppings, you can customize your baked potato to match your cravings, dietary preferences, or the ingredients you have on hand.
Whether you stick to classic flavors like cheese and bacon or go for bold combinations like BBQ pulled pork or buffalo chicken, there’s a loaded baked potato for every occasion.
So next time you bake a potato, get creative and pile on the flavor!
Alternative Cooking Methods for Baking Potatoes
Air Fryer Baked Potatoes: Faster and Crispier?
If you love baked potatoes but don’t want to wait an hour for them to cook in the oven, the air fryer might be your new best friend. Air fryers have become incredibly popular for their ability to crisp up food quickly, and they work wonders on baked potatoes. By using rapid hot air circulation, an air fryer creates a perfectly crispy skin while keeping the inside soft and fluffy. But is it really better than traditional baking? Let’s break it down.
—
1. Why Use an Air Fryer for Baked Potatoes?
The biggest advantage of air fryer baked potatoes is speed and crispiness. Unlike an oven, which takes time to preheat and relies on surrounding heat, an air fryer uses powerful fans to circulate hot air, cutting down the cooking time significantly.
Crispier Skin – The air fryer dehydrates the skin faster, creating a golden, crackly texture without the need for excessive oil.
Faster Cooking Time – While oven-baked potatoes take 50-60 minutes, air fryer potatoes cook in just 35-40 minutes at 400°F (200°C).
No Need to Flip – The circulating hot air ensures even cooking from all sides.
Energy Efficient – Air fryers use less electricity than a full-sized oven.
Perfect for Small Batches – If you’re only cooking one or two potatoes, an air fryer is more convenient than heating up an entire oven.
—
2. How to Make Air Fryer Baked Potatoes
The process is almost identical to baking potatoes in the oven, but with a few tweaks to get the best results.
Step 1: Choose the Right Potatoes
Russet potatoes are ideal because their high starch content results in the fluffiest insides, while their thick skin crisps up beautifully.
Step 2: Prep the Potatoes
1. Wash and Dry Thoroughly – Any moisture left on the skin can prevent crisping.
2. Poke Holes with a Fork – Just like oven-baking, this allows steam to escape and prevents bursting.
3. Rub with Oil and Salt – A light coating of olive oil or avocado oil helps achieve a crispy skin, and salt enhances flavor.
Step 3: Air Fry at the Right Temperature
Preheat the Air Fryer to 400°F (200°C) for a few minutes.
Place the Potatoes in the Basket – Avoid overcrowding so air can circulate properly.
Cook for 35-40 Minutes – Flip halfway through if desired, though it’s not always necessary.
Pro Tip: If you like extra crispy skin, air fry for 5 more minutes at 425°F (218°C) at the end.
—
3. How Does It Compare to Oven-Baked Potatoes?
While both methods produce delicious baked potatoes, there are a few key differences:
Verdict: If you want super crispy skin and faster results, go with the air fryer. If you’re cooking many potatoes at once, the oven might still be the better option.
—
4. Pro Tips for Perfect Air Fryer Baked Potatoes
Don’t Overcrowd the Basket – Too many potatoes will block airflow, preventing even cooking.
Use Similar-Sized Potatoes – This ensures they cook at the same rate.
Reheat Leftovers in the Air Fryer – 5 minutes at 375°F (190°C) will bring back the crispiness.
Add Butter or Cheese While Still Hot – This allows them to melt beautifully into the potato’s center.
—
Final Thoughts
If you love baked potatoes with ultra-crispy skin but don’t want to wait an hour, the air fryer is a game-changer. It delivers restaurant-quality baked potatoes in nearly half the time, making it an efficient, flavorful, and convenient alternative to oven-baking.
So, the next time you’re craving a perfectly baked potato, try using your air fryer and experience the crispiness for yourself!
Microwave vs. Oven: Does It Affect Texture?
When it comes to baking potatoes, you might wonder if using a microwave is a faster, more convenient alternative to the traditional oven method. While the microwave significantly cuts down on cooking time, it also affects the texture and flavor of the potato in noticeable ways. Let’s break down the differences between microwaving and oven-baking potatoes to see which method is best for achieving the perfect balance of fluffy insides and crispy skin.
—
1. How Microwaving Affects a Baked Potato
The microwave cooks food using electromagnetic waves that heat the water molecules inside the food. This means that the heat comes from within the potato rather than surrounding it, as in an oven.
Faster Cooking Time – A potato can be fully cooked in the microwave in 5-10 minutes, compared to the 45-60 minutes needed in an oven.
Moisture Loss – Microwaves heat food unevenly, leading to dry spots and areas that become overly moist. The inside might feel more steamed than baked.
Softer Skin – Unlike the oven, which dehydrates the outer layer for a crisp finish, microwaved potatoes tend to have wrinkled, rubbery, or soggy skin.
Less Flavor Development – The dry heat of an oven helps develop a more complex, roasted flavor, whereas microwaved potatoes can taste a bit bland.
Pro Tip: If you want the speed of a microwave but still crave a crispy skin, start by microwaving the potato for 5-6 minutes, then finish it in the oven (or air fryer) at 425°F (218°C) for 10-15 minutes. This hybrid method gives you the best of both worlds.
—
2. How Oven-Baking Affects a Potato’s Texture
Baking potatoes in an oven is the traditional method, and for good reason—it delivers the best texture and flavor. Unlike the microwave, which heats food internally, the oven provides even, surrounding heat, allowing the potato to cook slowly and evenly.
Perfectly Crispy Skin – The dry heat removes moisture from the potato’s skin, creating a golden, crispy crust.
Even Cooking – No hot spots or uneven textures—just a uniformly soft, fluffy interior.
Better Flavor Development – The slow roasting process caramelizes natural sugars, giving the potato a deeper, richer taste.
More Time-Consuming – While this method takes around 45-60 minutes, the superior texture and flavor make it worth the wait.
Pro Tip: To maximize crispiness, rub the potato with olive oil and coarse salt before baking, and place it directly on the oven rack for optimal air circulation.
—
3. Microwave vs. Oven: Side-by-Side Comparison
—
4. Is There a Way to Make Microwaved Potatoes Better?
If you’re in a hurry but don’t want to sacrifice texture, try these tricks:
Finish in the Oven (or Air Fryer) – After microwaving, bake the potato at 425°F (218°C) for 10-15 minutes to crisp up the skin.
Use a Damp Paper Towel – Wrapping the potato in a damp towel before microwaving can help retain moisture and prevent a dry, leathery texture.
Let It Rest – Allowing the potato to sit for a minute after microwaving helps distribute heat more evenly.
—
Final Verdict: Which Method is Best?
If you want a quick, no-fuss baked potato, the microwave gets the job done, but you may end up with a soggy or uneven texture. If you’re after perfectly crisp skin and a fluffy, flavorful interior, oven-baking is the best choice.
For the best of both worlds, try the hybrid method—microwave first for speed, then finish in the oven or air fryer for the ultimate crispy baked potato experience!
How to Reheat a Baked Potato Without Losing Its Texture
A baked potato is best enjoyed fresh out of the oven, but what if you have leftovers? Reheating a baked potato the wrong way can leave you with soggy skin and a dry, rubbery interior. The key to keeping its fluffy inside and crispy skin is using the right reheating method. Let’s explore the best techniques to reheat a baked potato while preserving its delicious texture.
—
1. The Best Method: Reheating in the Oven
If you have the time, reheating your baked potato in the oven is the best way to maintain its original texture. The oven restores the crispiness of the skin while keeping the inside soft and moist.
How to Reheat a Baked Potato in the Oven
Preheat your oven to 400°F (200°C).
Place the potato directly on the oven rack (or on a baking sheet with a wire rack). This allows hot air to circulate, crisping up the skin.
Bake for 15-20 minutes, until the potato is heated through.
If the potato seems a little dry, wrap it loosely in aluminum foil, but be aware this may soften the skin slightly.
Why It Works:
The dry heat removes excess moisture, preventing a soggy potato.
The slow reheating process preserves the fluffy texture inside.
The high temperature restores the crispy skin.
—
2. Quick and Effective: Reheating in an Air Fryer
The air fryer is a fantastic alternative if you want to reheat your baked potato faster while keeping the skin crispy. It uses hot air circulation to warm the potato evenly.
How to Reheat a Baked Potato in the Air Fryer
Set the air fryer to 375°F (190°C).
Place the potato in the basket—don’t overcrowd to ensure proper airflow.
Heat for 5-8 minutes, flipping halfway through for even crispiness.
If needed, add a light brush of oil before reheating to enhance the crispiness.
Why It Works:
The rapid hot air circulation restores the crispy skin without over-drying the interior.
It’s faster than an oven while still maintaining a good texture.
No need for extra oil or butter—just reheat and enjoy.
—
3. The Quickest Method: Reheating in the Microwave
If you’re short on time, the microwave is the fastest way to reheat a baked potato, but it requires a little extra care to avoid drying it out.
How to Reheat a Baked Potato in the Microwave
Place the potato on a microwave-safe plate.
Cover with a damp paper towel—this helps trap moisture and prevents the potato from drying out.
Microwave on medium power (50-70%) for 2-3 minutes.
Check the potato’s temperature and continue heating in 30-second intervals until it’s fully warmed.
If desired, finish it in the toaster oven or air fryer for 5 minutes to crisp up the skin.
Why It Works (and Why It’s Not Ideal):
The microwave quickly heats the potato, but it can make the skin wrinkled and soft.
Using a damp paper towel prevents the inside from drying out.
Microwaving at medium power instead of high prevents overheating.
✔ Best for: When you’re in a hurry and don’t mind softer skin.
—
4. Reheating on the Stovetop (For Sliced Potatoes or Leftovers)
If you have leftover sliced baked potatoes, you can reheat them in a skillet for a crispy, pan-fried texture.
How to Reheat Sliced Baked Potatoes on the Stovetop
Heat a nonstick or cast-iron skillet over medium heat.
Add a small amount of butter or oil to prevent sticking.
Place the potato slices in the pan and cook for 3-5 minutes per side until golden and crispy.
Why It Works:
This method adds extra crispiness, making it perfect for turning leftovers into a delicious side dish.
It works well if you don’t need to reheat a whole potato but want to enjoy crispy potato slices.
—
5. What’s the Best Way to Store Leftover Baked Potatoes?
Let the potatoes cool completely before storing. This prevents condensation, which can make them soggy.
Wrap them in foil or place them in an airtight container.
Store in the fridge for up to 3-4 days.
Avoid freezing whole baked potatoes—the texture becomes grainy when thawed.
—
Final Verdict: Which Reheating Method is Best?
For the best overall texture: Use the oven (400°F for 15-20 minutes).
For speed & crispiness: The air fryer (375°F for 5-8 minutes) is a great choice.
And for the quickest method: The microwave (2-3 minutes with a damp paper towel) is convenient, but the skin will be soft.
For repurposing leftovers: Sauté sliced potatoes on the stovetop for crispy edges.
If time allows, always go for the oven or air fryer to enjoy a crispy, fluffy reheated baked potato!
Conclusion
Baking the perfect potato is all about choosing the right type, using proper preparation techniques, and baking at the right temperature for that ideal balance of crispy skin and fluffy interior. Whether you prefer classic toppings like butter and sour cream or want to experiment with healthy alternatives like Greek yogurt and avocado, a well-baked potato is a versatile dish that can be enjoyed in countless ways.
If you have leftovers, reheating properly is key to maintaining texture. The oven or air fryer are the best choices for keeping the skin crisp, while the microwave offers a quick fix when you’re short on time.
With these tips in mind, you’re now ready to bake restaurant-quality potatoes at home every time. So preheat that oven, grab your favorite toppings, and enjoy the ultimate comfort food!
1 thought on “How to Bake the Perfect Potato – Crispy Skin & Fluffy Inside”