

Pita bread is a soft, round flatbread that has been a staple in Middle Eastern and Mediterranean cuisine for centuries. Its signature pocket makes it perfect for stuffing with delicious fillings like falafel, shawarma, or grilled meats. While store-bought pita is convenient, nothing beats the taste and texture of homemade pita—fresh, warm, and perfectly soft.
Making pita bread at home might seem intimidating, but it’s actually quite simple with the right techniques. Whether you prefer baking it in the oven or cooking it on a stovetop, this guide will walk you through every step, from preparing the dough to achieving the perfect puff. Plus, we’ll cover common mistakes to avoid so you can enjoy foolproof pita bread every time.
Let’s get started on making the best homemade pita bread!
What Makes Pita Bread Unique?
The Puffing Process: How Steam Creates the Signature Pocket
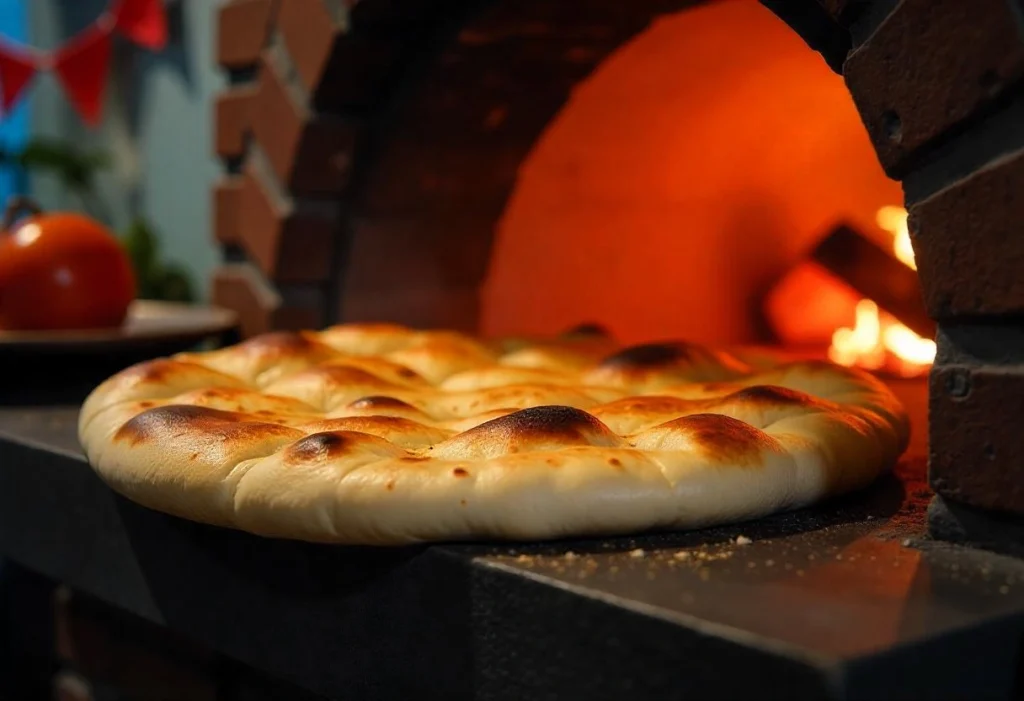
One of the most fascinating aspects of pita bread is its ability to puff up while cooking, creating the signature pocket that makes it perfect for stuffing. This process is a result of steam forming inside the dough as it bakes at high temperatures. Here’s how it works and how you can ensure your pita puffs up perfectly every time.
1. The Science Behind the Puff
When pita dough is placed in a very hot oven or on a scorching skillet, the heat rapidly turns the water content in the dough into steam. Because pita is rolled thin, the outer layers cook quickly, forming a firm crust while the inside remains soft. As the steam expands, it pushes the layers apart, causing the bread to inflate like a balloon. Once removed from the heat, the pita deflates, leaving behind a hollow pocket inside.
2. Key Factors for a Perfect Puff
If your pita doesn’t puff up, it usually comes down to one of the following factors:
Properly Kneaded Dough: Gluten development is crucial for elasticity. If the dough isn’t kneaded well, it may tear instead of expanding properly.
Resting Time: Allowing the dough to rest ensures it relaxes, making it easier to roll thin without springing back.
Even Thickness: Rolling the dough to about ¼-inch thickness ensures even cooking. If it’s too thick, steam won’t build up effectively.
High Heat is Essential: Pita needs a very hot surface (450-500°F / 230-260°C) to generate enough steam quickly. If the temperature is too low, the steam will escape before the bread has a chance to puff.
Preheated Baking Surface: If using an oven, a baking stone or an inverted baking sheet should be preheated to ensure instant heat transfer. On a stovetop, a hot cast iron skillet works best.
Proper Moisture Content: If the dough is too dry, there won’t be enough steam to create the pocket. Slightly sticky dough is ideal for the best puff.
3. What to Do if Your Pita Doesn’t Puff
Sometimes, despite following the right steps, your pita may not form a pocket. Here are a few troubleshooting tips:
Flip at the Right Time: If cooking on a stovetop, flip the pita once bubbles start forming to encourage even cooking and puffing.
Cover with a Lid: Trapping steam inside the skillet can help create the right environment for puffing.
Check for Small Tears: Any small cracks or tears in the dough can let steam escape, preventing proper inflation.
Experiment with Cooking Methods: If one method isn’t working, try using a different heat source—baking in the oven vs. cooking on a stovetop—to see what works best for your setup.
Mastering the puffing process may take a little practice, but once you get it right, you’ll be rewarded with soft, fluffy pita bread that’s perfect for sandwiches, dips, and more!
Pita vs. Other Flatbreads: What Makes It Unique?
Flatbreads are a diverse category of bread enjoyed across the world, with each type having its own distinct texture, flavor, and preparation method. While pita bread is one of the most well-known flatbreads, it differs from others like naan, tortillas, and lavash in several key ways. Understanding these differences can help you appreciate what makes pita special and how it fits into various cuisines.
1. Pita vs. Naan
Naan and pita bread may look similar, but they have significant differences in texture, ingredients, and cooking methods:
Leavening Agent: Pita uses yeast for a light and airy texture, while naan typically includes both yeast and yogurt, making it softer and slightly chewy.
Thickness and Puffing: Pita is rolled thin and puffs up during cooking, creating a pocket. Naan is usually thicker and doesn’t have a pocket but instead forms soft, airy layers.
Cooking Method: Pita is cooked quickly at high heat in an oven or on a skillet. Naan is traditionally cooked in a tandoor oven, which gives it a charred, smoky flavor.
Uses: Pita is often used as a pocket bread for stuffing, while naan is served as a side to scoop up curries and stews.
2. Pita vs. Tortillas
Tortillas, a staple in Mexican and Latin American cuisine, differ from pita in several ways:
Ingredients: Traditional tortillas are made with flour or corn, water, and salt, whereas pita includes yeast for leavening.
Texture and Thickness: Tortillas are usually thinner, more flexible, and don’t puff up like pita.
Cooking Method: Tortillas are cooked on a griddle or skillet without baking, while pita needs a very hot surface to create steam and form a pocket.
Uses: Tortillas are used for tacos, burritos, and wraps, while pita is primarily used for stuffing, dipping, or serving with Mediterranean dishes.
3. Pita vs. Lavash
Lavash is another Middle Eastern flatbread that differs from pita in several ways:
Thickness and Texture: Lavash is much thinner and crispier when baked, though it can also be soft when freshly made. Pita is thicker and soft, especially when warm.
Leavening: Traditional lavash is unleavened, meaning it doesn’t use yeast, while pita relies on yeast to help create its airy texture.
Cooking Style: Lavash is typically baked on the walls of a clay oven, whereas pita is baked in an oven or cooked on a stovetop.
Usage: Lavash is often used for wraps or served as crispy crackers, while pita is mainly used for stuffing or dipping in hummus and other spreads.
4. Pita vs. Other Middle Eastern and Mediterranean Breads
There are several other flatbreads that are sometimes confused with pita:
Manakish: A Lebanese flatbread that is similar to pita but topped with za’atar, cheese, or meat before baking.
Greek Pita: Unlike Middle Eastern pita, Greek pita does not have a pocket and is thicker, making it ideal for gyros and souvlaki wraps.
Taboon Bread: A Palestinian flatbread that is slightly thicker than pita and traditionally baked in a taboon (clay oven).
Why Pita Stands Out
What makes pita unique among these flatbreads is its ability to puff up and create a natural pocket, making it incredibly versatile. It’s a key component of Middle Eastern cuisine but is also used worldwide in sandwiches, wraps, and snacks. Its combination of softness, chewiness, and mild flavor makes it a perfect base for countless dishes.
By understanding these differences, you can better appreciate pita bread’s place in global cuisine and even experiment with different types of flatbreads in your cooking!
Types of Pita: Greek-Style vs. Middle Eastern Pita
Pita bread comes in different variations depending on the region and how it is prepared. The two most well-known types are Greek-style pita and Middle Eastern pita, each with distinct textures, uses, and preparation methods. Understanding these differences can help you choose the right type of pita for your recipes.
—
1. Middle Eastern Pita (Pocket Pita)
This is the most recognizable type of pita, commonly found in supermarkets and used in dishes like falafel, shawarma, and gyros.
Key Characteristics:
Has a Pocket: The most defining feature of Middle Eastern pita is the hollow pocket that forms inside the bread when baked at high temperatures. This makes it perfect for stuffing.
Thin and Soft: Typically rolled out to about ¼-inch thickness before baking, resulting in a soft yet slightly chewy texture.
Baked at High Heat: Cooked at 450-500°F (230-260°C) to allow steam to build up quickly and separate the inner layers.
Versatile in Use: Ideal for stuffing with meats, vegetables, and sauces, or used as a dipping bread with hummus and baba ganoush.
Where It’s Popular:
Middle Eastern pita is widely used in countries like Lebanon, Israel, Palestine, Egypt, Syria, and Jordan, where it is a staple in traditional cuisine.
—
2. Greek Pita (No Pocket Pita)
Unlike Middle Eastern pita, Greek-style pita does not puff up to create a pocket, making it more like a soft, flatbread-style bread.
Key Characteristics:
No Pocket: This type of pita remains flat, with a denser, chewy texture. It does not separate inside because it is usually cooked at a lower temperature than pocket pita.
Thicker and Softer: Rolled out slightly thicker, making it more pillowy and flexible, perfect for wrapping around fillings.
Often Brushed with Oil: Many Greek pita recipes include olive oil in the dough or brushed on the surface before cooking, adding extra flavor.
Grilled or Pan-Cooked: Instead of baking in an oven, Greek pita is often cooked on a stovetop or griddle for a golden, slightly crisp exterior.
Where It’s Popular:
Greek pita is a key part of Greek and Mediterranean cuisine, often used for gyros, souvlaki, and kebabs. It is also a great choice for dipping into tzatziki, feta-based spreads, or olive tapenade.
—
3. Whole Wheat and Multigrain Pita
For a healthier option, some people prefer whole wheat or multigrain pita, which adds fiber and nutrients.
Key Characteristics:
Made with Whole Wheat Flour: Instead of using all-purpose flour, whole wheat pita uses whole grain flour, giving it a nuttier flavor and a denser texture.
More Filling: Due to its higher fiber content, whole wheat pita is more filling than white pita.
Slightly Less Puffing: Because whole wheat flour absorbs more liquid and has less gluten, it may not puff as dramatically as white pita.
Healthier Alternative: Ideal for people looking to reduce refined carbs while still enjoying delicious pita bread.
Where It’s Popular:
Whole wheat and multigrain pita are commonly found in health-conscious diets, often used in vegan and Mediterranean-style meals.
—
4. Flavored and Specialty Pita
Some variations of pita incorporate additional ingredients to enhance flavor and texture.
Examples:
Za’atar Pita: Pita bread topped with a mix of za’atar (thyme, sesame seeds, and sumac) before baking, popular in Middle Eastern cuisine.
Garlic and Herb Pita: Infused with garlic, rosemary, oregano, or parsley for extra flavor.
Cheese-Stuffed Pita: Some recipes add feta or halloumi cheese inside the dough before cooking for a rich, cheesy taste.
Spiced Pita: Cumin, coriander, turmeric, or paprika can be added for a unique twist on the classic recipe.
These specialty pitas are great for snacking, pairing with soups, or serving as appetizers.
—
Which Type of Pita Should You Choose?
The best type of pita depends on what you’re making:
For sandwiches and stuffing: Choose Middle Eastern pita with a pocket.
For wraps and souvlaki: Use Greek-style pita for a soft, foldable texture.
For healthier options: Try whole wheat or multigrain pita.
For unique flavors: Experiment with za’atar, garlic, or cheese-stuffed pita.
By understanding these different types, you can customize your pita experience and enjoy it in a variety of ways!
Ingredients and Tools You Need
Essential Ingredients for Perfect Homemade Pita Bread
Making authentic, soft, and fluffy pita bread at home requires just a few simple ingredients. While the list is short, each ingredient plays a crucial role in creating the right texture, flavor, and puffing effect. Understanding these ingredients will help you make the best pita bread every time.
—
1. Flour: The Foundation of Pita Bread
Flour is the primary ingredient in pita bread and determines its texture, chewiness, and structure.
Best Flour Choices for Pita:
All-Purpose Flour: The most commonly used flour for pita, providing a balance of softness and chewiness.
Bread Flour: Has a higher protein content, which helps develop more gluten, leading to a chewier and more elastic dough.
Whole Wheat Flour: Adds a slightly nutty flavor and more fiber but can make the pita denser. Often mixed with all-purpose flour for a balance of softness and health benefits.
Gluten-Free Flour Blends: For those with gluten intolerance, special blends can be used, but they may require a binder like xanthan gum to mimic the elasticity of gluten.
Pro Tip: For the best texture, many bakers use a 50/50 mix of all-purpose and bread flour to achieve both softness and chewiness.
—
2. Yeast: The Leavening Agent
Yeast is responsible for making the dough rise, giving pita its airy, slightly chewy texture.
Types of Yeast to Use:
Active Dry Yeast: Needs to be dissolved in warm water before adding to the dough.
Instant Yeast (Rapid Rise Yeast): Can be mixed directly into the dry ingredients without proofing.
Fresh Yeast: Less common but provides a rich, slightly fermented flavor.
Pro Tip: Always check if your yeast is active by proofing it in warm water with a pinch of sugar. If it bubbles and foams within 5-10 minutes, it’s good to use.
—
3. Water: Hydrating the Dough
Water is essential for forming the dough and activating the yeast. The right amount of water determines the softness and elasticity of the dough.
Important Water Considerations:
Use warm water (about 100-110°F or 37-43°C) to help activate the yeast without killing it.
Too little water can make the dough dry and hard to roll out.
Too much water can make the dough sticky and difficult to handle.
Pro Tip: The dough should be slightly sticky but not too wet. If it feels dry, add a tablespoon of water at a time until it reaches the right consistency.
—
4. Salt: Enhancing Flavor and Controlling Fermentation
Salt is a key ingredient in pita bread, helping to enhance the flavor and strengthen the gluten structure.
Why Salt Matters:
Balances the sweetness of the flour and yeast fermentation.
Controls yeast activity, preventing the dough from over-proofing too quickly.
Helps improve the texture of the final bread.
Pro Tip: Never mix salt directly with yeast when proofing, as it can kill the yeast. Instead, mix it with the flour first.
—
5. Olive Oil: For Softness and Flavor
While traditional pita recipes don’t always include oil, adding olive oil can improve the texture and taste of the bread.
Benefits of Olive Oil in Pita Dough:
Makes the dough softer and easier to roll out.
Adds a subtle, slightly fruity flavor.
Helps keep the pita moist and prevents drying out too quickly.
Alternative Oils: If you don’t have olive oil, you can use vegetable oil, avocado oil, or melted butter.
Optional Ingredients for Extra Flavor
While classic pita bread is made with just a few essential ingredients, adding extra seasonings and mix-ins can enhance its flavor, aroma, and texture. Whether you want a more fragrant, herby, or slightly sweet pita, these optional ingredients will take your homemade bread to the next level.
—
1. Sugar or Honey: For a Slightly Sweet Touch
Adding a small amount of sugar or honey to the dough can enhance the overall flavor and aid in yeast activation.
Benefits of Sugar or Honey in Pita Dough:
Helps feed the yeast, promoting better fermentation and puffing.
Adds a subtle sweetness without overpowering the savory taste.
Contributes to a slightly golden-brown crust when baked.
How to Use:
Add 1-2 teaspoons of sugar or honey to the warm water when proofing the yeast.
If using honey, mix it well with the liquid ingredients before adding it to the flour.
Pro Tip: Honey also helps retain moisture in the bread, making it softer for longer.
—
2. Yogurt: For a Softer and More Tangy Pita
Some recipes include Greek yogurt or plain yogurt in the dough to create a softer, more tender texture.
Why Add Yogurt?
Improves elasticity, making the dough easier to roll out.
Gives the pita a slight tangy flavor, similar to naan.
Keeps the bread soft for a longer time after baking.
How to Use:
Replace ¼ cup of water with yogurt in your dough recipe.
Mix it well with the wet ingredients before combining it with the flour.
Best For: Greek-style pita or a softer, more pillowy bread.
—
3. Garlic and Onion Powder: For a Savory Boost
Adding garlic powder or onion powder gives the pita a deeper, savory flavor that pairs well with Mediterranean dishes.
Benefits:
Enhances the taste of plain pita without overpowering it.
Complements dips like hummus, tzatziki, and baba ganoush.
Adds a subtle umami depth to the bread.
How to Use:
Add ½ to 1 teaspoon of garlic or onion powder to the dry ingredients.
Mix evenly to distribute the flavor throughout the dough.
Pro Tip: Fresh minced garlic can also be added, but it may affect the dough’s rise and texture.
—
4. Herbs and Spices: For an Aromatic Twist
Dried herbs and spices can be kneaded into the dough or sprinkled on top before baking for extra flavor.
Popular Additions:
Za’atar: A Middle Eastern spice blend with thyme, sesame seeds, and sumac for a tangy, earthy taste.
Oregano or Rosemary: Adds a Mediterranean touch to the bread.
Cumin or Coriander: Gives a warm, slightly smoky depth of flavor.
Chili Flakes or Black Pepper: Adds a mild heat for a spicier variation.
How to Use:
Mix 1 teaspoon of your preferred herb or spice into the dry ingredients.
For a stronger flavor, brush the pita with olive oil and sprinkle herbs on top before cooking.
Best For: Seasoned pita chips, wraps, or pairing with flavorful dips.
—
5. Cheese: For a Rich and Savory Pita
Adding cheese to pita dough or using it as a filling creates a deliciously rich and cheesy bread.
Best Cheeses to Use:
Feta Cheese: Crumbled and mixed into the dough for a tangy, slightly salty taste.
Parmesan or Pecorino: Adds a nutty, umami flavor.
Halloumi or Mozzarella: Used as a filling for stuffed pita variations.
How to Use:
Knead ¼ cup of finely crumbled cheese into the dough before rising.
For stuffed pita, place shredded cheese between two thin dough layers and seal the edges before cooking.
Best For: Cheese-filled pita, grilled pita sandwiches, or pita to serve with soups.
—
6. Sesame Seeds, Nigella Seeds, or Poppy Seeds: For Extra Crunch
Adding seeds to the dough or sprinkling them on top before baking adds both flavor and texture.
Seed Options:
Sesame Seeds: A classic topping that gives a mild nutty taste.
Nigella Seeds (Black Seeds/Kalonji): Adds a slightly peppery, onion-like flavor.
Poppy Seeds: Provides a subtle crunch and a hint of sweetness.
How to Use:
Mix 1-2 teaspoons of seeds into the dough.
Brush the pita with olive oil or water and sprinkle seeds on top before baking.
Best For: Serving with dips, making pita chips, or enhancing presentation.
—
Which Optional Ingredients Should You Choose?
The best additions depend on your taste and how you plan to use the pita bread:
For a softer, richer pita: Add yogurt and olive oil.
For a savory twist: Use garlic powder, onion powder, and herbs.
For extra crunch: Sprinkle sesame or nigella seeds on top.
For a cheesy pita: Mix in feta or parmesan.
For a slightly sweet version: Add honey or sugar.
Experimenting with these ingredients allows you to customize your pita and create unique, flavorful variations that suit your meals perfectly!
Best Tools for Perfect Pita
Making homemade pita bread doesn’t require fancy equipment, but having the right tools can make the process easier and ensure the best results. From mixing and kneading the dough to baking or cooking the pita, each tool plays a role in achieving the perfect puff and texture. Here’s a breakdown of the best tools for making pita bread at home.
—
1. Mixing and Kneading Tools
Large Mixing Bowl
A spacious mixing bowl is essential for combining ingredients and allowing the dough to rise properly. If you’re making a large batch, opt for a bowl with enough room for the dough to double in size.
Alternative: A stand mixer with a dough hook can save time and effort for kneading.
Wooden Spoon or Dough Whisk
While you can mix the dough with your hands, a sturdy wooden spoon or dough whisk makes it easier to incorporate ingredients before kneading.
Bench Scraper
A bench scraper is a handy tool for handling sticky dough, dividing it into equal portions, and cleaning up flour from the countertop.
Pro Tip: Lightly oil the bench scraper before using it to prevent sticking.
Dough Kneading Mat or Clean Countertop
A smooth, non-stick surface is ideal for kneading the dough. Silicone mats are great because they prevent excess flour from being absorbed into the dough.
—
2. Proofing and Dough Handling Tools
Kitchen Scale
Using a kitchen scale ensures consistency when dividing the dough into equal portions, resulting in evenly-sized pitas that cook uniformly.
Damp Kitchen Towel or Plastic Wrap
Covering the dough while it rests prevents it from drying out and forming a tough crust.
Flour Sifter or Fine Mesh Strainer
Sifting flour before mixing ensures a smoother, lump-free dough and helps with even hydration.
Rolling Pin
A rolling pin is crucial for shaping the pita dough into thin, even rounds. A French-style rolling pin (tapered ends) or a small, lightweight rolling pin works best for better control.
Alternative: If you don’t have a rolling pin, you can use a clean bottle or your hands to press the dough into rounds.
—
3. Cooking and Baking Tools
Pizza Stone or Baking Steel (For Oven Baking)
A pizza stone or baking steel helps distribute heat evenly and mimics the high temperatures of traditional pita ovens.
How to Use:
Place the stone or steel in the oven and preheat it to 475-500°F (245-260°C) for at least 30 minutes before baking.
Place the pita directly on the hot surface for quick puffing.
Alternative: If you don’t have a pizza stone, an inverted baking sheet preheated in the oven works well.
Cast Iron Skillet or Griddle (For Stovetop Cooking)
A cast iron skillet or griddle is the best alternative to an oven for making pita on the stovetop. It retains high heat, helping the pita puff up quickly.
How to Use:
Preheat the skillet over medium-high heat.
Cook each pita for about 30-45 seconds per side, flipping when bubbles form.
Alternative: A non-stick pan can work but may not produce as much puff.
Tongs or Spatula
Tongs or a spatula help flip the pita without deflating it or burning your fingers.
Pro Tip: If your pita doesn’t puff, lightly press it with the spatula while cooking to encourage air pockets to form.
Wire Cooling Rack
A wire cooling rack allows air to circulate around the pita, preventing it from becoming soggy as it cools.
Alternative: Place the pita on a clean kitchen towel to keep it warm and soft.
—
4. Storage and Serving Tools
Airtight Container or Bread Box
Storing pita properly helps keep it soft and fresh. Use an airtight container or a bread box to prevent it from drying out.
Pro Tip: If pita becomes too firm, wrap it in a damp towel and warm it in the microwave for a few seconds.
Pita Warmer or Clean Kitchen Towel
To keep pita warm before serving, wrap it in a clean towel or use a tortilla/pita warmer.
—
Which Tools Are Essential?
If you’re just starting, the bare essentials for making pita include:
✔ Mixing bowl
✔ Rolling pin
✔ Cast iron skillet or baking stone
✔ Tongs or spatula
✔ Damp towel for proofing
For serious pita-making, investing in a pizza stone, stand mixer, and cooling rack can improve your results!
Step-by-Step Guide to Making Homemade Pita Bread
Step 1: Preparing the Dough
The foundation of perfect homemade pita bread begins with properly preparing the dough. This step is crucial because the dough’s consistency, hydration, and gluten development will determine the texture, softness, and puffing ability of the final bread. Below, we’ll break down the process into clear steps to ensure success.
—
1. Gather Your Ingredients
Before starting, make sure you have all the necessary ingredients measured and ready. Here’s a basic list:
Essential Ingredients:
3 ½ cups (450g) all-purpose or bread flour (or a mix of both)
1 ½ teaspoons salt
1 teaspoon sugar or honey (optional, for yeast activation)
1 packet (2 ¼ teaspoons) active dry yeast or instant yeast
1 ¼ cups (300ml) warm water (100-110°F / 37-43°C)
2 tablespoons olive oil (optional, for a softer texture)
Optional Flavor Enhancers:
½ teaspoon garlic powder or onion powder (for a savory touch)
1 teaspoon dried herbs like oregano, thyme, or za’atar (for a Mediterranean twist)
1-2 tablespoons yogurt (for a softer, slightly tangy pita)
—
2. Activate the Yeast (For Active Dry Yeast Only)
If you’re using active dry yeast, you need to activate it before mixing it into the dough:
1. Warm the Water: Heat the water to around 100-110°F (37-43°C). It should be warm but not too hot (hot water can kill the yeast).
2. Dissolve Sugar and Yeast: In a small bowl, mix the warm water with sugar (or honey) and yeast. Stir gently.
3. Let It Bloom: Allow the mixture to sit for 5-10 minutes until it becomes foamy and bubbly. This indicates that the yeast is active.
Pro Tip: If the yeast does not foam up after 10 minutes, it may be expired or the water temperature was incorrect. Start over with fresh yeast.
Skipping This Step? If you’re using instant yeast, you can mix it directly with the dry ingredients without proofing.
—
3. Mix the Dry Ingredients
While the yeast is activating (or if using instant yeast), prepare the dry ingredients:
1. In a Large Mixing Bowl: Combine flour and salt. If using garlic powder, herbs, or other dry seasonings, add them now for even distribution.
2. Create a Well: Make a small well in the center of the flour mixture to pour in the wet ingredients later.
—
4. Combine Wet and Dry Ingredients
Now it’s time to bring the dough together:
1. Pour the Yeast Mixture: Slowly add the yeast-water mixture into the flour.
2. Add Olive Oil (Optional): If using, drizzle in the olive oil for extra softness.
3. Mix with a Spoon or Hands: Start stirring with a wooden spoon or dough whisk until the dough starts coming together.
Pro Tip: If the dough feels too dry, add 1 tablespoon of warm water at a time. If it’s too wet, sprinkle in a little more flour. The dough should be slightly sticky but manageable.
—
5. Knead the Dough
Kneading is essential for gluten development, which gives pita bread its elasticity and chewiness.
How to Knead by Hand:
1. Transfer the dough onto a lightly floured surface.
2. Use the heel of your hand to push the dough forward, then fold it back onto itself.
3. Turn the dough slightly and repeat, kneading for 8-10 minutes until it becomes smooth, elastic, and slightly tacky.
How to Knead with a Stand Mixer:
1. Use the dough hook attachment and mix on low speed for 6-8 minutes until the dough is smooth and pulls away from the sides of the bowl.
Pro Tip: To check if the dough is ready, use the “windowpane test”: Take a small piece of dough and gently stretch it between your fingers. If it forms a thin, translucent sheet without tearing, the gluten is well-developed.
—
6. First Rise (Proofing the Dough)
After kneading, the dough needs to rest and rise to develop flavor and structure.
1. Shape the Dough into a Ball: Lightly grease a bowl with olive oil and place the dough inside.
2. Cover and Let It Rise: Use plastic wrap or a damp kitchen towel to prevent drying out.
3. Proof for 1-2 Hours: Let the dough rise in a warm, draft-free area until it doubles in size.
Ideal Rising Conditions:
Room Temperature (75-80°F / 24-27°C) → 1-1.5 hours
Cooler Kitchen (65-70°F / 18-21°C) → 2 hours
Quick Rise Option: Place the bowl in a slightly warm oven (turned off) with the oven light on to speed up proofing.
Pro Tip: If you have time, a slow rise in the fridge (overnight for up to 24 hours) enhances flavor and texture!
—
7. Punch Down and Divide the Dough
Once the dough has doubled in size, it’s time to prepare it for shaping:
1. Punch It Down: Gently press down on the dough to release some of the air.
2. Divide Into Equal Portions: Use a kitchen scale or bench scraper to cut the dough into 8 equal pieces for medium-sized pitas (or more for smaller pitas).
3. Shape Each Piece into a Ball: Lightly dust with flour and cover with a towel to rest for another 10-15 minutes before rolling out.
Why Let It Rest Again? This extra resting period relaxes the gluten, making it easier to roll out without the dough springing back.
—
Summary of Key Steps in Dough Preparation:
✔ Mix and proof the yeast (if using active dry yeast).
✔ Combine dry and wet ingredients to form a dough.
✔ Knead well (8-10 minutes) until smooth and elastic.
✔ Let the dough rise (1-2 hours, until doubled in size).
✔ Punch down and divide into equal portions.
✔ Let it rest again (10-15 minutes) before shaping.
Once your dough is ready, you can move on to Step 2: Rolling and Shaping the Pita to create those perfect, thin rounds that will puff beautifully when cooked!
Step 2: Shaping the Pita
Once your dough has risen and rested, the next crucial step is shaping it properly. The way you shape the pita will determine how well it puffs up during cooking, ensuring that perfect pocket inside. This step requires gentle handling to maintain the dough’s airiness while achieving an even thickness.
—
1. Prepare Your Workspace
Before shaping the pita, make sure your workspace is set up for smooth handling:
✔ Lightly flour your work surface to prevent sticking.
✔ Have a rolling pin ready for even shaping.
✔ Preheat the oven (if baking) or warm up your skillet (if cooking on the stovetop).
✔ Keep a damp kitchen towel nearby to prevent the dough from drying out.
—
2. Divide and Shape the Dough Balls
After the dough has risen and been punched down, it’s time to portion and shape it.
Dividing the Dough:
1. Use a Bench Scraper or Knife: Cut the dough into 8 equal portions for medium-sized pitas (or 10-12 for smaller pitas).
2. Weigh Each Piece (Optional): If you want consistent sizes, use a kitchen scale—each ball should weigh around 80-100 grams.
3. Shape into Balls:
Gently tuck the edges under and roll each piece into a smooth ball.
Place the dough balls on a lightly floured surface and cover them with a damp kitchen towel.
Let them rest for 10-15 minutes to allow the gluten to relax, making rolling easier.
—
3. Roll Out the Dough
Now comes the most important part: flattening the dough evenly while maintaining its light structure.
How to Roll Pita Dough Properly:
1. Lightly flour your rolling pin and work surface to prevent sticking.
2. Flatten Gently: Place a dough ball on the floured surface and use your fingertips to press it down slightly.
3. Roll Evenly:
Roll the dough outward from the center, rotating it quarter turns as you go.
The goal is to create a round disc about ¼ inch (6mm) thick and 6-8 inches in diameter.
Avoid making it too thin—otherwise, it won’t puff properly.
4. Smooth Edges: Ensure the edges are even to promote consistent puffing during cooking.
5. Let It Rest:
Place the rolled-out pitas on a lightly floured surface.
Cover them with a light towel or plastic wrap to prevent drying out while you finish rolling the rest.
Let them rest for 5-10 minutes before cooking.
Pro Tip: If the dough springs back while rolling, let it rest for an additional 5 minutes before trying again. This allows the gluten to relax.
—
4. Ensuring Even Thickness for Proper Puffing
The key to getting the perfect pita pocket lies in rolling the dough evenly:
✅ Uniform Thickness → Ensures even cooking and puffing.
✅ Not Too Thin → If the dough is too thin, it might crisp up instead of forming a soft, foldable pita.
✅ Not Too Thick → If the dough is too thick, it may not puff completely, leaving a dense interior.
If you’re baking, make sure your oven and baking stone are fully preheated. If cooking on the stovetop, your skillet should be hot before adding the dough—otherwise, it won’t puff correctly.
—
5. Stacking and Storing Rolled Pitas Before Cooking
If you’re making multiple pitas at once, proper stacking prevents them from sticking together or drying out:
✔ Lightly dust each pita with flour before stacking.
✔ Use parchment paper between layers if making a large batch.
✔ Cover with a damp towel to prevent drying.
At this stage, your pita dough is fully shaped and ready for cooking! Move on to Step 3: Cooking the Pita to transform your carefully rolled dough into beautifully puffed, homemade pita bread.
Step 3: Cooking the Pita
Now that your pita dough is shaped and ready, it’s time for the most exciting part—cooking! The right cooking method ensures that your pita puffs up properly, creating the signature pocket inside. Whether you’re using an oven, stovetop, or grill, getting the right temperature and technique is key.
—
1. Choosing Your Cooking Method
Pita bread can be cooked in different ways, each offering slightly different results. Here are the best methods:
A. Baking in the Oven (Best for Large Batches)
Baking is the traditional way to cook pita, as it provides the high heat needed for perfect puffing.
✔ Preheat the Oven: Set your oven to 475-500°F (245-260°C) at least 30 minutes before baking.
✔ Use a Baking Stone or Inverted Baking Sheet: A hot surface is key to rapid puffing. If you don’t have a baking stone, turn a baking sheet upside down and heat it in the oven.
✔ Place the Pitas in the Oven: Arrange a few at a time directly on the hot surface.
✔ Bake Quickly: Pitas cook in 2-3 minutes—you’ll see them start to puff up! Once they have golden spots, remove them immediately.
Pro Tip: If your pitas aren’t puffing, try increasing the oven temperature or preheating your baking stone for longer.
—
B. Cooking on the Stovetop (Best for Small Batches)
Cooking pita on the stovetop is fast and gives a slightly crispier, more charred exterior.
✔ Use a Cast-Iron Skillet or Heavy Pan: Preheat over medium-high heat for at least 5 minutes.
✔ No Oil Needed: Pitas should be cooked on a dry pan to mimic the heat of a stone oven.
✔ Cook One at a Time: Place the rolled-out dough in the pan and wait for bubbles to appear (about 30 seconds).
✔ Flip Once: After 1 minute, flip the pita and press gently with a spatula.
✔ Final Flip for Puffing: Flip back and press lightly—this helps it puff! Total cooking time is about 2 minutes per pita.
Pro Tip: If pitas aren’t puffing, your pan may not be hot enough. Increase the heat slightly and try again.
—
C. Grilling (Best for Smoky Flavor)
Grilling pita bread adds a smoky charred flavor, similar to Middle Eastern street-style pita.
✔ Preheat the Grill: Set it to medium-high heat (450-500°F / 230-260°C).
✔ Use Direct Heat: Place pitas directly on the grates.
✔ Flip Once: After 30-45 seconds, flip when bubbles appear.
✔ Check for Puffing: After another minute, flip again to encourage the pocket to form.
✔ Remove When Golden: Pitas should cook in about 2 minutes total.
Pro Tip: If your grill tends to burn food quickly, lower the heat slightly and watch the pitas closely.
—
2. Watching for the Puffing Process
The puffing of pita bread happens when steam rapidly expands inside the dough, separating the top and bottom layers. Here’s how to ensure it puffs perfectly:
✔ High Heat is Essential: Lower temperatures won’t create enough steam for puffing.
✔ Even Rolling: Pitas must be evenly thick to cook uniformly.
✔ Moist Dough: If the dough is too dry, it won’t puff—cover with a damp towel before cooking.
✔ Minimal Handling: Avoid over-flouring the dough, as too much flour can block puffing.
What if My Pita Doesn’t Puff?
Try cooking at a higher heat.
Make sure the dough is not rolled too thin or too thick.
If using the stovetop, press lightly with a spatula after flipping.
Check if the dough was hydrated enough—drier dough tends to stay flat.
—
3. Storing and Keeping Pita Soft
Freshly cooked pita is best enjoyed warm, but if you need to store it:
✔ Wrap Immediately in a Clean Kitchen Towel – This keeps it soft and pliable.
✔ Store in an Airtight Container or Bag – Keeps pita fresh for 2-3 days at room temperature.
✔ Freeze for Longer Storage: Wrap in plastic wrap and freeze for up to 3 months. Reheat in a warm oven or toaster.
—
Final Thoughts
Cooking pita is a quick, rewarding process, and once you master the right heat and handling, you’ll get that beautiful puff and soft texture every time. Now, it’s time to enjoy your homemade pita with your favorite fillings!
Step 4: Storing and Reheating
Homemade pita bread is best enjoyed fresh and warm, but if you have leftovers, proper storage and reheating will keep them soft and delicious for days. Whether you plan to eat them within a few days or store them for long-term use, following the right techniques will ensure your pitas stay fresh and pliable.
—
1. How to Store Fresh Pita Bread
To prevent pita bread from drying out or becoming too hard, it’s important to store it properly. Here are the best methods:
A. Storing at Room Temperature (Short-Term Storage – Up to 3 Days)
If you plan to eat your pita within a couple of days, storing it at room temperature is the best option.
✔ Wrap the Pitas in a Clean Kitchen Towel: As soon as they cool down, wrap them in a cotton or linen towel to trap moisture and keep them soft.
✔ Use an Airtight Bag or Container: Place the wrapped pitas in a ziplock bag or airtight container. This prevents them from drying out.
✔ Store in a Cool, Dry Place: Avoid placing them near heat sources or in direct sunlight, as this can cause them to dry out faster.
Pro Tip: Add a small piece of parchment paper between each pita to prevent them from sticking together.
—
B. Refrigerating Pita Bread (Medium-Term Storage – Up to 1 Week)
Refrigeration is an option, but it can make pita bread dry and stiff. To minimize this:
✔ Wrap the Pitas Well: Use plastic wrap, foil, or an airtight bag to keep them from drying out.
✔ Warm Them Up Before Eating: Refrigerated pitas should be reheated before serving to restore their soft texture (see reheating methods below).
Note: Refrigeration is not ideal for pita storage, as it can speed up staling. If you don’t plan to eat them within a few days, freezing is a better option.
—
C. Freezing Pita Bread (Long-Term Storage – Up to 3 Months)
Freezing is the best way to preserve homemade pita for an extended period while keeping its texture intact.
✔ Cool the Pitas Completely: Never freeze warm pitas, as condensation can lead to freezer burn.
✔ Separate with Parchment Paper: Place a sheet of parchment paper between each pita to prevent sticking.
✔ Use a Freezer-Safe Bag or Container: Store the pitas in a ziplock freezer bag or an airtight container to prevent freezer burn.
✔ Remove Excess Air: Press out as much air as possible before sealing the bag.
Pro Tip: Label the bag with the date so you can track freshness.
—
2. How to Reheat Pita Bread
Reheating pita properly is crucial to restoring its soft, fluffy texture. Here are the best methods:
A. Reheating on the Stovetop (Best for Soft, Fresh-Tasting Pita)
✔ Heat a Dry Skillet or Pan: Set a cast-iron or nonstick skillet over medium heat.
✔ Warm Each Pita for 30-60 Seconds Per Side: Flip once, pressing gently with a spatula to encourage puffing.
✔ Cover with a Lid for Extra Softness: If your pita is slightly dry, cover the pan for a few seconds to trap steam and soften it.
Result: A warm, slightly crispy pita with a soft, fluffy interior.
—
B. Reheating in the Oven (Best for Large Batches)
✔ Preheat the Oven to 350°F (175°C).
✔ Wrap Pitas in Foil or a Damp Towel: This prevents them from drying out while reheating.
✔ Heat for 5-10 Minutes: Until warmed through and soft.
Result: Warm, evenly heated pitas with a soft texture.
—
C. Using the Microwave (Quickest Method for Individual Pitas)
✔ Wrap the Pita in a Damp Paper Towel: This creates steam to soften the bread.
✔ Microwave for 15-20 Seconds: Check and heat in 5-second increments if needed.
Result: A soft, warm pita (but may lack crispness).
—
D. Reheating Pita on the Grill (For a Charred, Smoky Flavor)
✔ Preheat the Grill to Medium-High Heat.
✔ Brush the Pita with a Little Water: This helps restore moisture.
✔ Grill for 30-45 Seconds Per Side: Until warm with light grill marks.
Result: A slightly crispy, smoky-flavored pita—perfect for dipping or stuffing!
—
3. How to Keep Reheated Pita Soft
To prevent your reheated pita from becoming hard:
✔ Use Moisture: Wrapping it in a damp towel (for the oven or microwave) helps retain softness.
✔ Cover Immediately After Reheating: Place the warm pita in a covered dish or wrap it in foil to trap steam.
✔ Eat Freshly Reheated Pita Quickly: Reheated pita is best enjoyed immediately while it’s still warm and soft.
—
Final Thoughts
Properly storing and reheating pita bread ensures that it stays soft, fresh, and delicious even days after baking. Whether you’re keeping it for a short time at room temperature, freezing for later, or reheating to restore its freshness, these methods will help you enjoy homemade pita anytime!
Common Mistakes and How to Avoid Them
Why Didn’t My Pita Puff Up?
One of the most frustrating moments when making homemade pita is watching it cook—only to realize it isn’t puffing up. That signature pocket forms when steam rapidly expands inside the dough, separating the top and bottom layers. If your pita stays flat, don’t worry! There are several common reasons this happens and simple ways to fix it.
—
1. Dough Wasn’t Kneaded Enough
Proper gluten development is key to pita puffing up. If the dough isn’t kneaded well, it won’t have the right elasticity and strength to trap steam.
✔ Solution: Knead the dough for at least 8-10 minutes until it becomes smooth and elastic. If using a stand mixer, knead for about 5-7 minutes on medium speed.
How to Tell if Your Dough is Kneaded Enough:
It should be smooth, soft, and slightly tacky but not sticky.
Try the “windowpane test”—stretch a small piece of dough between your fingers. If it forms a thin, translucent sheet without tearing, it’s ready.
—
2. Dough Didn’t Rest Long Enough
Letting the dough rest allows the gluten to relax, making it easier to roll out. If the dough is too tight, it won’t expand properly during cooking.
✔ Solution: After kneading, let the dough rest for at least 1-2 hours in a warm place. If possible, allow a longer overnight rise in the fridge for better texture and flavor.
—
3. Pitas Were Rolled Too Thin or Too Thick
Rolling the dough to the right thickness is crucial for puffing.
✔ Too Thin (Less than ⅛ inch): The pita might not have enough structure to trap steam, causing it to stay flat.
✔ Too Thick (More than ¼ inch): The outer layers won’t heat fast enough to create steam inside, so no pocket will form.
✔ Solution: Roll the dough to ¼ inch (6 mm) thick for the perfect balance. Use even pressure to prevent thin spots.
—
4. Dough Was Too Dry
If the dough lacks enough moisture, it won’t create enough steam inside to puff up.
✔ Solution: Use a well-hydrated dough—aim for a soft, slightly sticky texture. If the dough feels dry while rolling, lightly brush with water before cooking to help steam formation.
—
5. Cooking Temperature Was Too Low
Pita requires high heat to puff up quickly. If the temperature is too low, the outside will cook too slowly, preventing the quick steam buildup needed for puffing.
✔ Solution:
Oven method: Preheat to at least 475-500°F (245-260°C). A pizza stone or preheated baking sheet helps create intense bottom heat.
Stovetop method: Use a cast-iron skillet over medium-high to high heat. The pan should be hot before adding the dough.
—
6. The Cooking Surface Wasn’t Hot Enough
A cold or unevenly heated cooking surface won’t generate the sudden burst of steam needed for puffing.
✔ Solution:
If using an oven, preheat the baking stone or sheet for at least 30 minutes.
If using a stovetop, heat the skillet for at least 5 minutes before adding the pita.
—
7. The Pita Was Flipped Too Soon
If you flip the pita too early while cooking, it may not have enough time to develop steam inside.
✔ Solution: When cooking on the stovetop, wait until you see bubbles forming on the top before flipping (usually after 30-45 seconds). Flipping too soon can prevent proper puffing.
—
8. Dough Was Over-Floured While Rolling
Too much flour on the surface can block steam from escaping properly, preventing puffing.
✔ Solution: Use just a light dusting of flour when rolling out the dough. Shake off any excess before cooking.
—
9. Overcrowding in the Oven
Placing too many pitas in the oven at once can lower the temperature and affect the cooking process.
✔ Solution: Bake in small batches to maintain even heat and airflow.
—
10. Not Enough Steam Was Created
Steam is what makes pita puff! Without enough moisture in the dough or the right cooking environment, the pocket won’t form.
✔ Solution:
Check dough hydration—add a tiny bit more water if the dough feels dry.
Try lightly spritzing the oven with water just before baking to create extra steam.
—
Final Thoughts
If your pita isn’t puffing up, don’t get discouraged! Try adjusting your technique—knead well, roll to the right thickness, and ensure a hot cooking surface. Once you get it right, you’ll enjoy soft, perfectly puffed homemade pita every time!
Over or Under-Kneading the Dough
Kneading is one of the most crucial steps in making pita bread. It develops the gluten network, which gives the dough elasticity and strength, allowing it to puff up properly when cooked. However, kneading for too little or too long can lead to problems, affecting both the texture and the formation of the signature pocket inside pita.
—
1. The Importance of Proper Kneading
Kneading helps:
✔ Develop gluten for elasticity and chewiness.
✔ Incorporate air for a light, airy texture.
✔ Ensure even hydration for a smooth, pliable dough.
✔ Strengthen the dough structure so it can trap steam and puff up properly.
If the dough is not kneaded correctly, it may become too weak to hold steam or too tight to expand, both of which prevent proper puffing.
—
2. Signs of Under-Kneaded Dough
If pita dough is under-kneaded, the gluten network hasn’t fully developed, making the dough too weak to hold its shape. This can cause the pita to turn out flat, dense, or tough instead of light and puffy.
How to Tell if Dough is Under-Kneaded:
✔ Dough is shaggy and sticky even after mixing.
✔ Tears easily when stretched instead of stretching smoothly.
✔ Feels soft but lacks elasticity when pressed.
✔ Pitas don’t puff up because they can’t trap steam properly.
Solution for Under-Kneaded Dough:
✔ Continue kneading for at least 8-10 minutes by hand or 5-7 minutes in a stand mixer until smooth and elastic.
✔ Perform the windowpane test: Take a small piece of dough and gently stretch it between your fingers. If it forms a thin, translucent sheet without tearing, it’s ready.
✔ If the dough is still weak, knead it in short intervals, letting it rest in between to allow gluten development.
—
3. Signs of Over-Kneaded Dough
While over-kneading is less common by hand, it can happen if using a stand mixer for too long. Excessive kneading over-develops the gluten, making the dough too tight and stiff. This prevents it from expanding properly, resulting in pitas that are dry, tough, and don’t puff up.
How to Tell if Dough is Over-Kneaded:
✔ Feels overly firm and stiff instead of soft and pliable.
✔ Difficult to stretch—it snaps back immediately.
✔ Pitas come out tough and chewy rather than soft and airy.
✔ No proper puffing because the tight gluten structure prevents steam expansion.
Solution for Over-Kneaded Dough:
✔ Let the dough rest longer (up to 30 minutes) before shaping to help relax the gluten.
✔ If it’s extremely stiff, lightly mist with water and knead gently for a minute to rehydrate it.
✔ Avoid overworking the dough after kneading—handle it gently during shaping.
—
4. How to Knead Dough Properly for Perfect Pita
Follow these steps to ensure your dough is kneaded just right:
1️⃣ Mix Ingredients Well – Combine flour, water, yeast, salt, and any optional ingredients until a rough dough forms.
2️⃣ Start Kneading – Work the dough on a lightly floured surface (or use a stand mixer with a dough hook).
3️⃣ Use the Right Technique –
✔ Push the dough away from you with the heel of your hand, then fold it back over itself.
✔ Rotate slightly and repeat.
4️⃣ Knead for 8-10 Minutes – The dough should become smooth, soft, and slightly tacky but not sticky.
5️⃣ Check Gluten Development – Use the windowpane test to ensure elasticity.
6️⃣ Let the Dough Rest – Cover and allow it to rise for at least 1-2 hours to relax the gluten.
—
Final Thoughts
Kneading is the foundation of great pita bread. Under-kneaded dough won’t develop enough gluten to puff up, while over-kneaded dough becomes too stiff and chewy. The key is finding the right balance—smooth, elastic dough that stretches easily but holds its shape. With proper kneading, your pita will bake up soft, fluffy, and perfectly puffed every time!
Too Dry or Too Dense? Fixing Hydration Issues
The hydration level of your dough plays a crucial role in making perfect pita bread. If the dough is too dry, it won’t generate enough steam to create the signature pocket, resulting in flat, dense pitas. If the dough is too dense, it can be difficult to roll out and may lead to tough, chewy bread instead of soft and fluffy pitas. Understanding how to balance hydration is key to achieving light, airy, and perfectly puffed pita bread.
—
1. Signs That Your Dough is Too Dry
If your pita dough lacks moisture, it may feel rough, stiff, or crumbly rather than soft and pliable. Dry dough doesn’t stretch well, making it difficult to roll out smoothly.
Common Causes of Dry Dough:
❌ Not enough water – The dough needs adequate hydration to develop gluten and create steam.
❌ Too much flour added during kneading – Excess flour can dry out the dough and make it tough.
❌ Low humidity – Dry air (especially in colder months) can pull moisture from the dough.
❌ Not enough resting time – Dough needs time to absorb water properly.
How to Fix Dry Dough:
✔ Gradually add more water – If your dough feels too dry, knead in 1 teaspoon of water at a time until it becomes soft and elastic. Be careful not to overdo it!
✔ Cover the dough – Always keep the dough covered with a damp cloth or plastic wrap while resting to prevent drying.
✔ Use warm water – Warmer water absorbs more easily, leading to better hydration.
✔ Avoid adding too much flour while rolling – Use only a light dusting to prevent the dough from drying out.
—
2. Signs That Your Dough is Too Dense
Dense dough results in heavy, chewy pita that struggles to puff up. It often lacks enough elasticity and airiness for proper steam formation.
Common Causes of Dense Dough:
❌ Too much flour – A high flour-to-water ratio makes the dough stiff and difficult to work with.
❌ Over-kneading – If the gluten is overworked, the dough becomes too tight, preventing proper expansion.
❌ Not enough rising time – If the dough doesn’t rest long enough, it won’t develop the airy structure needed for soft pitas.
❌ Old or inactive yeast – If the yeast doesn’t activate properly, the dough won’t rise, making it heavy and dense.
How to Fix Dense Dough:
✔ Adjust flour-to-water ratio – Pita dough should be soft and slightly sticky, not firm and dry.
✔ Knead just enough – Aim for about 8-10 minutes by hand or 5-7 minutes in a mixer.
✔ Check yeast activity – If your dough isn’t rising, proof the yeast separately before mixing.
✔ Give the dough more time to rest – A well-rested dough is softer and easier to shape.
—
3. Ideal Dough Consistency for Perfect Pita
The perfect pita dough should feel:
✔ Soft and elastic – Stretches easily without tearing.
✔ Slightly tacky – A bit sticky but not too wet.
✔ Smooth – No dry patches or cracks.
If your dough sticks too much to your hands, add a tiny bit of flour. If it feels dry and stiff, add a few drops of water and knead gently.
—
Final Thoughts
Hydration is the key to soft, fluffy pita bread. If the dough is too dry, it won’t rise or puff properly, and if it’s too dense, it will be tough and chewy. By maintaining the right moisture balance, you’ll create dough that’s smooth, elastic, and perfect for puffing up beautifully in the oven or on the stovetop.
Delicious Ways to Enjoy Your Homemade Pita
Classic Pita Sandwiches
Pita bread is one of the most versatile flatbreads in the world, serving as the perfect vessel for a variety of delicious sandwich fillings. Whether stuffed, folded, or wrapped, classic pita sandwiches are a staple in many cuisines, offering a balance of soft, chewy bread and flavorful ingredients. Below are some of the most popular and beloved pita sandwich varieties, each with its unique taste and cultural background.
—
1. Falafel Pita – A Middle Eastern Favorite
Falafel pita is a classic vegetarian sandwich that’s popular across the Middle East and beyond. It features crispy, deep-fried chickpea or fava bean patties, typically flavored with garlic, parsley, and cumin.
What’s Inside?
✔ Falafel balls – Crispy on the outside, soft on the inside.
✔ Hummus or tahini sauce – Adds creaminess and a nutty flavor.
✔ Fresh veggies – Tomatoes, cucumbers, lettuce, and onions for crunch.
✔ Pickled turnips or peppers – A tangy, salty contrast.
Serving Tip:
Drizzle with extra tahini sauce or yogurt-based garlic sauce for a creamy finish!
—
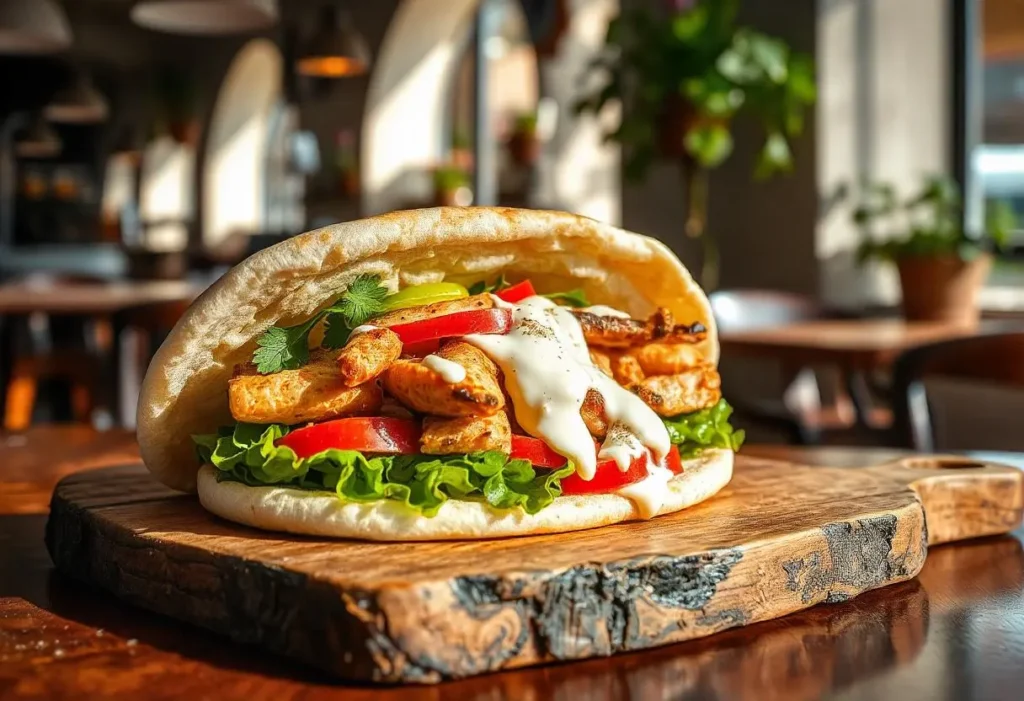
2. Chicken Shawarma Pita – A Street Food Staple
Shawarma is one of the most famous street foods, and when served in a pita, it becomes an irresistible handheld meal. The meat is slow-roasted on a vertical spit and then sliced thinly, making it tender and flavorful.
What’s Inside?
✔ Marinated, roasted chicken – Infused with warm Middle Eastern spices like cumin, coriander, and paprika.
✔ Garlic sauce (Toum) – A bold, creamy, and garlicky spread.
✔ Fresh or pickled vegetables – Lettuce, cucumbers, tomatoes, and onions for freshness.
✔ French fries (optional) – Some variations include crispy fries inside the pita!
Serving Tip:
Wrap the stuffed pita in parchment paper or foil to hold everything together while eating.
—
3. Gyro Pita – A Greek Classic
Greek gyros are similar to shawarma but have their own unique flavors and preparation style. They’re made with seasoned, slow-roasted lamb or beef, sliced and layered inside warm pita bread.
What’s Inside?
✔ Gyro meat – A mixture of lamb and beef, cooked on a rotisserie.
✔ Tzatziki sauce – A cooling yogurt-based sauce with cucumber, garlic, and dill.
✔ Sliced tomatoes and onions – For a fresh, slightly sweet contrast.
✔ Lettuce or shredded cabbage – Adds crunch.
Serving Tip:
Traditionally, a gyro pita is folded rather than fully stuffed and often wrapped in paper for easy eating.
—
4. Sabich Pita – A Unique Israeli Delight
Sabich is an Iraqi-Jewish sandwich that has become a popular street food in Israel. It’s a vegetarian pita sandwich filled with fried eggplant and hard-boiled eggs, creating a delicious combination of textures and flavors.
What’s Inside?
✔ Fried eggplant slices – Soft and rich in flavor.
✔ Hard-boiled eggs – Adds protein and creaminess.
✔ Hummus and tahini – Provides a nutty and creamy base.
✔ Israeli salad – A fresh mix of diced tomatoes, cucumbers, and onions.
✔ Amba sauce – A tangy, fermented mango sauce for a unique kick.
Serving Tip:
For extra flavor, sprinkle some sumac or za’atar before serving!
—
5. Tuna or Chicken Salad Pita – A Light and Fresh Option
For a healthier and more protein-packed pita sandwich, tuna or chicken salad pita is a great choice. It’s quick to prepare and can be customized with different ingredients.
What’s Inside?
✔ Tuna or shredded chicken – Mixed with mayo or yogurt.
✔ Diced celery and onions – Adds crunch and mild sweetness.
✔ Lettuce and tomato slices – For a fresh and crisp bite.
✔ Lemon juice and herbs – Brightens up the flavors.
Serving Tip:
For extra crunch, add chopped nuts or sunflower seeds to the salad mixture!
—
Final Thoughts
Classic pita sandwiches are endlessly adaptable, making them a fantastic meal option for any time of the day. Whether you prefer a hearty meat-based option like shawarma or gyro, a vegetarian favorite like falafel or sabich, or a lighter choice like tuna salad pita, there’s a pita sandwich for everyone.
No matter which filling you choose, a soft, homemade pita makes all the difference, enhancing the flavors and textures of every bite!
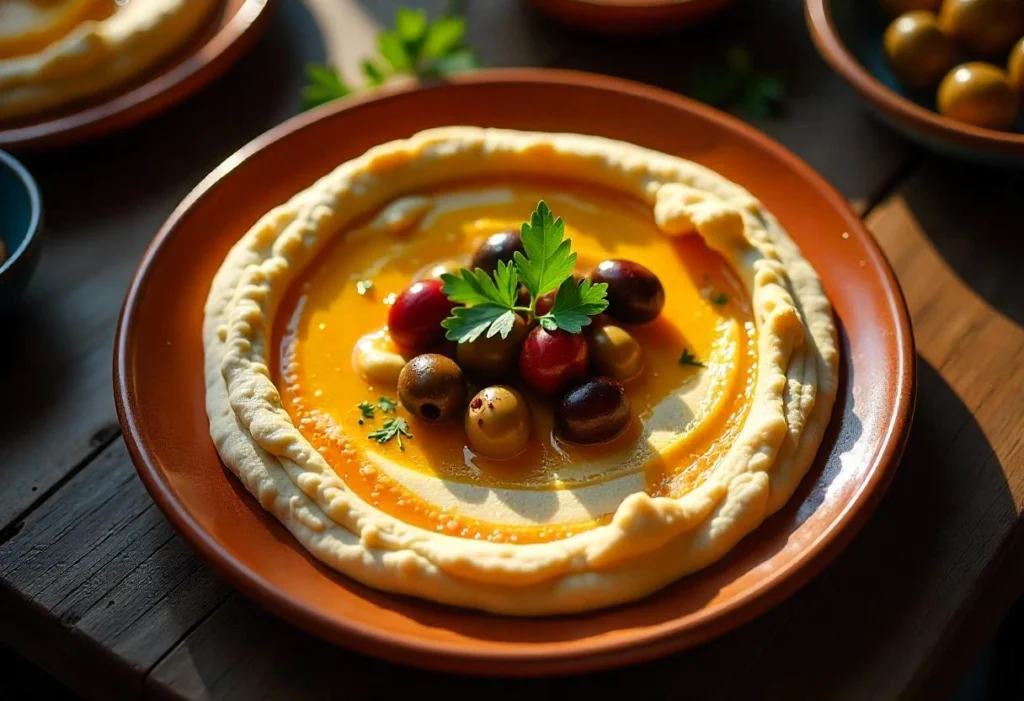
Dips and Spreads: The Perfect Pairings for Pita Bread
Pita bread is a match made in heaven for dips and spreads, thanks to its soft, slightly chewy texture and ability to scoop up creamy, flavorful mixtures. Whether served as a snack, appetizer, or part of a full meal, pairing pita with dips elevates the dining experience. From rich and nutty hummus to tangy yogurt-based tzatziki, here are some of the best dips and spreads to enjoy with homemade pita bread.
—
1. Hummus – The Classic Chickpea Spread
Hummus is one of the most iconic Middle Eastern dips, made from blended chickpeas, tahini, lemon juice, and garlic. Its creamy, nutty, and slightly tangy flavor pairs perfectly with warm pita.
How to Serve:
✔ Drizzle extra virgin olive oil on top.
✔ Sprinkle with paprika or sumac for extra depth of flavor.
✔ Add whole chickpeas, pine nuts, or fresh parsley as garnish.
Variations to Try:
Roasted Red Pepper Hummus – Adds a smoky sweetness.
Spicy Harissa Hummus – Gives a fiery kick.
Avocado Hummus – A creamy twist with a buttery texture.
—
2. Tzatziki – A Cool and Refreshing Yogurt Dip
Tzatziki is a Greek cucumber and yogurt-based dip, known for its refreshing taste and creamy consistency. It’s commonly served with gyros, grilled meats, and pita bread.
Key Ingredients:
✔ Greek yogurt – Thick and tangy.
✔ Grated cucumber – Adds freshness and crunch.
✔ Garlic and lemon juice – Enhances flavor.
✔ Dill or mint – Provides a fresh herbal note.
How to Serve:
✔ Serve chilled for a refreshing contrast to warm pita.
✔ Use it as a dip or spread it inside a pita sandwich for extra creaminess.
—
3. Baba Ganoush – The Smoky Eggplant Dip
Baba ganoush is a silky, smoky eggplant dip that originates from the Levant. It’s similar to hummus but made with roasted or grilled eggplant instead of chickpeas.
How to Serve:
✔ Drizzle with olive oil and a sprinkle of sumac or pomegranate seeds.
✔ Serve with warm, slightly charred pita bread for a smoky combination.
✔ Garnish with fresh parsley or toasted sesame seeds for added texture.
Variations to Try:
Spicy Baba Ganoush – Add chili flakes or harissa for a fiery kick.
Creamy Yogurt Baba Ganoush – Mix in a little Greek yogurt for extra richness.
—
4. Labneh – Thick and Creamy Strained Yogurt
Labneh is a Middle Eastern spread made from strained yogurt, creating a rich, creamy, and slightly tangy dip. It’s often served drizzled with olive oil and topped with spices or herbs.
How to Serve:
✔ Spread onto a plate and drizzle with olive oil.
✔ Sprinkle with za’atar, sumac, or chili flakes.
✔ Use as a spread inside pita sandwiches with cucumbers, tomatoes, and olives.
Variations to Try:
Garlic Labneh – Mixed with roasted or fresh garlic for extra depth.
Herbed Labneh – Blended with mint, dill, or thyme.
—
5. Muhammara – The Bold and Spicy Red Pepper Dip
Muhammara is a Syrian dip made from roasted red peppers, walnuts, and pomegranate molasses. It has a rich, slightly sweet, smoky, and mildly spicy flavor, making it an excellent pairing for pita.
How to Serve:
✔ Drizzle with olive oil and sprinkle with chopped walnuts.
✔ Serve with warm pita or pita chips for a crunchy contrast.
✔ Pair with grilled meats or kebabs for extra flavor.
Variations to Try:
Extra Spicy Muhammara – Add red chili flakes or fresh chili.
Nut-Free Muhammara – Replace walnuts with sunflower seeds or sesame.
—
6. Olive Tapenade – A Mediterranean Favorite
Olive tapenade is a bold and briny spread made from finely chopped or blended olives, capers, and garlic. Originating from the Mediterranean, it’s perfect for those who love intense umami flavors.
How to Serve:
✔ Spread onto warm pita bread or pita chips.
✔ Use as a topping for bruschetta or crostini.
✔ Pair with feta cheese and roasted vegetables for a delicious mezze platter.
Variations to Try:
Green Olive Tapenade – Made with green olives for a slightly milder, fruitier taste.
Spicy Tapenade – Add red pepper flakes or chili for a fiery kick.
—
7. Feta and Roasted Red Pepper Dip (Htipiti)
Htipiti is a Greek dip made with whipped feta, roasted red peppers, and olive oil, offering a creamy, salty, and slightly smoky flavor.
How to Serve:
✔ Serve chilled or at room temperature with warm pita bread.
✔ Drizzle with extra virgin olive oil and sprinkle with black pepper.
✔ Pair with fresh vegetables like cucumbers and carrots.
Variations to Try:
Spicy Htipiti – Add crushed red pepper or a touch of harissa.
Herb-Infused Htipiti – Blend in fresh basil, oregano, or thyme.
—
Final Thoughts
Dips and spreads are an essential part of enjoying pita bread, bringing out its soft texture and subtle flavors. Whether you’re in the mood for creamy hummus, smoky baba ganoush, tangy tzatziki, or bold muhammara, there’s a perfect dip for every taste. Try mixing and matching different dips to create a diverse and flavorful mezze platter!
Creative Uses for Pita Bread
Pita bread is more than just a vessel for dips or a sandwich wrap—it’s an incredibly versatile ingredient that can be used in a variety of creative ways. Whether you have fresh, slightly stale, or toasted pita, you can turn it into a delicious meal or snack with a little imagination. Below are some unique and inventive ways to use pita bread in your cooking.
—
1. Pita Chips – A Crunchy Snack
If you have leftover pita bread, don’t let it go to waste! Homemade pita chips are a simple and delicious way to enjoy pita in a new form. They’re perfect for dipping, snacking, or even as a crunchy topping for soups and salads.
How to Make Pita Chips:
✔ Cut pita into triangles – Use a knife or kitchen scissors to make bite-sized pieces.
✔ Brush with olive oil and season – Sprinkle with salt, pepper, garlic powder, za’atar, or paprika.
✔ Bake or air-fry – Bake at 375°F (190°C) for 10–12 minutes until crispy.
Serving Ideas:
Pair with hummus, baba ganoush, or tzatziki.
Use as a crouton replacement in salads.
Crush them over soups for extra crunch.
—
2. Pita Pizza – A Quick and Easy Alternative
Pita bread makes an excellent thin and crispy pizza crust, perfect for a quick meal. It’s faster than traditional pizza dough and can be customized with your favorite toppings.
How to Make Pita Pizza:
✔ Preheat the oven to 400°F (200°C).
✔ Brush pita with olive oil for a crispier base.
✔ Spread marinara sauce, pesto, or hummus as the base.
✔ Add toppings – Cheese, vegetables, meats, and fresh herbs.
✔ Bake for 8–10 minutes until the cheese is melted and bubbly.
Creative Pizza Variations:
Mediterranean Pita Pizza – Feta, olives, tomatoes, and oregano.
BBQ Chicken Pita Pizza – BBQ sauce, shredded chicken, red onions, and cilantro.
Breakfast Pita Pizza – Scrambled eggs, cheese, and bacon.
—
3. Pita Breakfast Wraps – A Healthy Morning Meal
Instead of using tortillas or bread, pita makes a great alternative for breakfast wraps. It’s sturdy enough to hold eggs, veggies, cheese, and protein, making it a nutritious and satisfying way to start your day.
Filling Ideas:
✔ Scrambled eggs with feta and spinach.
✔ Smoked salmon with cream cheese and capers.
✔ Avocado, cheese, and tomatoes for a vegetarian option.
How to Prepare:
Warm the pita slightly for better flexibility.
Stuff with your favorite ingredients and fold it like a taco or roll it up.
Enjoy as a grab-and-go breakfast!
—
4. Pita Salad Bowls – A Unique Twist on Salads
Pita can transform an ordinary salad into a satisfying meal. You can either use pita pieces as croutons or turn a whole pita into an edible salad bowl.
How to Make a Pita Bowl:
✔ Preheat oven to 375°F (190°C).
✔ Brush the pita lightly with oil and place it inside an oven-safe bowl.
✔ Bake for 8–10 minutes until crispy and firm.
✔ Fill with salad ingredients – Lettuce, grilled chicken, chickpeas, cheese, and dressing.
Serving Idea:
Try a Greek salad bowl with cucumbers, tomatoes, feta, and olives.
Make a taco-style pita bowl with seasoned beef, salsa, and guacamole.
—
5. Pita Stuffed with Dessert Fillings – A Sweet Treat
Pita bread isn’t just for savory dishes—it can also be used for desserts! The slightly chewy texture makes it a great base for sweet fillings and toppings.
Dessert Filling Ideas:
✔ Nutella and banana – A classic combination of chocolate and fruit.
✔ Honey and ricotta – A creamy and slightly sweet pairing.
✔ Cinnamon sugar pita bites – Brush pita with butter, sprinkle with cinnamon sugar, and toast.
How to Prepare:
Warm pita slightly to make it more flexible.
Stuff with desired ingredients or spread toppings on top.
Toast lightly in a pan or oven for extra crispiness.
—
6. Pita Quesadillas – A Fusion Favorite
Pita can easily replace tortillas in quesadillas, creating a crispy and cheesy fusion dish. It holds up well to melting cheese and fillings without getting soggy.
How to Make Pita Quesadillas:
✔ Place shredded cheese and fillings (chicken, beans, peppers, mushrooms) between two pita halves.
✔ Cook on a skillet over medium heat until golden brown on both sides.
✔ Slice into wedges and serve with salsa or guacamole.
Serving Ideas:
Mediterranean Quesadilla – Feta, olives, sun-dried tomatoes, and spinach.
Buffalo Chicken Quesadilla – Shredded chicken with buffalo sauce and cheddar cheese.
—
7. Pita Pocket Burgers – A Lighter Alternative
Instead of traditional burger buns, use pita pockets to hold your burger patties. This reduces excess carbs and creates a unique eating experience.
How to Make a Pita Burger:
✔ Grill or pan-fry your favorite burger patty (beef, chicken, lamb, or veggie).
✔ Stuff the pita with lettuce, tomatoes, onions, and cheese.
✔ Add your favorite sauce – Tzatziki, garlic aioli, or spicy mayo.
Why Try This?
Less bread, more filling!
Easier to hold and eat.
Perfect for a Mediterranean-style lamb burger.
—
Final Thoughts
Pita bread is far more versatile than just a sandwich wrap! From crispy pita chips to breakfast wraps, pizzas, desserts, and even salad bowls, there are endless ways to get creative with pita in the kitchen. Whether you’re looking for a quick snack, a healthier alternative, or a completely new way to enjoy pita, these ideas will help you make the most of every bite.
So, the next time you have extra pita, think beyond the basics and try something new!
Conclusion: Mastering Homemade Pita Bread
Making perfect homemade pita bread is a rewarding experience that brings fresh, warm, and flavorful bread to your table. From choosing the right ingredients to understanding the puffing process, each step plays a crucial role in achieving that signature pocket and soft texture. Whether you enjoy pita with classic Mediterranean dips, as a sandwich wrap, or in creative recipes like pita chips or pita pizzas, the possibilities are endless.
If your pita didn’t puff up perfectly, don’t worry—small adjustments in kneading, hydration, and cooking temperature can make all the difference in your next batch. With the right techniques and a little practice, you’ll soon be baking soft, fluffy, and delicious pita bread every time.
Now that you have the knowledge, it’s time to get hands-on in the kitchen! Try making homemade pita, experiment with different flavors, and explore new ways to enjoy this versatile flatbread. Happy baking!
1 thought on “How to Make Perfect Homemade Pita Bread: A Step-by-Step Guide”