
There’s nothing quite like sinking your teeth into a perfectly crafted burger. From its juicy patty to its flavorful toppings, a burger is the ultimate comfort food that has become a global favorite. Originating as a humble sandwich, the burger has evolved into a versatile dish, loved for its endless customization options. Whether it’s the classic beef patty on a toasted bun or a gourmet creation stacked with unique ingredients, burgers bring together simplicity and indulgence in every bite.
But what makes a truly great burger? It’s not just about the ingredients but also the technique. In this guide, we’ll uncover the secrets to crafting the perfect burger with tips to achieve juicy patties and a delicious, restaurant-quality burger every time. Get ready to elevate your burger game!
Choosing the Right Ingredients
Ground Beef or Plant-Based Options
When it comes to making the perfect burger, the foundation lies in the patty. Choosing the right type of meat—or meat alternative—is essential for flavor, texture, and overall satisfaction. Here’s a closer look at both ground beef and plant-based options:
1. Ground Beef: The Classic Choice
For traditional burger lovers, ground beef is the go-to choice. However, not all ground beef is created equal. The key to a juicy, flavorful patty lies in its fat content. A good rule of thumb is to choose beef with an 80/20 ratio—80% lean meat and 20% fat. The fat adds flavor and keeps the patty moist during cooking, preventing it from drying out.
Cuts of Beef: Ground chuck is a popular choice due to its rich flavor and ideal fat content. Ground sirloin is leaner but can be combined with fattier cuts for balance.
Fresh vs. Pre-Packaged: Whenever possible, opt for freshly ground beef from your local butcher for maximum flavor and freshness. Pre-packaged ground beef can work in a pinch but may lack the same level of quality.
Custom Blends: For a gourmet twist, some chefs combine different cuts of meat like brisket, short rib, or even bacon to create a custom burger blend.
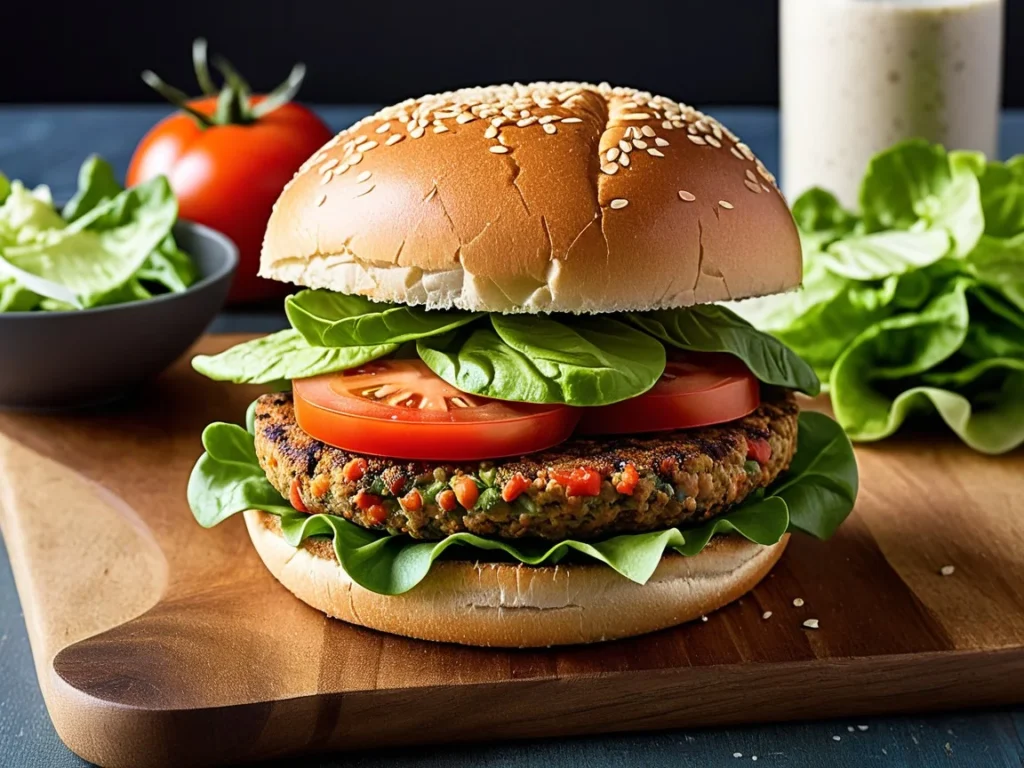
2. Plant-Based Options: A Modern Alternative
With the rise of plant-based diets, meatless burgers are more popular than ever. These patties are no longer the dry, bland options of the past; they’ve evolved into flavorful, juicy alternatives that can stand up to their beef counterparts.
Popular Brands: Companies like Beyond Meat and Impossible Foods offer plant-based patties that mimic the taste and texture of beef. These are made from ingredients like pea protein, soy, and coconut oil.
Homemade Options: You can also create your own plant-based patties using ingredients like black beans, chickpeas, lentils, quinoa, or mushrooms. Adding breadcrumbs, spices, and vegetables ensures a well-rounded flavor and consistency.
Cooking Tips: Plant-based patties often cook faster than beef and should be handled gently to prevent crumbling. Follow package instructions or cook on medium heat for the best results.
3. Factors to Consider When Choosing
Flavor Preferences: If you love the rich, savory taste of beef, stick to ground meat. If you’re open to experimenting, plant-based options can surprise you with their depth of flavor.
Dietary Needs: Plant-based burgers are ideal for vegetarians, vegans, or anyone looking to reduce their red meat intake.
Environmental Impact: Opting for plant-based alternatives can significantly reduce your carbon footprint, making it an eco-friendly choice.
Whether you’re a meat lover or plant-based enthusiast, the key is selecting high-quality ingredients that suit your taste and cooking style. Both options can deliver a mouthwatering burger experience when prepared with care and attention to detail.
Seasoning Essentials
A great burger is all about bringing out the natural flavors of the patty while adding just the right touch of seasoning to enhance its taste. Whether you’re working with ground beef or plant-based alternatives, the right seasoning can make all the difference between an average burger and an unforgettable one. Here’s a breakdown of the essential elements of seasoning:
—
1. The Basics: Salt and Pepper
Salt: Salt is the cornerstone of burger seasoning. It not only enhances the meat’s natural flavor but also helps to create a beautiful crust when seared on a grill or stovetop. Use kosher salt or sea salt for the best results, as these provide better coverage and texture than table salt.
Pepper: Freshly ground black pepper adds just the right amount of spice and depth to the patty. For the best flavor, grind your pepper just before seasoning.
Pro Tip: Season the patties right before cooking to avoid drawing out too much moisture from the meat.
—
2. Adding Depth with Dry Spices
While salt and pepper are essential, incorporating additional dry spices can take your burger to the next level. Here are some popular options:
Garlic Powder: A touch of garlic powder adds a savory, umami-rich flavor.
Onion Powder: This complements garlic powder and gives the burger a slightly sweet, aromatic note.
Smoked Paprika: For a subtle smoky flavor, smoked paprika is an excellent choice.
Cayenne Pepper: Add a pinch for a hint of heat if you enjoy a spicy kick.
Ground Mustard: This can enhance the tanginess of the burger and pairs well with toppings like pickles and mustard.
Mix these spices into the ground meat or sprinkle them on top of the patty for a bold, flavorful burger.
—
3. Fresh Ingredients for Extra Flavor
In addition to dry spices, fresh ingredients can elevate your burger’s taste:
Minced Garlic: For a more robust garlic flavor, mix finely minced garlic directly into the ground meat.
Fresh Herbs: Chopped herbs like parsley, thyme, or cilantro can add brightness and freshness to your patty.
Onions: Finely diced onions can be mixed into the meat for extra moisture and flavor. Alternatively, caramelized onions can be used as a topping.
Pro Tip: If using fresh ingredients, avoid overloading the patty to maintain its structure and texture.
—
4. Marinating or Infusing for Gourmet Burgers
For a gourmet twist, consider marinating or infusing your ground meat with additional flavors:
Worcestershire Sauce: A splash of Worcestershire sauce adds a deep, savory flavor to beef patties.
Soy Sauce: Perfect for adding umami, especially if you’re using plant-based alternatives.
Hot Sauce: A few dashes of hot sauce can introduce subtle heat and tang.
BBQ Sauce: Mix a small amount into the meat for a sweet and smoky flavor.
Let the patties rest for a few minutes after seasoning to allow the flavors to meld before cooking.
—
5. Avoid Over-Seasoning
While it’s tempting to go all out, it’s important not to overdo it. The goal is to enhance the patty’s flavor without overpowering it. Focus on balancing flavors and keeping the seasoning simple if you’re planning to load your burger with bold toppings and condiments.
—
Seasoning your burger with the right balance of salt, spices, and fresh ingredients ensures that every bite is packed with flavor. Experiment with different combinations to discover your signature burger seasoning blend!
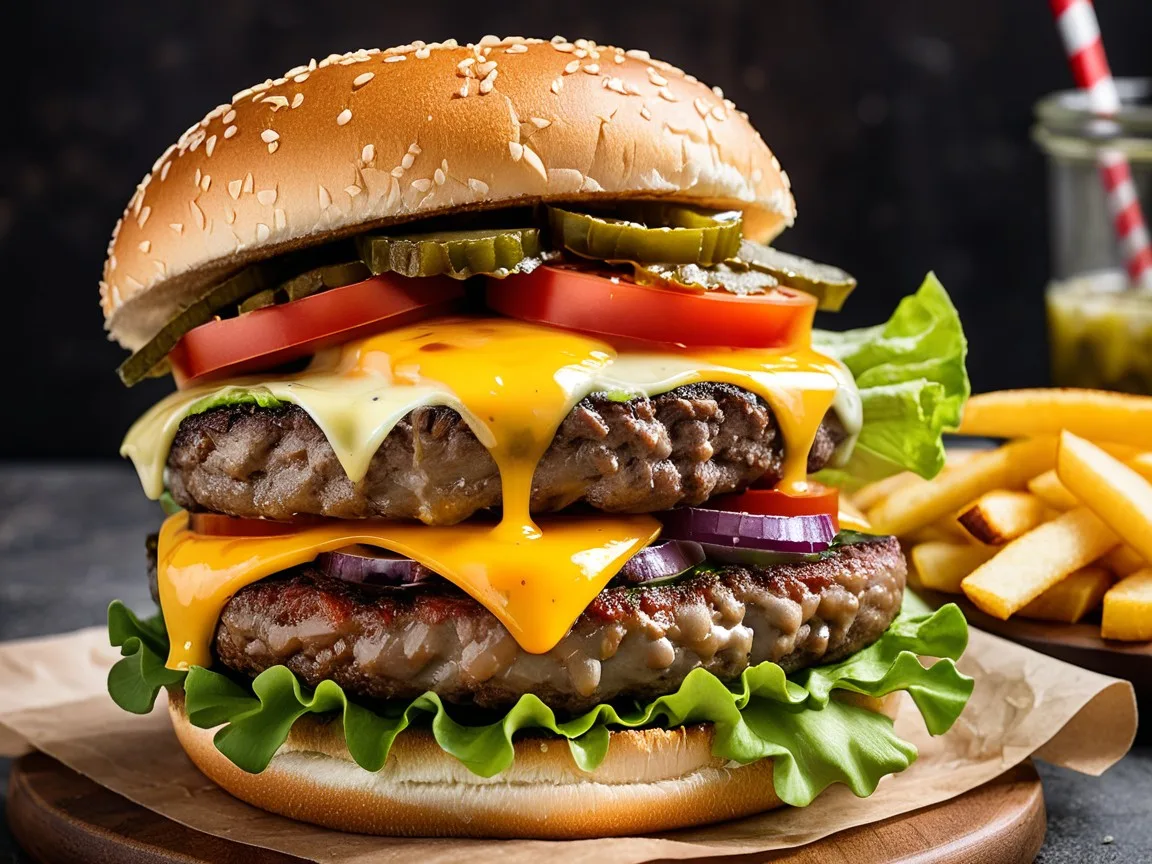
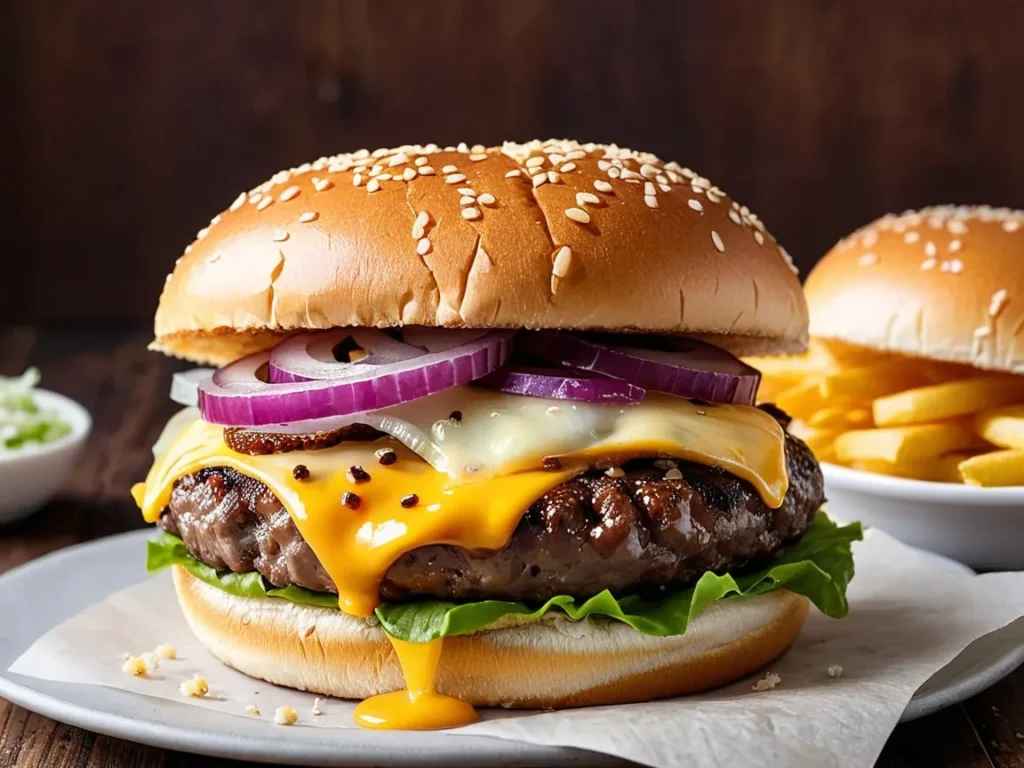
Buns and Cheese
The bun and cheese might seem like supporting players in the burger ensemble, but they’re just as crucial as the patty when it comes to crafting the perfect burger. The right combination can elevate the entire experience by adding texture, flavor, and balance. Here’s how to choose and use buns and cheese to create a truly unforgettable burger:
—
1. Choosing the Right Bun
The bun is more than just a vessel to hold your patty; it’s the first thing you bite into, and it sets the tone for your burger. Here’s what to consider when selecting the perfect bun:
Soft Yet Sturdy: The ideal burger bun should be soft and pillowy but sturdy enough to hold the patty and toppings without falling apart. Popular options include:
Brioche Buns: Buttery and slightly sweet, brioche buns are a gourmet favorite that pairs well with rich, juicy patties.
Potato Buns: These buns are light, fluffy, and slightly sweet, making them perfect for classic burgers.
Sesame Seed Buns: A traditional choice that adds a subtle crunch and nuttiness to your burger.
Toasting the Bun: Lightly toasting the bun enhances its flavor and prevents it from becoming soggy. Toast the inside on a skillet, grill, or under a broiler for a golden, crisp edge while keeping the exterior soft.
Pro Tip: If you’re making sliders, opt for smaller buns like Hawaiian rolls for a sweet and fluffy option.
—
2. Selecting the Perfect Cheese
Cheese is the creamy, melty layer that ties everything together. The type of cheese you choose can significantly impact the flavor profile of your burger. Here are some classic and creative options:
Classic Choices:
Cheddar: Sharp and flavorful, cheddar is a timeless choice that melts beautifully over a hot patty.
American Cheese: Known for its perfect melt and creamy texture, American cheese is a staple for traditional burgers.
Swiss Cheese: With its mild, nutty flavor, Swiss cheese pairs well with caramelized onions or mushrooms.
Gourmet Options:
Blue Cheese: Crumbled or sliced blue cheese adds a bold, tangy flavor that pairs well with arugula and bacon.
Gruyère: This rich, nutty cheese is perfect for upscale burgers and melts smoothly.
Goat Cheese: For a creamy and slightly tart twist, goat cheese works wonderfully with roasted red peppers or caramelized onions.
Pepper Jack: If you like a spicy kick, Pepper Jack cheese with its jalapeño undertones is a great choice.
Pro Tip: For maximum meltiness, add the cheese to the patty during the last minute or two of cooking. Covering the skillet or grill with a lid helps the cheese melt evenly.
—
3. Pairing Buns and Cheese with the Burger Style
To ensure harmony between your bun, cheese, and patty, consider pairing them based on the burger’s overall flavor profile:
Classic Cheeseburger: Sesame seed bun + cheddar or American cheese.
Gourmet Burger: Brioche bun + Gruyère or blue cheese.
Spicy Burger: Potato bun + Pepper Jack cheese.
Vegetarian Burger: Multigrain or ciabatta bun + goat cheese or mozzarella.
The bun and cheese should complement the patty without overpowering it. Balance is key!
—
4. Tips for Bun and Cheese Success
Avoid Overloading the Bun: Too many toppings can make the bun soggy or cause it to fall apart. Use just the right amount of condiments and fillings.
Cheese Alternatives for Plant-Based Burgers: For vegan or plant-based burgers, opt for dairy-free cheese alternatives made from cashew, almond, or coconut. Look for brands that melt well to replicate the creamy texture of traditional cheese.
Keep It Fresh: Always use fresh buns and high-quality cheese for the best results. Stale buns or low-quality cheese can ruin an otherwise perfect burger.
—
Your choice of bun and cheese plays a significant role in the taste, texture, and presentation of your burger. By selecting the right combination and paying attention to preparation details, you can take your burger from good to extraordinary!
Prepping the Perfect Patty
Patty Size and Thickness
When it comes to creating the perfect burger, the size and thickness of your patty are critical factors that can make or break the final result. A well-sized and properly thick patty ensures even cooking, juiciness, and the right balance of texture. Here’s a deeper dive into why patty size and thickness matter, and how to get them just right:
—
1. The Ideal Patty Size
The size of your patty determines not only how much meat you’re biting into but also how well it cooks. Generally, the standard patty size is around 4-6 ounces (about a quarter to a third of a pound). Here’s what to consider when determining the right size for your burger:
Standard 4-6 Ounce Patties: This is a great starting point for most burgers. A 4-ounce patty is typically perfect for a single layer of meat in a regular-sized bun. For larger appetites, 6 ounces might be better.
Bigger Isn’t Always Better: While you might be tempted to create giant patties, bigger isn’t always better. A larger patty can be harder to cook evenly, and it may end up dry or overcooked on the outside while undercooked in the center.
Slider Size: For smaller portions or party snacks, sliders are a popular choice. These mini burgers typically weigh about 2 ounces per patty and are perfect for offering variety and allowing people to enjoy multiple flavors.
Pro Tip: When forming patties, aim for consistency in size to ensure even cooking for each one.
—
2. Patty Thickness: How Thick Should It Be?
While the size of your patty is important, thickness plays an equally crucial role in how the burger cooks and how juicy it remains. Here’s what you need to know about the ideal thickness:
1/2-Inch to 3/4-Inch Thick Patties: For most burgers, aim for a patty thickness between 1/2 inch and 3/4 inch. This thickness allows the patty to cook through evenly while developing a nice crust on the outside. If you go much thicker, it may take longer to cook through, leading to a dry outer layer.
Thin Patties: If you’re making a smash burger or thin patty burger, a thinner patty (around 1/4 inch) can work great for creating a crispy, seared crust. These are often used for fast-food-style burgers, where the focus is on texture and quick cooking.
Thicker Patties: For a heartier burger, a 1-inch thick patty can be used, but be mindful of the cooking time. You’ll want to cook it on medium heat to ensure that the interior cooks properly without burning the outside.
—
3. Creating Even Patties
Ensuring that all your patties are uniform in size and thickness is essential for consistent cooking. Here’s how to achieve that:
Use a Scale: If you want precision, use a kitchen scale to measure the weight of each patty. Divide your total amount of ground meat into even portions, so each patty weighs the same.
Patty Press or Forming Tools: A patty press can help create even, uniform patties with consistent thickness. If you don’t have one, you can simply use your hands or a burger mold to press and shape the meat.
Indent the Center: For thicker patties, create a small dimple in the center with your thumb. This prevents the patty from puffing up in the middle as it cooks, ensuring it maintains an even shape and cooks evenly throughout.
—
4. The Role of Fat Content in Patty Thickness
The fat content of your ground meat also affects the thickness and texture of your patty. When using fattier meats like 80/20 ground beef, the patty will retain moisture, helping it stay juicy even with a slightly thicker patty. If you’re working with leaner meats like turkey or chicken, you might want to stick to thinner patties, as they can dry out more easily and might not hold together as well when thicker.
Pro Tip: To prevent lean patties from becoming too dry, consider mixing in ingredients like finely chopped onions, mushrooms, or breadcrumbs to retain moisture and keep the patty tender.
—
5. Cooking Considerations for Patty Size and Thickness
The size and thickness of your patty also affect how long it will take to cook. Here’s a quick guide:
4-6 Ounce Patties (1/2 to 3/4 inch thick): Cook these on medium-high heat for about 3-4 minutes per side for medium doneness. Use a meat thermometer to ensure the internal temperature reaches 160°F for beef (or appropriate temperature for other meats).
Thick Patties (1 inch thick): Thicker patties will need more time to cook through. Consider cooking them on medium heat for 5-6 minutes per side to allow the inside to cook properly without burning the exterior.
Thin Patties: Thin patties cook very quickly, around 2-3 minutes per side. Keep an eye on them to avoid overcooking.
—
6. Additional Tips for the Perfect Patty
Don’t Overwork the Meat: While shaping the patties, handle the meat gently. Overworking the mixture can lead to tough, dense patties that are less enjoyable to eat.
Chill the Patties: After forming the patties, let them chill in the fridge for 15-30 minutes before cooking. This helps them hold their shape better during the cooking process.
—
Patty size and thickness are more than just about aesthetics; they directly influence the texture, juiciness, and flavor of your burger. Whether you prefer a thin, crispy patty or a thick, juicy one, getting the size and thickness right will make all the difference in achieving the perfect burger every time.

Avoid Overworking the Meat
One of the most important but often overlooked steps in making the perfect burger is handling the ground meat with care. While it’s tempting to mix and press the meat until it’s perfectly uniform, overworking it can result in a tough, dry, and dense patty. The key to a juicy, tender burger lies in knowing how to handle the meat properly. Here’s why avoiding overworking the meat is so crucial and how to do it right:
—
1. What Happens When You Overwork the Meat?
When ground meat is handled too much, it can cause the protein strands to bond more tightly. This leads to a denser, tougher texture in the finished patty, as the excess handling expels the natural fats and juices that keep the burger moist and flavorful. Overworking the meat also makes it harder for the patty to retain its tender, juicy qualities after cooking. Essentially, the burger becomes more like a meatloaf than a juicy patty.
Toughness: The more you press, squeeze, or knead the meat, the more the proteins (like myosin) break down and tighten. This results in a chewy, tough burger that doesn’t have the desired melt-in-your-mouth texture.
Dryness: Excess handling also squeezes out moisture, which means the burger will likely end up dry, especially if you’re using leaner meat or plant-based options that don’t have as much fat.
—
2. How to Handle Ground Meat Correctly
To ensure your burger patties stay tender and juicy, follow these simple techniques for handling ground meat with care:
Form the Patties Gently: Use your hands to gently shape the ground meat into patties. Don’t compress or pack the meat too tightly. Aim to form a loose, slightly rounded patty, which will retain its moisture during cooking.
Use a Light Touch: Instead of pressing down hard or kneading the meat, simply gather it into a ball and lightly flatten it with your palms. This minimal handling preserves the fat and moisture in the meat.
Don’t Mix in Other Ingredients Too Early: If you’re adding ingredients like onions, garlic, or breadcrumbs, mix them gently with the meat just until combined. Overmixing the meat and ingredients together can also lead to a dense, tough patty.
Pro Tip: If you’re making a more complex flavor mix, such as a burger with herbs, cheese, or spices, incorporate these ingredients evenly without overworking the meat.
—
3. Use the Right Tools for Shaping Patties
To avoid overworking your burger patties, you can also use specific tools to help create consistent shapes without excessive handling:
Patty Press: A burger press helps you form even patties without having to touch the meat too much. This ensures uniform thickness and size, reducing the need for manual handling.
Burger Molds: Silicone or metal molds can help create perfectly round patties with minimal effort.
Using a Cookie Scoop: If you don’t have a burger press, a small cookie scoop is an easy way to portion out equal amounts of ground meat for your patties. Once portioned, you can flatten them gently with your hands or a spatula.
These tools are especially helpful for creating multiple patties that are uniform in size and shape without overworking the meat.
—
4. Why Fat Content Matters
Fat plays a crucial role in keeping the patty juicy and tender, so handling the meat with care is even more important when dealing with leaner cuts of beef or plant-based patties. The fat content (such as in an 80/20 ground beef blend) helps to lubricate the meat during cooking and prevents it from becoming too dry.
For lean meats (e.g., turkey or chicken): These types of meat have less fat and are more prone to dryness. Avoid overhandling them to keep the texture light and tender. Consider adding ingredients like olive oil, yogurt, or finely diced vegetables to help retain moisture.
For plant-based burgers: Many plant-based patties also benefit from a delicate touch to maintain their texture. While they might not have animal fats, they often contain oils or starches to bind them together. Overworking them can cause these ingredients to break down and create a crumbly texture.
—
5. Chilling the Patties
After forming your patties, consider chilling them in the fridge for 15-30 minutes before cooking. This helps the patties hold their shape during the cooking process and allows the fat to solidify, which can result in a juicier burger. If you overwork the meat, the fat becomes more dispersed, and chilling will no longer have the same effect.
—
6. Signs That You’ve Overworked the Meat
How can you tell if you’ve overworked the ground meat? Here are some signs to watch out for:
The texture feels dense: If the meat feels overly compact or rubbery as you form the patty, you may have overworked it.
The patty falls apart easily: If the meat feels loose or crumbles apart during cooking, it could be an indication that you handled it too much and broke down the structure.
It’s dry or tough after cooking: If your burger ends up feeling dry and tough despite being cooked to the right temperature, overworking the meat is likely the culprit.
—
7. The Importance of Resting
Once your burger patties are formed and cooked, allow them to rest for a few minutes before serving. This lets the juices redistribute throughout the patty, ensuring it stays moist and flavorful. Overworked patties tend to dry out more quickly, so resting is an even more important step in those cases.
—
In short, avoiding overworking the meat is one of the simplest and most effective ways to ensure your burger stays juicy and tender. By treating the meat gently and using the right techniques, you’ll create a burger that has a perfect texture, flavor, and moisture content, making each bite as delicious as the last.
Creating a Dimple
Creating a dimple in the center of your burger patty is a simple yet highly effective technique that ensures your burger cooks evenly and retains its juiciness. While it might seem like a small step, this little trick can make a big difference in the final outcome of your burger, especially when it comes to avoiding a puffed-up, uneven patty. Here’s why and how you should create a dimple in your burger patties:
—
1. Why Create a Dimple?
As burgers cook, the heat causes the proteins in the meat to contract, which can make the patty shrink and puff up in the center. This natural process can cause an uneven cooking surface, which may lead to an undercooked center or overcooked edges. By creating a small dimple or indentation in the center of the patty before cooking, you prevent this puffing effect and ensure the burger stays flat and cooks evenly.
Prevents Puffing: Without a dimple, the burger patty tends to swell in the middle, creating a dome-like shape. The edges may cook faster, while the center remains raw or undercooked.
Even Cooking: The dimple ensures that the heat is evenly distributed across the patty, so the burger cooks more consistently from edge to center.
Maintains Shape: Instead of having a burger that looks like a meatball or a dome, the dimple keeps the patty level, making it easier to stack toppings and avoid an uneven bite.
—
2. How to Create a Dimple
Creating the perfect dimple is a straightforward process that requires minimal effort. Here’s how to do it:
Form Your Patties: Start by shaping your ground meat into evenly sized balls or patties. Don’t press them too tightly—this will help keep them tender.
Use Your Thumb: To make the dimple, gently press your thumb into the center of the patty. The indentation should be about half an inch deep and should cover roughly half the diameter of the patty.
Make It Even: Try to make the dimple uniform in shape to ensure the patty cooks evenly. It doesn’t need to be a perfect circle, but it should be centered to avoid uneven cooking.
Pro Tip: If you’re making larger or thicker patties (like for gourmet burgers), you can make the dimple a bit deeper to help the patty cook more evenly. But be careful not to create too deep of a well, as it could cause the patty to break apart during cooking.
—
3. The Impact on Cooking
Once the dimple is created, it will influence how your burger cooks on the grill, in the skillet, or on a flat-top griddle. Here’s how:
More Even Cooking: With the dimple in place, the patty will stay level, ensuring that heat distributes evenly across the surface. This leads to a patty that’s uniformly cooked, with the center not being underdone while the edges are overcooked.
Less Shrinking: The dimple reduces the amount of shrinkage in the patty by preventing the middle from puffing up. This means your burger will stay close to its original size and shape as it cooks.
Better Presentation: Creating a dimple keeps your patty flat and level, which results in a more visually appealing burger. A perfectly shaped patty is not only easier to cook but also makes for a more satisfying bite.
—
4. Dimple Variations for Different Burger Styles
The dimple method is versatile and can be adjusted depending on the type of burger you’re making:
Standard Beef Burgers: A simple thumbprint dimple works well for most classic beef burgers, preventing the patty from bulging in the middle and ensuring even cooking.
Smash Burgers: For smash burgers, you may not need to create a dimple since the patty is intentionally pressed flat on the cooking surface. The searing technique for smash burgers ensures that the patty cooks evenly and gets a crispy, flavorful crust.
Thicker Gourmet Burgers: For thicker burgers, like those with gourmet toppings or specialty meats, the dimple can be slightly deeper to help the patty cook through without overcooking the edges.
Plant-Based Burgers: Plant-based patties, which tend to be more fragile than meat-based ones, can also benefit from the dimple. It helps keep them from falling apart while cooking, ensuring they retain their shape.
—
5. Additional Tips for Dimple Success
Don’t Overdo It: While a dimple is helpful, make sure it’s not too deep or too wide, as this can cause the patty to lose its structure. The goal is to create a slight indentation, not a hole.
Rest the Patties: After forming your patties and creating the dimples, let them rest in the fridge for 15-30 minutes before cooking. This helps the meat firm up and hold the dimple shape while cooking.
Use a Spoon for Precision: If you want more control over the dimple’s size and depth, you can use the back of a spoon to gently press into the center of the patty instead of using your thumb. This can help create a more even indentation.
—
6. When Not to Use a Dimple
While creating a dimple is helpful in most cases, there are certain burger styles where it may not be necessary:
Thin Patties: For ultra-thin patties, such as those used for sliders or smash burgers, the dimple is usually unnecessary. The thin patty cooks so quickly that the puffing effect is minimal, and it’s often pressed out during cooking anyway.
Specialty Stuffed Burgers: If you’re making stuffed burgers (with cheese or other fillings inside), a dimple can be used to create a cavity for the filling, but make sure the edges are tightly sealed to prevent leakage during cooking.
—
In conclusion, creating a dimple in your burger patty is a small step that yields impressive results. It helps prevent the patty from puffing up, ensures even cooking, and maintains a juicy, tender texture. Whether you’re making a classic beef burger or experimenting with plant-based patties, the dimple technique is a game-changer that ensures every bite is as delicious as the last.
Mastering the Cooking Technique
Grilling vs. Stovetop: Which is Better for Your Burger?
When it comes to cooking burgers, one of the most common debates is whether to grill or cook them on the stovetop. Both methods have their unique benefits, and the choice often comes down to personal preference, convenience, and the desired flavor profile. In this section, we’ll break down the key differences between grilling and stovetop cooking, so you can decide which method works best for your perfect burger.
—
1. Flavor Profiles: Grilled vs. Pan-Seared
The flavor of your burger can be significantly impacted by the cooking method you choose. Here’s how grilling and stovetop cooking affect the taste and aroma of your patty:
Grilling: Grilling imparts a distinct smoky flavor that is hard to replicate on the stovetop. The direct heat of the grill causes fat to drip off the meat, creating a charred, crispy exterior that adds depth to the flavor. If you’re cooking on a charcoal grill, the smoky aroma from the charcoal adds an additional layer of flavor to the burger, giving it a more barbecue-style taste.
Ideal for: Burgers that benefit from a smoky, slightly charred taste, and a crispy exterior.
Perfect for outdoor cooking: If you love grilling outside in the fresh air, this method allows you to enjoy the ambiance of a backyard cookout.
Stovetop: Cooking burgers on the stovetop, especially in a cast-iron skillet, can still produce a great flavor, but it differs from grilling. The pan-seared crust that develops on a stovetop burger is rich and flavorful, but without the smoky char that grilling offers. The fat from the burger stays within the pan, allowing it to render and coat the meat, making it juicier. The stovetop also gives you better control over the temperature, ensuring a more consistent cook.
Ideal for: Burgers that you want to cook indoors, with a rich, caramelized crust, and the option to control the heat more precisely.
Best for year-round cooking: When the weather doesn’t permit grilling, the stovetop gives you the flexibility to cook perfect burgers indoors at any time.
—
2. Cooking Time and Control
The amount of time you spend cooking your burger and the control you have over the process varies between grilling and stovetop cooking. Here’s a comparison:
Grilling: Grilling typically takes a bit longer to preheat, especially with charcoal, which can take around 15-20 minutes to reach the right temperature. Once the grill is hot, burgers generally cook fairly quickly (about 3-4 minutes per side for medium doneness), but the total time may vary depending on the grill’s temperature and the thickness of the patties.
Control: While grilling, controlling the heat is slightly less precise, especially on a charcoal grill. You can manipulate the heat by adjusting the air vents or moving the burgers to different spots on the grill, but there’s less fine-tuning compared to a stovetop.
Cooking Process: The heat from the grill comes from below, which can cause uneven cooking if the patties are not monitored closely.
Stovetop: On the stovetop, cooking burgers is a bit more straightforward. Once the pan is preheated (which only takes about 5 minutes), you can cook the patties at a consistent temperature. This allows you to control the doneness more precisely.
Control: The stovetop offers much more control over the heat, as you can adjust the burner temperature easily. With a cast-iron skillet, you can get a uniform heat distribution, leading to a consistent cook.
Cooking Process: The heat comes from both sides, creating a good, even sear on the patty. If you’re cooking thicker burgers, you may want to lower the heat to avoid burning the outside while cooking the inside thoroughly.
—
3. Texture: Crispy vs. Juicy
The texture of your burger plays a significant role in how enjoyable it is to eat. Here’s how grilling and stovetop cooking affect the texture:
Grilling: The grilling method is known for creating a crispy, caramelized exterior thanks to the intense direct heat. The fat from the burger drips off the meat, which can reduce the juiciness of the patty slightly, but this also gives it that iconic “charred” flavor that many people love.
Resulting Texture: Expect a slightly firmer, crispier outer crust, especially if the burger is cooked on a high heat. However, grilling can sometimes cause burgers to become dry if they are overcooked.
Stovetop: Cooking burgers on the stovetop allows the fat to stay in the pan and coat the meat as it cooks. This helps to retain moisture, leading to a juicier, more tender burger. If you’re using a cast-iron skillet, it also promotes a crisp crust, while keeping the interior juicy and soft.
Resulting Texture: The stovetop creates a more even texture throughout the patty, with a juicy center and a nice crust on the outside, especially when you sear the patty on medium-high heat.
—
4. Versatility and Additional Flavor Elements
Both methods offer unique ways to enhance the flavor and texture of your burger:
Grilling: Grilling allows you to get creative with additional flavor elements like wood chips or grill planks. If you’re using a charcoal grill, you can introduce smoky flavors by adding wood chips (such as hickory or mesquite), or for even more variety, you can use grill planks made of cedar to infuse additional flavor into the burger.
Special Flavor Additions: Grilling also makes it easier to add grilled vegetables, such as onions, peppers, or tomatoes, which can be cooked right alongside your patties. The grill marks can add an extra layer of texture and flavor to these toppings.
Stovetop: On the stovetop, you have the advantage of direct access to the pan, which can be used to caramelize onions, toast buns, or melt cheese right on top of the patty. You also have the flexibility to baste the burger with butter, garlic, or herbs as it cooks, adding a layer of richness and depth to the flavor.
Special Flavor Additions: The stovetop is great for searing the burger in a flavorful fat (such as bacon fat or butter) and then adding sauces or cheese directly into the pan, allowing them to melt evenly into the patty.
—
5. Clean-Up Considerations
Grilling: After grilling, clean-up can be a bit more involved. If you’re using a charcoal grill, you’ll need to dispose of the ash, and cleaning the grates can take time. Gas grills are easier to clean but still require some effort, especially around the grates and burners.
Grilling Tip: To make clean-up easier, brush your grill grates with a wire brush before and after grilling to remove residue. You can also oil the grates to prevent sticking.
Stovetop: The stovetop is much easier to clean in terms of equipment—simply clean the skillet or pan after cooking. However, if you’re cooking with grease or butter, it can be a bit messier on the stovetop, and you might need to wash extra pans or utensils.
Stovetop Tip: If using a cast-iron skillet, avoid soap when cleaning, as it can strip the seasoning. Use hot water and a stiff brush to clean it, and then re-season if necessary.
—
6. Weather and Convenience
Grilling: Grilling is often associated with outdoor cooking and can be a social activity. However, it depends on good weather and the time it takes to get the grill up to temperature. It’s great for summer cookouts, but not ideal in cold or rainy weather.
Stovetop: The stovetop is weatherproof and always available. You can cook burgers indoors year-round without worrying about weather conditions or waiting for the grill to heat up.
—
Final Thoughts: Grilling vs. Stovetop
Both grilling and stovetop cooking can produce amazing burgers, but the best method for you depends on the flavor profile you want, your available tools, and the cooking environment. If you’re after a smoky, charred flavor and enjoy the outdoor grilling experience, grilling is the way to go. If you prefer precision, juicier burgers, and year-round convenience, stovetop cooking is an excellent choice.
Ultimately, both methods have their strengths and are worth trying to find your perfect burger cooking technique!
Heat Control: The Key to Perfectly Cooked Burgers
When it comes to cooking the perfect burger, heat control is one of the most important factors that can make or break your burger’s texture, flavor, and juiciness. Whether you’re grilling or cooking on the stovetop, managing the temperature is essential for cooking the patties evenly and achieving the right level of doneness. Here’s an in-depth look at how heat control impacts the cooking process and how you can master it to make the juiciest, most flavorful burgers every time.
—
1. Why Heat Control Matters for Burgers
Burgers are made from ground meat, which behaves differently from whole cuts of meat. When cooking burgers, you need to ensure that the heat is regulated so that the meat cooks through without becoming dry, tough, or burnt. Too high of a heat can burn the outside while leaving the inside raw, while too low of a heat can cause the patty to cook too slowly, becoming dry and overcooked.
Even Cooking: Heat control ensures that the patty cooks evenly. The goal is to develop a crispy exterior while keeping the inside juicy. If the heat is too high, you may achieve a well-browned outside but a raw center. If the heat is too low, the burger will cook too slowly and can become greasy or soggy.
Juicy Patties: The right temperature helps the fat render properly, which keeps the burger moist. If the heat is too low, the fat may not melt efficiently, leading to a less juicy burger. Too high a heat can cause the outside to cook too quickly, sealing the juices inside, but potentially making the interior too tough.
—
2. Managing Heat on the Grill
When grilling burgers, heat control is crucial to avoid flare-ups, uneven cooking, and overcooked patties. Here’s how to manage heat on the grill:
Direct vs. Indirect Heat:
Grills are typically divided into two heat zones: direct heat (over the coals or burners) and indirect heat (away from the coals or burners). For most burgers, you want to sear the patties over direct heat, creating a crispy crust, then move them to indirect heat to finish cooking through.
Direct Heat: This is high, direct heat (around 450°F to 500°F) that creates the sear and caramelization on the patty’s surface. Start by cooking your burger on direct heat for 2-4 minutes per side to achieve a nice, crispy crust.
Indirect Heat: After searing, move your patties to the cooler side of the grill (with the lid closed) to cook through without burning. This indirect heat is typically around 350°F and allows the burger to reach the desired internal temperature without charring the outside too much.
Managing Flare-Ups: Fat from the burger can drip onto the coals, causing flare-ups that can burn your patty. To avoid this, ensure that you have a two-zone fire (direct and indirect heat) and adjust the positioning of your burgers when flare-ups occur.
Temperature Monitoring:
Using a grill thermometer helps you manage the heat on the grill. The ideal temperature for cooking burgers is typically 400°F to 450°F over direct heat and around 350°F for indirect heat.
—
3. Heat Control on the Stovetop
On the stovetop, heat control is much easier to manipulate, and it’s where you can have greater control over the precise temperature at which your burger cooks. Here’s how to manage heat on a stovetop:
Using a Cast-Iron Skillet: A cast-iron skillet retains and distributes heat evenly, making it one of the best tools for cooking burgers. Preheat the skillet over medium-high heat for 3-5 minutes before adding the patties. The pan should be hot enough that the burger sizzles when placed in the skillet, but not so hot that it burns the outside before cooking the inside.
Medium-High Heat (375°F to 400°F): This is the sweet spot for achieving a good sear without overcooking the patty. It’s hot enough to create that crispy exterior while allowing the interior to cook through.
Adjusting the Heat: Once you’ve achieved a good sear, you can lower the heat to medium (around 350°F) to allow the burger to cook through without overbrowning. If you want to melt cheese, cover the skillet with a lid or foil to trap the heat and melt it evenly.
Cooking Multiple Burgers: When cooking multiple burgers in a skillet, it’s important to avoid overcrowding the pan, as this can reduce the heat, causing the patties to steam rather than sear. Cook the burgers in batches if needed, ensuring enough space between them for the heat to circulate.
—
4. Internal Temperature of the Burger
Heat control is also essential for ensuring that your burger reaches the desired level of doneness without overcooking. The key is to use a meat thermometer to monitor the internal temperature of the patty as it cooks:
Rare: 120°F to 125°F (warm red center)
Medium-Rare: 130°F to 135°F (warm pink center)
Medium: 140°F to 145°F (pink center)
Medium-Well: 150°F to 155°F (slightly pink center)
Well-Done: 160°F and above (no pink)
Resting the Burger: Once the burger reaches your preferred temperature, remove it from the heat and let it rest for a few minutes. This allows the juices to redistribute throughout the patty, ensuring that the burger remains juicy.
—
5. How to Adjust Heat Based on Burger Thickness
Thicker burgers require more careful heat management to ensure they cook evenly without burning the outside. Here’s how to adjust your heat for thicker patties:
Start on High Heat: For thicker burgers, begin by searing the patty on high heat to develop a crispy crust. This should take about 4-5 minutes per side.
Reduce Heat to Finish Cooking: After the initial sear, lower the heat to medium or medium-low to allow the burger to cook through without burning the outside. If you’re using a stovetop, you may want to cover the pan with a lid to help retain heat and cook the burger more evenly.
Grilling Thicker Patties: For thicker burgers on the grill, use the two-zone method—sear the burger over direct heat, then move it to indirect heat to finish cooking through. You may also want to close the lid of the grill to help the burger cook through evenly.
—
6. Common Heat Control Mistakes to Avoid
Too High Heat: High heat is great for searing, but it can easily burn the outside of your burger while leaving the inside undercooked. Always use medium-high heat for even cooking and adjust as needed.
Too Low Heat: Cooking a burger on too low heat causes the fat to melt too slowly, leading to a greasy, less flavorful burger. Make sure the pan or grill is at the right temperature before adding the patties.
Not Preheating Properly: Whether you’re using a grill or stovetop, always preheat your cooking surface before adding the burgers. If you place the patty on a cold or poorly heated surface, it won’t sear properly, and the texture will suffer.
—
Final Thoughts: Mastering Heat Control
Mastering heat control is essential for cooking the perfect burger. Whether you’re grilling or cooking on the stovetop, regulating the temperature ensures your burger is cooked to perfection, with a deliciously seared crust and a juicy interior. By adjusting the heat based on the size and thickness of the patty and using a thermometer to monitor the internal temperature, you can guarantee a burger that’s flavorful, juicy, and cooked just the way you like it.
Using a Meat Thermometer: Ensuring Perfectly Cooked Burgers Every Time
When it comes to cooking burgers, achieving the perfect level of doneness is essential for flavor and safety. While timing can help, the best way to ensure your burger is cooked just right is by using a meat thermometer. This tool allows you to measure the internal temperature of the burger, so you can avoid the guesswork and achieve the perfect cook every time.
—
1. Why You Should Use a Meat Thermometer
Using a meat thermometer takes the guesswork out of cooking burgers, ensuring they reach the ideal level of doneness without the risk of overcooking or undercooking. Here’s why it’s essential:
Accurate Cooking: Burgers can be tricky to cook perfectly by eye alone, especially if they are thick or have varying fat content. A thermometer gives you an accurate reading of the patty’s internal temperature, which guarantees it’s cooked to your liking.
Food Safety: Ground beef needs to be cooked to a specific internal temperature to eliminate harmful bacteria, such as E. coli and Salmonella. According to food safety guidelines from the USDA, ground beef should be cooked to at least 160°F (71°C) to ensure safety.
Avoiding Dry or Overcooked Patties: By using a thermometer, you can prevent the mistake of overcooking your burgers and turning them dry. Overcooking often happens when a burger is left on the heat too long without checking the internal temperature, resulting in a tough, dry patty.
—
2. How to Use a Meat Thermometer
To get the most accurate results, it’s essential to know how to properly use your meat thermometer. Here’s a step-by-step guide:
Insert the Thermometer Properly: Insert the thermometer into the center of the patty, avoiding any bones (if applicable) or fat areas. You want to place the thermometer in the thickest part of the patty to get the most accurate reading. Ensure that the tip of the thermometer reaches the center of the meat and is not touching the grill grates or skillet, which could cause an inaccurate reading.
Wait for the Temperature to Stabilize: After inserting the thermometer, give it a few seconds to stabilize and display the correct temperature. Depending on the type of thermometer, it may take anywhere from 5 to 10 seconds for the reading to stop fluctuating.
Check the Temperature Frequently: For optimal results, check the temperature in several spots on thicker patties to ensure even cooking. If the thermometer shows that the burger is almost at your desired temperature, remove it from the heat and let it rest for a few minutes to allow the juices to redistribute.
—
3. Ideal Burger Temperatures
Different levels of doneness require different internal temperatures. Here’s a quick guide for the internal temperature ranges of your burger, based on how you prefer it cooked:
Rare (120°F to 125°F / 49°C to 52°C): This level of doneness is for a burger with a cool red center. The exterior will be browned, but the inside remains very juicy and slightly raw.
Medium-Rare (130°F to 135°F / 54°C to 57°C): The burger will have a warm red center and will be juicy, with a slight resistance when pressed.
Medium (140°F to 145°F / 60°C to 63°C): The center of the burger will be pink, but not raw, with juices still visible when you cut into the patty. This is a popular choice for those who like their burgers cooked through but still tender.
Medium-Well (150°F to 155°F / 66°C to 68°C): At this stage, the burger will have only a slight hint of pink in the center, with a firm texture and very little juice.
Well-Done (160°F / 71°C and above): The burger will be fully cooked through, with no pink or redness in the center. This is a popular choice for those who prefer a burger with little to no moisture remaining in the patty.
Ground Poultry (165°F / 74°C): If you’re using ground chicken or turkey for your burgers, they should be cooked to a minimum of 165°F (74°C) for safety.
—
4. Benefits of Using a Digital Meat Thermometer
While there are several types of thermometers available, digital meat thermometers offer the fastest and most accurate readings. Here’s why they are the go-to choice for cooking burgers:
Quick and Precise: Digital thermometers provide an instant reading of the internal temperature, often in just a few seconds. This is especially helpful when you’re cooking multiple burgers and need to check temperatures quickly.
Easy to Read: Digital thermometers typically display a clear, easy-to-read number, making it simple to see exactly what temperature your burger is at, even in low-light conditions.
Versatility: Digital thermometers are also versatile, meaning you can use them to measure the internal temperature of different meats, making them a must-have kitchen tool for any cook.
Affordable and Easy to Use: You don’t have to spend a lot of money on a high-end thermometer. Many affordable models are available that provide quick and accurate results, perfect for checking burger temperatures.
—
5. Common Mistakes to Avoid When Using a Meat Thermometer
While a thermometer is an essential tool, there are a few common mistakes to watch out for:
Not Calibrating the Thermometer: Occasionally, thermometers may need calibration to ensure accurate readings. Follow the manufacturer’s instructions to calibrate your thermometer regularly, especially if it has been in use for a while.
Checking Temperature Too Late: Don’t wait until the burger is already well-done to check the temperature. Check the temperature a couple of minutes before the burger is expected to reach the desired doneness to prevent overcooking.
Not Cleaning Between Uses: If you’re cooking multiple burgers, be sure to clean the thermometer between uses to prevent cross-contamination, especially if you’re handling raw meat.
Inserting the Thermometer Incorrectly: As mentioned earlier, always ensure that the thermometer is placed in the center of the patty and not touching the sides of the grill or skillet. This will give you an accurate reading.
—
6. Resting Your Burger After Measuring the Temperature
Once you’ve reached the perfect internal temperature, it’s important to allow the burger to rest for a few minutes. This allows the juices to redistribute within the patty, ensuring that your burger remains moist and flavorful. Resting also helps the burger retain its shape and texture.
Rest for 3-5 Minutes: After removing the burger from the grill or stovetop, let it sit on a plate or cutting board for about 3-5 minutes. During this time, the internal temperature may rise by a few degrees, so be mindful of the timing.
Cover with Foil: If you’re concerned about the burger cooling down, loosely cover it with foil while it rests. This will keep the heat in without trapping steam, which could make the burger soggy.
—
Final Thoughts: The Power of a Meat Thermometer
Using a meat thermometer is the most reliable way to cook burgers to your desired doneness, ensuring food safety and perfect texture. Whether you’re cooking a rare burger or a well-done patty, the thermometer takes the guesswork out of the process, making sure your burger is just right every time. By investing in a quality thermometer and learning how to use it properly, you can consistently achieve delicious, juicy, and perfectly cooked burgers.
Assembling the Burger
Layering Toppings: The Art of Building the Perfect Burger
The toppings on a burger are just as important as the patty itself. Not only do they add flavor, but the right combination of ingredients can elevate your burger to a whole new level. The way you layer your toppings also plays a significant role in the overall taste, texture, and even the aesthetic of the burger. Here’s a detailed guide to mastering the art of layering toppings to create a burger that’s perfectly balanced and bursting with flavor.
—
1. Start with a Base Layer: The Condiments
Condiments are typically the first layer you add to the burger, and they set the stage for everything that follows. They provide moisture, flavor, and a bit of tang or creaminess. The key is to spread condiments evenly to ensure that every bite has a balanced flavor.
Spread Evenly: Use a knife or the back of a spoon to spread your condiments evenly over the bottom bun. This will help create a good base that prevents the bun from becoming soggy.
Types of Condiments:
Ketchup: A classic choice, offering sweetness and tang. It works best in thin layers, as it can overpower the burger if used too liberally.
Mustard: Adds a sharp, tangy flavor. Dijon, yellow, or spicy brown mustard can be used depending on the desired taste.
Mayonnaise: Adds creaminess and richness to the burger. Some people also mix mayo with other condiments like ketchup or hot sauce to create a custom sauce.
Specialty Sauces: Try experimenting with BBQ sauce, ranch dressing, sriracha, or aioli for unique flavors.
Layering Tip: If you’re using multiple condiments, consider pairing complementary flavors. For instance, BBQ sauce pairs well with caramelized onions, while mustard works well with pickles and lettuce.
—
2. The Protein Layer: Your Patty
After the condiments come the star of the show—the patty. It’s essential to ensure that your patty is placed directly onto the base condiments, as it acts as the anchor for the other toppings. The patty’s texture and flavor should be able to stand out, so it should be the dominant layer in your burger build.
Positioning the Patty: Ensure that the patty is placed squarely on the base layer, with no condiments or toppings underneath it. This prevents the patty from becoming soggy while also allowing it to hold up under the weight of the other ingredients.
Cheese Placement: If you’re adding cheese, melt it directly onto the patty just before it’s finished cooking. This ensures the cheese is perfectly melted, creating a gooey, flavorful layer that complements the burger.
—
3. Layering Vegetables for Crunch and Freshness
After the patty comes the vegetable layer, which adds crunch, freshness, and texture. Vegetables balance out the richness of the patty and condiments, and they offer a contrast to the softness of the bun.
Lettuce: A crisp, leafy green like romaine, iceberg, or arugula is often the first vegetable added. The lettuce layer helps create a barrier between the juicy patty and the bottom bun, preventing it from getting soggy. A fresh layer of lettuce also adds a refreshing crunch.
Tomatoes: Thick, juicy slices of tomato bring both flavor and moisture to the burger. Make sure to use ripe, firm tomatoes so they won’t get too mushy when layered.
Onions: Raw onions (red or white) add a sharp, spicy kick, while caramelized onions provide a sweet, savory contrast. Onion rings or pickled onions are also great choices for those looking to add even more texture and flavor.
Pickles: Tangy and slightly sour pickles offer a delightful contrast to the rich flavors of the patty and cheese. Adding pickles will give your burger an extra layer of flavor and crunch.
Layering Tip: For the best texture and freshness, try to use crisp vegetables like lettuce, onions, and tomatoes. Layer these toppings in a way that they are evenly distributed, so each bite gets a balanced mix of flavors.
—
4. Additional Toppings for Flavor and Creativity
The next layer is where you can get creative and add unique toppings to give your burger extra personality. These toppings may vary based on the burger style you’re making but can range from fried eggs to bacon or even grilled pineapple.
Cheese: A good cheese layer can elevate any burger. Some popular choices include cheddar, Swiss, American, or blue cheese. Melted cheese forms a gooey, flavorful layer that binds the toppings together. Consider double layering cheese for extra richness or combining different types for complex flavor.
Bacon: Crispy bacon strips add a salty, smoky crunch to the burger. Bacon pairs well with both savory and sweet toppings, like BBQ sauce or fried eggs.
Fried Egg: A fried egg adds richness and a bit of extra indulgence. As the yolk breaks, it provides a velvety sauce that complements the patty’s juices and condiments.
Avocado or Guacamole: Slices of avocado or a spoonful of guacamole bring creaminess and a hint of buttery flavor. The richness of avocado pairs beautifully with spicier condiments or grilled chicken burgers.
Grilled Vegetables: Grilled mushrooms, peppers, or zucchini add a smoky depth of flavor and a hearty texture that works especially well with a beef or turkey patty.
—
5. The Top Bun: The Final Touch
The final layer in your burger construction is the top bun. While it might seem like a simple component, the top bun can play a crucial role in holding all the layers together and providing a nice texture to the burger.
Toasting the Bun: Lightly toasting the top bun (and sometimes the bottom) adds an extra layer of flavor and prevents the bun from getting soggy due to the condiments and juices from the patty. Toasting the bun on the grill or in a skillet for 1-2 minutes gives it a slight crunch without making it too dry.
Adding Extra Condiments: You can also spread more condiments or sauces on the top bun before placing it on your burger. This helps tie together the flavors in the burger and creates a smoother eating experience.
Serving the Burger: Once the top bun is placed, press the burger down gently to help all the layers come together, ensuring that the burger doesn’t fall apart when eaten.
—
6. Layering Tips for Perfect Balance
The secret to a great burger is balance. Here are some tips to help ensure that your burger toppings don’t overwhelm the patty or make the burger too hard to eat:
Keep it Layered: Don’t overload the burger with too many toppings. A burger that’s too tall can be difficult to eat and may cause the ingredients to spill out. Aim for a well-balanced combination of ingredients that stack evenly without creating a towering mess.
Use Fresh Ingredients: Opt for fresh, high-quality ingredients for the best flavor. Fresh vegetables, quality cheese, and freshly cooked patties make a significant difference in the overall taste and texture of the burger.
Consider the Texture: Think about the texture of each topping and how it complements the others. A balance of crunchy (lettuce, pickles), creamy (avocado, mayo), and savory (cheese, bacon) will create a burger that has a rich, well-rounded mouthfeel.
Make it Personal: Don’t be afraid to experiment with different toppings to suit your taste. Whether you like adding jalapeños for heat, pineapple for sweetness, or sautéed mushrooms for earthiness, customize your burger to make it your own.
—
Final Thoughts: Crafting the Perfect Burger
Layering toppings is more than just a functional step in burger construction—it’s an art form. By carefully choosing and layering your toppings in a balanced and thoughtful way, you can create a burger that not only looks impressive but also delivers an amazing eating experience. Whether you’re sticking to the basics or getting creative with your choices, perfecting the layering process ensures every bite is packed with flavor and texture.
Condiment Pairings: The Key to Elevating Your Burger’s Flavor
Condiments are more than just flavor enhancers; they play a crucial role in balancing out the richness of the patty, cheese, and other toppings, adding moisture, tang, and sometimes a kick of heat. The right condiment pairing can transform a good burger into an extraordinary one. Here’s how to choose and combine the perfect condiments to elevate your burger to a whole new level of deliciousness.
—
1. Classic Condiment Combos: Timeless Flavors
The classics never go out of style, and for good reason. The foundational condiments like ketchup, mustard, and mayonnaise are beloved for their ability to complement the rich, savory flavors of a burger. But pairing them thoughtfully can create depth and balance.
Ketchup + Mustard: A timeless duo that’s simple but satisfying. Ketchup adds a touch of sweetness and tang, while mustard provides a zesty, slightly spicy kick. This combo works well on any type of burger, but it’s especially popular with cheeseburgers and grilled burgers. A little bit of ketchup and mustard can go a long way in brightening up the flavors of the meat.
Mayonnaise + Mustard: For a creamier take on the classic pairing, mix mayonnaise and mustard. The mayo’s richness balances the tang of mustard, creating a creamy and flavorful spread. This pairing is perfect for those who want a creamy, slightly sharp sauce that works well with both beef burgers and chicken burgers. It’s also a great base for creating more elaborate custom sauces by adding ingredients like garlic, honey, or herbs.
Ketchup + Mayonnaise: This pairing is for those who enjoy a sweet and creamy condiment. Ketchup adds sweetness and a touch of acidity, while mayo provides smooth richness. This combination is ideal for classic beef burgers and works beautifully with bacon or fried onions as toppings. You can also create a special sauce by blending ketchup and mayo with a little bit of pickle relish or hot sauce for an extra kick.
—
2. Flavorful Sauces: Bold Choices to Spice Things Up
For those looking to experiment beyond the basics, specialty sauces add a bold new layer of flavor to burgers. These sauces are designed to stand out, providing unique textures and tastes that complement different burger styles.
BBQ Sauce: Smoky, tangy, and sweet, BBQ sauce pairs wonderfully with grilled burgers, especially when topped with bacon, onions, or cheddar cheese. The caramelized, slightly sweet flavor of BBQ sauce creates a perfect contrast to the savory flavors of beef. For an even more dynamic flavor, try honey BBQ sauce or spicy BBQ sauce for an extra kick.
Sriracha Mayo: If you like heat, sriracha mayo is a spicy, creamy choice. A blend of sriracha hot sauce and mayo, this condiment provides a fiery heat with a cooling, creamy texture. It’s ideal for adding heat to any burger, especially those with avocado or grilled chicken. It also pairs wonderfully with fried egg-topped burgers, adding a creamy kick to balance the richness of the yolk.
Chipotle Sauce: Smoky and spicy, chipotle sauce is a great option for a burger that’s looking for a deep, bold flavor. Chipotle adds a smoky heat that’s perfect for Mexican-inspired burgers, such as those topped with jalapeños, guacamole, or pepper jack cheese. The smoky flavor complements the meat while adding a unique twist.
Aioli: For a more refined, gourmet burger, aioli offers a rich, garlicky flavor. Traditionally made with olive oil, garlic, and egg yolk, aioli is a perfect match for Mediterranean-style burgers, such as those with lamb or feta cheese. Aioli also pairs beautifully with grilled vegetables and roasted garlic, providing a smooth, aromatic base.
—
3. Sweet and Savory Condiments: Balancing Richness and Brightness
Some burgers benefit from a touch of sweetness to balance out the richness of the patty, especially when paired with savory or spicy toppings. Sweet condiments add a surprising contrast to the burger, balancing flavors and creating a more complex taste experience.
Caramelized Onion Jam: Sweet, soft, and deeply flavorful, caramelized onion jam adds sweetness and a slight tang to your burger. It pairs wonderfully with rich, juicy beef burgers, especially when topped with blue cheese or bacon. The jam’s sweetness and depth contrast perfectly with savory toppings, adding a rich layer of flavor to each bite.
Mango Chutney: If you’re in the mood for a tropical flair, mango chutney offers a sweet, tangy flavor that pairs well with grilled chicken or turkey burgers. The spicy and fruity notes of chutney provide a beautiful contrast to milder patties and work wonderfully with toppings like cilantro or avocado. The sweetness helps balance out the heat if you’re also using spicy toppings like jalapeños.
Honey Mustard: A blend of honey and mustard, this condiment offers the perfect balance of sweet and tangy. It pairs wonderfully with grilled chicken burgers, turkey burgers, and fried chicken sandwiches. Honey mustard can also be an excellent choice for adding a bit of sweetness to a BBQ-style burger, complementing flavors like bacon and cheddar.
Apple Butter: Apple butter has a sweet, spiced flavor that pairs perfectly with pork burgers or any burger topped with sage. The apple and cinnamon notes in the butter give an extra depth of flavor, making it a great pairing for seasonal or fall-inspired burgers.
—
4. Pickles and Other Relishes: Adding Tang and Crunch
Pickles, relishes, and other tangy condiments add an essential crunch and tanginess that cuts through the richness of the patty and other toppings. They offer the perfect contrast to creamy sauces and fatty cuts of meat.
Pickles: The classic pickle is a burger staple for a reason. Its tangy and crunchy profile adds a perfect textural contrast to the softness of the bun and the richness of the patty. Whether you prefer dill pickles, bread-and-butter pickles, or spicy pickles, the acidity helps balance out the burger’s richness. Pickles work especially well with cheeseburgers, BBQ burgers, and fried chicken burgers.
Relish: Pickle relish, whether sweet or tangy, provides a sweet, sour flavor that adds a burst of brightness. Sweet relish is commonly paired with classic American-style burgers, adding a nostalgic flavor. On the other hand, spicy relish can pair wonderfully with grilled burgers topped with cheddar cheese and bacon.
Kimchi: For an adventurous twist, try kimchi—a spicy, fermented Korean condiment made from pickled cabbage and radish. Kimchi provides both heat and a tangy crunch that pairs well with beef burgers, pork, or even veggie patties. The fermented flavors give your burger a unique edge.
—
5. Creative and Unique Pairings: Thinking Outside the Box
If you’re looking to break away from the conventional, there are plenty of unexpected condiments that can add a surprising punch of flavor to your burger.
Fried Egg: While technically not a traditional condiment, a fried egg can act as a condiment itself, adding richness and moisture. The creamy yolk provides a luxurious sauce that elevates the flavors of the burger, especially when paired with bacon, avocado, or cheese.
Guacamole: Creamy and flavorful, guacamole adds a rich, velvety texture that pairs wonderfully with spicy beef or chicken burgers. The creaminess of avocado in guacamole helps mellow out spicy condiments like sriracha and balances the heat with its cool, smooth flavor.
Tzatziki Sauce: A Greek-style yogurt-based sauce with cucumber and garlic, tzatziki adds a fresh, herby, and tangy flavor to any burger, particularly lamb burgers. It’s a great way to introduce a creamy, refreshing element to balance out bold, grilled flavors.
—
Final Thoughts: The Power of Condiment Pairings
Choosing the right condiment is an essential part of creating a memorable burger. By understanding how different flavors and textures work together, you can experiment with different combinations to create the perfect balance of tang, heat, sweetness, and creaminess. From the classic ketchup-mustard duo to more adventurous pairings like kimchi or mango chutney, condiment pairings are your secret weapon in building a burger that stands out with every bite. Don’t be afraid to mix and match, and most importantly, have fun with your creations!
Toasting the Buns: Achieving the Perfect Crunch and Flavor
The humble bun is an often overlooked, yet essential, part of a burger. It’s the vessel that holds everything together, but its texture and flavor can also make a significant difference in the overall experience of eating a burger. Toasting the buns is a simple step, but one that can elevate the entire burger, offering a satisfying crunch, enhanced flavor, and a more sturdy structure to hold all the toppings. Let’s explore why toasting the buns is important and how you can perfect this step for the ultimate burger.
—
1. The Importance of Toasting the Buns
Toasting the buns isn’t just about adding a little crispness; it serves several important purposes in creating a burger that’s both delicious and easy to eat.
Prevents Sogginess: One of the most significant reasons for toasting buns is to prevent sogginess. As the juicy patty and condiments drip, a toasted bun provides a protective barrier, absorbing less moisture and maintaining its structure. Without this barrier, the bun can become mushy and fall apart, making it difficult to enjoy the burger.
Adds Flavor and Texture: Toasting creates a light crunchy exterior that adds contrast to the soft, juicy interior. The slight caramelization of the bread during toasting deepens its flavor, giving the bun a slightly sweet, nutty taste that complements the savory patty. The toasted edges also create a satisfying crispiness that enhances the overall texture of the burger.
Creates a Better Eating Experience: A toasted bun makes the burger more structurally stable, especially when you have multiple toppings. The bun holds up better, preventing everything from falling apart as you bite into it. This gives you a better bite-to-bite consistency and allows you to enjoy all the flavors and textures of the burger without worrying about the ingredients spilling out.
—
2. Types of Buns to Toast
While almost any type of bun can be toasted, different buns bring their own unique texture and flavor when toasted. Here’s a breakdown of some popular bun types and how they perform when toasted.
Brioche Buns: Brioche is a rich, buttery bread that becomes wonderfully crispy on the outside when toasted. It’s known for its soft, slightly sweet interior, which becomes more flaky and golden after toasting. The richness of the brioche enhances the flavors of both the meat and the condiments, making it a popular choice for gourmet burgers. Brioche buns are best toasted lightly to preserve their delicate texture while ensuring they’re sturdy enough to hold a juicy patty and toppings.
Pretzel Buns: Pretzel buns are hearty and have a slightly salty, savory flavor. When toasted, they develop a satisfying crispiness with a chewy interior. Their dense structure makes them perfect for holding heavier burgers or those with more toppings. Toasting a pretzel bun amplifies its saltiness, making it an excellent pairing for BBQ burgers, cheeseburgers, or burgers with sharp cheese.
Seeded Buns: These buns, often topped with sesame or poppy seeds, offer a crunchy texture on top that can add to the overall experience when toasted. The seeds themselves also contribute a subtle nutty flavor that pairs well with beef and chicken burgers. Toasting these buns helps bring out the flavor of the seeds, giving the burger a bit of extra earthiness.
Whole Wheat Buns: Whole wheat buns are more robust than white bread buns and have a slightly earthy flavor. Toasting them accentuates their natural grains and adds a nice crispness, which is a good counterpoint to the burger’s juiciness. Whole wheat buns are a great choice for anyone looking for a more nutritious option, and the toasting process helps enhance their taste.
Gluten-Free Buns: Gluten-free buns can sometimes be a bit crumbly and soft, so toasting them is a great way to firm them up and add a crispy exterior. While the texture may differ from traditional buns, a well-toasted gluten-free bun can still provide a satisfying crunch and serve as a solid base for your burger. Many gluten-free buns are slightly sweeter, so toasting brings out a bit of caramelization that pairs well with a variety of toppings.
—
3. How to Toast the Buns: Techniques for the Perfect Crisp
While the concept of toasting seems simple, achieving the ideal level of crispiness requires a little technique and attention to detail. Here are a few ways to toast buns to perfection:
Using a Skillet or Griddle: This method is the most effective for achieving even toasting. Heat a non-stick skillet or griddle over medium heat. Lightly butter or oil the cut sides of the buns (this is optional but adds a lovely richness). Place the buns, cut side down, on the skillet. Toast for about 1-2 minutes until the bun is golden brown and crispy. If you prefer a bit of extra flavor, add a small dollop of butter to the skillet as the buns toast, allowing it to infuse the bread with richness.
Grilling: If you’re already grilling your burger, grilling the buns alongside the patty can save time and enhance the flavor. Simply place the cut side down on the grill, and watch carefully to avoid burning. Grill for about 1 minute or until the edges are slightly charred and crisp. Grilling imparts a smoky flavor that complements the grilled meat and adds a rustic touch to your burger.
Oven Toasting: Toasting buns in the oven is a good option when making a larger batch of burgers or if you don’t have a skillet or grill available. Preheat your oven to 350°F (175°C) and place the buns cut side up on a baking sheet. Toast for about 5-7 minutes or until golden brown. You can also brush the buns lightly with butter before placing them in the oven for an added rich flavor.
Toaster: If you’re looking for a quick and easy method, you can use a toaster. This is ideal for smaller, less delicate buns like seeded hamburger buns or soft white buns. Toast each bun half in the toaster until golden brown. However, this method can sometimes result in uneven toasting, so keep a close eye on it.
—
4. Toasting Tips for Perfect Buns
Butter or Oil for Extra Flavor: While toasting, consider spreading a light layer of butter or olive oil on the cut sides of the buns. Butter adds richness and enhances the flavor, while olive oil adds a slightly savory note. You can also experiment with garlic butter or herbed butter for an extra burst of flavor.
Watch the Time: Toasting buns is a quick process, so keep a close eye on them to prevent burning. The goal is a golden-brown, crisp exterior with a slightly soft, warm interior. If your buns get too toasted, they can become overly hard, which can make eating the burger uncomfortable.
Use a Lid for Even Heat: If you’re toasting buns on the stovetop or grill, consider placing a lid over the buns to help evenly distribute heat and toast both sides at once. This can prevent one side from being underdone while the other is too crispy.
Consider the Burger Style: The style of burger you’re making can determine how you toast the buns. For example, if you’re making a sloppy joe or a burger with many toppings, you may want to toast the buns a bit longer to ensure they don’t collapse under the weight of the ingredients. On the other hand, a more delicate burger like a chicken or fish burger might require a lighter toast to preserve the balance.
—
Final Thoughts: Toasting Buns for Maximum Enjoyment
Toasting your buns is an easy step that makes a huge impact on the overall quality of your burger. Not only does it improve the texture by adding a satisfying crunch, but it also helps the bun hold up better against the juicy patty and condiments. Whether you’re grilling, pan-frying, or oven-toasting, this small step is key to creating a burger that’s not only delicious but also enjoyable to eat from start to finish. So next time you’re preparing a burger, don’t skip this important step—your taste buds will thank you!
Tips for Serving and Storing
Serving Fresh: The Secret to a Perfectly Timed Burger
When it comes to creating the ultimate burger experience, timing and freshness are key. Serving fresh ensures that the burger retains its ideal texture, flavor, and temperature when it’s time to take that first satisfying bite. From the moment the patty leaves the grill or skillet to the moment it’s placed on the plate, each element needs to be fresh and well-timed. Here’s how to master the art of serving fresh burgers, ensuring a delicious and memorable meal.
—
1. Timing is Everything
One of the most important aspects of serving a burger fresh is timing. A perfectly cooked burger will start to lose its appeal once it begins to cool down, especially the patty, which can lose its juicy texture if it’s left to sit for too long. Here’s how to ensure everything comes together at the right moment:
Resting the Patties: After grilling or pan-frying, it’s important to let the patties rest for a few minutes before serving. This allows the juices to redistribute throughout the meat, ensuring a juicy and tender burger. However, you don’t want to let the patty rest for too long, as it will cool down and lose its perfect temperature. A 1-2 minute rest is ideal.
Assembling Just Before Serving: Once your patties are ready and the buns are toasted, assemble the burger as close to serving time as possible. This ensures the buns stay crispy, and the toppings remain fresh and vibrant. If you assemble the burger too early, the bun can become soggy, and the toppings may wilt, losing their crunch and appeal.
Serving Immediately After Assembly: After you’ve built your burger with all the toppings, serve it immediately. A hot, freshly assembled burger is a joy to eat—warm from the patty, crisp from the bun, and packed with fresh, vibrant flavors. Don’t let your burgers sit on the counter waiting for the last one to be made. Serve them as soon as possible to maintain the optimum texture and temperature.
—
2. Fresh Ingredients for Maximum Flavor
The quality and freshness of the ingredients you use play a huge role in the final burger experience. Fresh ingredients help maintain the vibrancy of flavors and contribute to the overall quality of your burger.
Fresh Lettuce: Whether it’s romaine, arugula, or iceberg, fresh, crisp lettuce is a key component in a satisfying burger. Lettuce adds crunch, texture, and a light, refreshing contrast to the richness of the patty. Always use fresh leaves, and avoid pre-cut lettuce, as it can wilt and lose its crunch.
Tomatoes: A fresh, ripe tomato adds a burst of juiciness and natural sweetness to your burger. Sliced thick, tomatoes give a satisfying bite that balances out the richness of the beef. Heirloom tomatoes are a great choice when in season, as they bring a more robust flavor. Slice tomatoes just before assembly to ensure they’re fresh and juicy, avoiding any wilting.
Onions: Onions, whether raw, grilled, or caramelized, bring depth and flavor to your burger. Always use fresh onions to avoid that overly sharp, overpowering taste that can occur with older onions. Fresh, crisp red onions add a touch of sweetness and sharpness, while caramelized onions add a rich, savory sweetness that complements the burger perfectly.
Cheese: Always use freshly sliced cheese rather than pre-packaged, pre-sliced varieties. Cheddar, Swiss, American, or blue cheese should be sliced just before serving to ensure that they melt perfectly and provide that creamy, flavorful richness that a good burger needs.
—
3. Temperature: Keeping It Hot
A fresh burger is a hot burger. The temperature of both the patty and the bun plays an important role in the overall experience. Serving a burger at the right temperature ensures the flavors meld properly, and the textures remain intact.
Hot, Juicy Patty: A warm patty is key to a great burger. A cold patty can taste dry and lack flavor, while a hot patty releases juices and enhances the flavor. After grilling or pan-searing, make sure the patty is still hot when served, ensuring that the cheese melts perfectly and the juices stay locked inside.
Warm Buns: The buns should also be warm and lightly crispy when serving. Toast them just before you assemble the burger to ensure they’re still warm but not overly crispy. Warm buns help the burger hold its shape, and they provide a nice contrast to the hot patty and fresh toppings.
Freshly Assembled: The goal is to serve the burger immediately after it’s assembled, while the patty is still hot, the bun is crisp, and the toppings are fresh. If the burger sits for too long after assembly, the heat from the patty can wilt the lettuce or melt the cheese too much, leading to a less satisfying experience.
—
4. The Right Serving Environment
To keep the burger fresh, consider how you’re serving it and the environment in which it’s being eaten. Presentation and serve temperature can make a big difference in how the burger is enjoyed.
Plates and Serving Dishes: Opt for plates that help maintain heat, such as ceramic plates. Avoid overly cold or unheated plates, as this can cause the burger to lose heat quickly. You could also serve the burger in a basket lined with paper, which keeps the burger secure and adds a fun, casual touch.
Avoid Overcrowding: Don’t crowd your burgers on the plate or platter. When burgers are packed too closely together, they lose their heat and can become soggy from condensation. Serve each burger individually, allowing the flavors and textures to shine.
Serve with Fresh Sides: Pair the burger with fresh sides that complement its flavor. Fresh-cut fries, coleslaw, or a light salad can enhance the freshness of the meal. Serve these sides immediately to maintain their crispness and texture.
—
5. Eating Fresh: The Ultimate Fresh Burger Experience
One of the simplest but most important aspects of serving fresh is ensuring that the burger is eaten right away. A burger is best enjoyed while it’s hot, with all the ingredients at their peak freshness. The crunchy, juicy textures and vibrant flavors will all stand out more when the burger is served immediately.
Serve Immediately After Assembly: The perfect burger is a timed burger—serve it the moment it’s assembled to ensure the freshness of each component. The freshness of the ingredients, along with the right temperature, is what elevates the burger experience.
Encourage Immediate Enjoyment: If you’re serving multiple burgers, try to serve them one at a time or in small batches. This way, the first burger served is fresh and hot, and you can enjoy each burger in its ideal state.
—
Final Thoughts: The Freshness Factor
Serving a burger fresh isn’t just about putting ingredients together—it’s about timing, quality, and temperature. The burger that is served immediately after assembly, with the juiciest patty, the freshest vegetables, and the warmest bun, will always be the most satisfying. By understanding the importance of freshness and how each component contributes to the overall burger experience, you can ensure that every bite is as enjoyable as the first. Whether you’re grilling at home or serving burgers at a backyard cookout, the freshest burger will always win in taste and enjoyment.
Leftover Storage: Keeping Your Burger Fresh for Later
While a freshly made burger is always the best, sometimes you find yourself with delicious leftovers that you want to enjoy later. Proper storage of leftover burgers is essential to maintaining their flavor, texture, and safety. Here’s how to store leftover burgers effectively and ensure they stay fresh for the next time you’re craving a juicy bite.
—
1. Storing the Patties
The patty is the most important part of the burger, and how you store it will significantly affect the taste and texture when reheated. Whether it’s beef, chicken, or a plant-based patty, proper storage is key to preserving the juiciness and flavor.
Refrigeration: If you plan to eat the leftovers within a day or two, you can store the patties in the refrigerator. First, make sure the patties have cooled down to room temperature before storing them. This prevents condensation, which can lead to soggy patties. Place them in an airtight container or wrap them tightly in plastic wrap or aluminum foil. If you’re stacking patties, place a piece of wax paper or parchment between them to prevent them from sticking together.
Freezing: If you want to store the patties for a longer period, freezing is your best option. To freeze, wrap the patties individually in plastic wrap or freezer paper, then place them in a freezer-safe bag or container. Make sure to remove as much air as possible to prevent freezer burn. Frozen patties can last up to 3 months in the freezer. When ready to use, thaw them in the refrigerator overnight and reheat them on the stove or grill.
Avoid Storing with Toppings: It’s best to store the patties separately from the other components of the burger. Storing patties with lettuce, tomatoes, or other toppings can lead to soggy vegetables and compromised texture. Keep these toppings separate and add them when you’re ready to reassemble your burger.
—
2. Storing the Buns
The bun is crucial for holding everything together, and while it doesn’t have as much staying power as the patty, it can still be saved if properly stored. However, you must store them in a way that maintains their freshness and texture.
Refrigeration: If you have leftover buns, store them in an airtight container or zippered bag in the refrigerator. To prevent them from drying out, place a damp paper towel in the bag with the buns. This helps to retain moisture. If the buns are store-bought, be sure to check the packaging for expiration dates and the manufacturer’s recommended storage instructions.
Freezing: To store buns for a longer period, freezing is the best option. Wrap each bun individually in plastic wrap or place them in a freezer-safe bag to prevent freezer burn. When ready to use, thaw the buns in the refrigerator or at room temperature, and toast them lightly before reassembling your burger. This will bring back the fluffiness and crispy edges that make a fresh bun so enjoyable.
Avoid Storing with Condiments: Similar to the patty, it’s best to store buns separately from the condiments to avoid sogginess. If the buns have been topped with ketchup, mustard, or mayonnaise, they can become soggy quickly. Keep them unassembled and store them dry.
—
3. Storing Toppings and Condiments
Many of the toppings and condiments are best when fresh, but if you have leftovers, you’ll want to store them in a way that maintains their quality. Lettuce, tomatoes, onions, and cheese can all be stored separately, and there are best practices for each.
Lettuce: If you have leftover lettuce, store it in a resealable bag with a paper towel inside to absorb excess moisture. This keeps the lettuce crisp and fresh for longer. Keep the bag sealed, but don’t pack the lettuce too tightly, as that can cause wilting.
Tomatoes and Onions: Tomatoes and onions should be stored in an airtight container in the refrigerator. For sliced tomatoes, place a paper towel at the bottom to absorb any excess moisture. Whole tomatoes are best stored at room temperature, but once sliced, they should be refrigerated.
Cheese: Cheese should always be stored in its original packaging or in an airtight container. If you’re dealing with slices of cheese, consider placing a layer of parchment paper between slices to prevent them from sticking together. Keep the cheese refrigerated, and be sure to consume it within a few days for the best taste.
Condiments: Condiments such as ketchup, mustard, and mayo can usually be stored in their original containers in the refrigerator. If you’ve used condiments from a jar or bottle for your burger, ensure that the lid is tightly sealed to prevent contamination. Avoid storing condiments in jars or containers that have come in contact with the burger to keep them fresh for longer.
—
4. Reheating Leftovers
Properly reheating your burger leftovers is essential for retaining their flavor and texture. Here’s how to reheat each component effectively:
Reheating Patties: For reheating leftover beef patties, the best method is to warm them on the stovetop or grill. Heat a skillet over medium heat and cook the patties for about 2-3 minutes on each side until they’re heated through. If you’re reheating in the oven, wrap the patties in foil and bake them at 350°F (175°C) for 10-12 minutes. Avoid microwaving the patties, as it can cause them to dry out.
Reheating Buns: If you’ve frozen your buns, toast them lightly once thawed to bring back the crispy texture. If you’re reheating refrigerated buns, you can wrap them in foil and place them in a warm oven (around 350°F or 175°C) for 5-7 minutes. For an extra touch, you can lightly butter the buns before reheating.
Reheating Toppings: Most toppings, such as lettuce and tomatoes, are best served fresh, so it’s usually not recommended to reheat these. However, onions (whether caramelized or grilled) can be reheated in a skillet over medium heat for a few minutes. If you’ve used melted cheese, it should still be somewhat intact when reheated, but keep an eye on it to avoid it getting overly greasy or slimy.
—
5. Food Safety Considerations
When storing leftover burgers, it’s important to follow basic food safety practices to ensure that your leftovers are safe to eat and don’t spoil prematurely.
Cooling Down: Before storing any leftover burger components, make sure they’ve cooled down to room temperature. Placing hot items directly into the fridge can raise the temperature inside the fridge and affect the safety of other foods. Ideally, leftovers should be refrigerated within 2 hours of cooking to prevent bacteria growth.
Storage Duration: Leftover patties, buns, and toppings should generally be eaten within 3 days if stored in the refrigerator. If you’re freezing, the patties can last for up to 3 months. Be sure to label your leftovers with the date they were stored so you can keep track of their freshness.
Reheating Leftovers: When reheating, ensure that the patty reaches an internal temperature of at least 165°F (74°C) to kill any potential bacteria. This is particularly important for poultry or plant-based patties, which can harbor bacteria if not reheated thoroughly.
—
Final Thoughts: Storing Leftovers to Enjoy Later
Properly storing and reheating leftover burgers ensures that you can enjoy a delicious meal without sacrificing the quality or flavor of the original. By following the right storage techniques for patties, buns, toppings, and condiments, you can maintain the freshness and texture of your burger for days to come. Whether you’re saving leftovers for lunch or dinner the next day, these tips will help you enjoy your burger at its best even after it’s been stored.
Side Pairings: Complementing Your Perfect Burger
While the burger itself is the star of the show, a well-chosen side dish can elevate the entire meal. The right side pairings not only complement the flavors of the burger but also add variety to the texture and enhance the overall dining experience. Whether you’re grilling up classic beef patties or experimenting with plant-based options, these side dishes will help balance the richness of the burger and provide a satisfying contrast. Let’s dive into some of the best side pairings for your burger.
—
1. Crispy Fries and Chips
No burger meal feels complete without a side of fries or chips. These classics are beloved for their crispy texture, salty flavor, and satisfying crunch, which perfectly complement the juicy, tender burger.
Hand-Cut Fries: For the ultimate fry experience, hand-cut fries are a great option. Freshly cut from whole potatoes, they offer a thicker, heartier texture that contrasts nicely with the burger’s softness. Toss them in sea salt, garlic powder, or even a bit of paprika for an extra layer of flavor. Serve them with a side of ketchup or aioli for dipping.
Sweet Potato Fries: If you’re looking for a sweeter option, sweet potato fries are a fantastic alternative. Their natural sweetness and crispy exterior provide a lovely balance to the savory, umami-packed flavor of the burger. Serve with a tangy dip like chipotle mayo or spicy ketchup for an added kick.
Potato Chips: For a lighter, crunchier alternative, potato chips (either classic or kettle-cooked) add a satisfying crunch without the heaviness of fries. They come in a variety of flavors, from sea salt to barbecue, making them a versatile side that can complement any type of burger.
—
2. Fresh Salads
Salads provide a refreshing contrast to the rich, indulgent burger, and their crisp, cool textures help balance out the warmth of the patty. Whether you prefer a light, leafy salad or something more substantial, salads can add variety and a burst of freshness.
Classic Caesar Salad: A Caesar salad made with crisp romaine lettuce, crunchy croutons, and creamy dressing adds both texture and a bit of tanginess to your burger meal. The flavors of the parmesan and garlic in the dressing complement the savory burger patty perfectly.
Coleslaw: Coleslaw is a perfect side for a burger, particularly when it’s creamy, tangy, and crunchy. It can add a refreshing, cool contrast to a hot, juicy burger. The vinegar-based coleslaw pairs particularly well with grilled burgers, as the acidity cuts through the richness of the meat.
Greek Salad: For a Mediterranean twist, try pairing your burger with a Greek salad. The coolness of cucumber, the saltiness of feta cheese, and the sharpness of red onions create a nice contrast to the burger’s richness. A drizzle of olive oil and a squeeze of lemon juice adds a refreshing, zesty touch.
Mixed Green Salad with Vinaigrette: A light, refreshing mixed greens salad dressed in a tangy vinaigrette can provide the perfect balance of freshness and acidity, complementing the burger without overpowering it. Add avocado, tomatoes, and cucumbers for extra texture.
—
3. Grilled Vegetables
If you’re looking to keep the meal lighter or add a healthy side, grilled vegetables are a fantastic option. The smoky flavor from the grill complements the savory richness of the burger and offers a delicious contrast to the burger’s texture.
Grilled Corn on the Cob: Grilled corn on the cob is a flavorful and fun side to serve with burgers. The slight char from the grill, paired with a brush of butter or spicy aioli, adds sweetness and depth that pairs wonderfully with any type of burger, especially if you’re grilling outdoors.
Grilled Asparagus or Zucchini: For a lighter, slightly smoky touch, grilled asparagus or zucchini can be a great choice. Toss them with olive oil, garlic, and a sprinkle of salt and pepper before grilling to bring out their natural flavors.
Grilled Bell Peppers: Grilled bell peppers add a natural sweetness and smokiness that pairs well with a burger. Whether you serve them as a side or as a topping on the burger, their tender texture and bold flavor provide a great contrast to the beef or plant-based patty.
—
4. Pickles and Relishes
Pickles and relishes provide the perfect acidic, tangy bite to balance out the richness of the burger. Their sharp, zesty flavor cuts through the heaviness of the patty, making every bite feel fresh and flavorful.
Pickled Cucumbers: The classic burger side, pickles, add a crisp and tangy element to every bite. Whether you prefer dill, bread-and-butter, or spicy pickles, they provide a welcome contrast to the savory flavor of the meat. Serve them on the side or pile them onto the burger for a crunchy bite.
Pickled Red Onions: Pickled red onions offer a slightly milder and more colorful version of traditional pickles. Their tangy flavor enhances the burger while adding a bit of acidity and color to the plate.
Relishes: Relishes, especially sweet or spicy varieties, can be a great side or topping to add some complexity to your burger. A tangy mustard relish or a tomato-based relish can add an extra layer of flavor without overpowering the main dish.
—
5. Baked Beans
For a hearty, satisfying side, baked beans are a fantastic option. Their rich, sweet, and savory flavor works wonderfully with grilled burgers, especially if you’re looking for something to balance the meaty richness.
Classic Baked Beans: The sweetness from the molasses and the richness from the smoked pork (or bacon) in traditional baked beans pairs well with a burger, adding depth and flavor. The soft beans offer a nice textural contrast to the crispness of the fries or salad.
Spicy Bean Varieties: For a more adventurous twist, try serving spicy baked beans with a hint of chipotle or jalapeños. These add a smoky heat that pairs wonderfully with beef, turkey, or plant-based patties.
—
6. Onion Rings
For those who love extra crunch and a bit of indulgence, onion rings are a fantastic side to serve with your burger. The crispy batter and sweet onion inside offer a savory-sweet contrast that enhances the burger experience.
Crispy Onion Rings: Deep-fried onion rings are the quintessential side to serve with a burger. The batter should be light and crispy, not greasy, and the onions should be sweet and tender. Serve them with a tangy dipping sauce like BBQ sauce or ranch dressing.
Beer-Battered Onion Rings: For a more robust flavor, try beer-battered onion rings. The beer batter gives a slightly malty and crispy coating that adds depth to the side dish. These are especially good with beef burgers or hearty plant-based patties.
—
Final Thoughts: The Perfect Side Can Elevate the Burger Experience
The right side dishes can transform a simple burger into a truly satisfying meal. From crispy fries and grilled vegetables to tangy pickles and refreshing salads, each side has the potential to enhance the flavor and texture of your burger. Whether you’re going for classic comfort or something a bit more adventurous, side pairings are the perfect way to create a complete burger meal that will impress your guests and satisfy your cravings.
Conclusion: Crafting the Perfect Burger Experience
The perfect burger isn’t just about the patty; it’s about creating a complete meal that engages all your senses. By thoughtfully choosing the right ingredients, seasoning, cooking techniques, and side pairings, you can elevate your burger experience to new heights. From juicy, well-seasoned patties to fresh, crispy fries and tangy pickles, each component plays a crucial role in balancing flavor and texture.
By following the tips and ideas outlined in this guide, you’ll be able to consistently create burgers that are not only delicious but also perfectly complemented by the ideal sides. Whether you prefer a classic burger with fries, a refreshing salad, or bold grilled vegetables, the sides you choose can transform your meal into something truly memorable.
So, next time you fire up the grill or heat up your stovetop, remember that crafting the perfect burger is about attention to detail — from patty preparation to side pairings and everything in between. Get creative with your combinations, enjoy the process, and most importantly, savor every bite!